
Peanut Butter Cheesecake Donut
Disclosure: This post contains affiliate links.If you click and make a purchase, I may earn a small commission at no extra cost to you.

Peanut Butter Cheesecake Donut
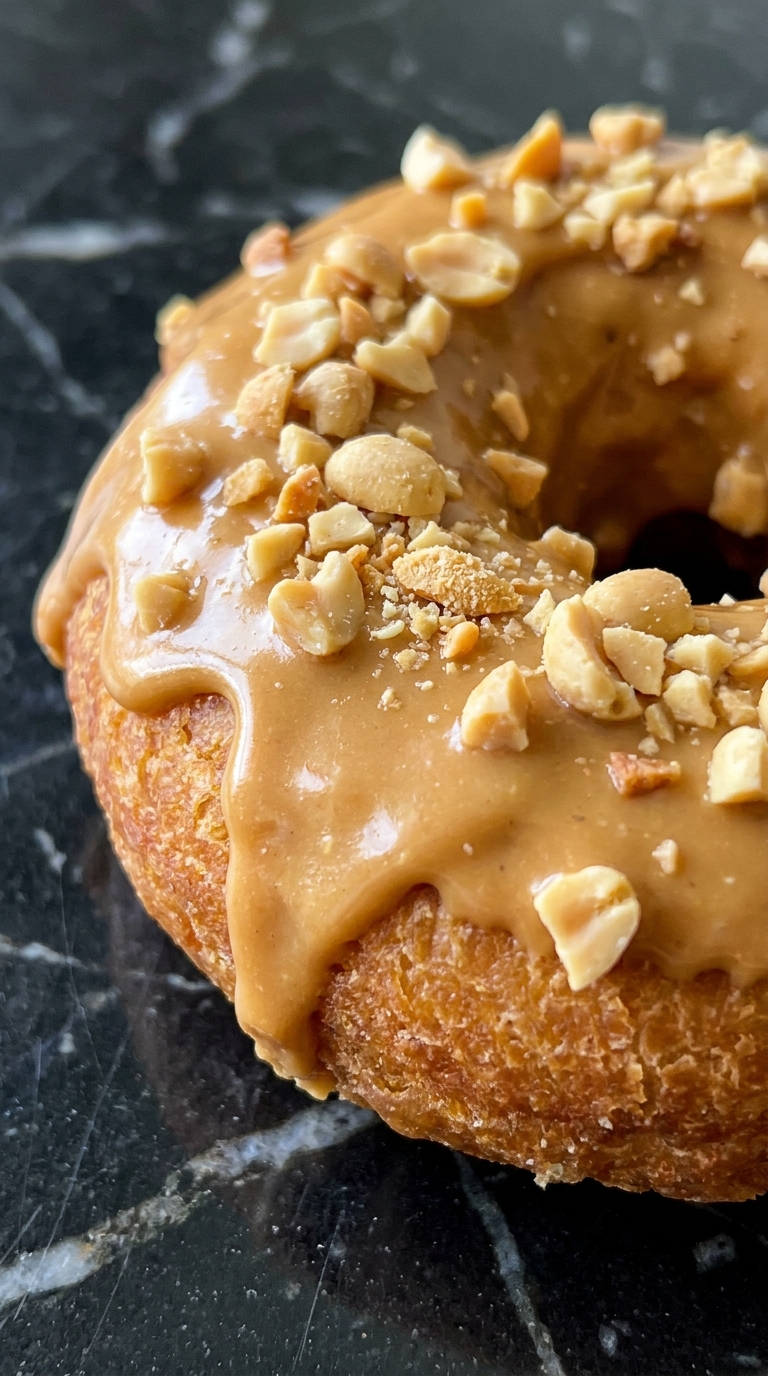
Imagine biting into a cloud of tender vanilla cake that gives way to a lush, tangy ribbon of peanut butter cheesecake. These donuts are not your average morning pastry. They are a celebration of creamy, nutty decadence swirled into a handheld treat that feels both nostalgic and utterly luxurious. The aroma of roasted peanuts mingles with warm vanilla and butter, creating a sensory experience that starts in your kitchen and ends with a satisfied smile. Trust me, you’re going to love this twist on two classic desserts rolled into one irresistible ring.
Why These Donuts Are Pure Bliss
There is something magical about the marriage of peanut butter and cheesecake. The salty, earthy depth of the nuts balances the bright tang of cream cheese, creating a filling that tastes like the center of your favorite candy cup transformed into silk. When piped into a fluffy baked donut and crowned with a glossy peanut butter glaze, each bite delivers a triple threat of textures. The cake is soft and yielding, the filling is dense and creamy, and the glaze sets into a delicate shell that crackles softly before melting on your tongue.
A Nod to Americana and Fusion Baking
Donuts have long been a cornerstone of American baking culture, from the early Dutch olykoek to the modern artisanal shops of Portland and Brooklyn. Peanut butter, that staple of school lunch sandwiches, has similarly woven itself into the fabric of American comfort food. Cheesecake traces its roots back to ancient Greece, but the New York style we adore today became popular in the early twentieth century. This recipe brings these threads together, representing the beautiful fusion that happens when home bakers experiment with familiar flavors. It is a testament to how traditions evolve, creating new classics that honor their origins while tasting entirely fresh.
Your New Go-To Indulgence
This recipe strikes the perfect balance between impressive and achievable. You do not need a deep fryer or professional pastry training to create bakery-worthy results. The baked method ensures a lighter texture and easier cleanup, while the filling technique looks fancy but requires only a simple piping bag. This one’s a total game-changer for weekend brunches, birthday breakfasts, or anytime you want to treat yourself to something extraordinary.
Versatile: These donuts shine at breakfast, but they also work beautifully as dessert for casual dinner parties or packed into lunchboxes for a midday surprise.
Budget-Friendly: Using pantry staples like flour, sugar, and peanut butter keeps costs low while delivering a gourmet experience that rivals specialty shop prices.
Quick and Easy: From mixing bowl to finished glaze, you are looking at under an hour of active time, making this feasible even on busy weekends.
Customizable: Swap the peanut butter for almond butter, add chocolate chips to the batter, or drizzle with melted chocolate instead of glaze to make it your own.
Crowd-Pleasing: The familiar flavors appeal to kids and adults alike, making these a safe bet for potlucks, office parties, or family gatherings.
Make-Ahead Friendly: The donuts themselves keep well overnight, and you can prepare the filling a day in advance for easy assembly in the morning.
Great for Leftovers: Store any extras in the refrigerator and enjoy them chilled for a dense, fudgy treat that tastes like peanut butter cheesecake bars.
Baker’s Secrets for Donut Perfection
After countless batches tested in my kitchen, I have learned that small details make the difference between good donuts and transcendent ones. Room temperature ingredients blend more smoothly, creating a uniform crumb without lumps. Do not overmix the batter, or you will end up with tough, rubbery rings instead of tender clouds. When filling the donuts, apply gentle, consistent pressure to avoid bursting the sides. It is worth every bite to take these extra moments to ensure perfection.
Room Temperature Matters: Cold cream cheese will result in lumpy filling, so let it soften on the counter for at least an hour before beating.
Do Not Overfill the Pans: Filling the cavities more than three-quarters full causes the donuts to mushroom over the edges and lose their classic ring shape.
Cool Completely Before Filling: Warm donuts will melt the cheesecake filling, causing it to ooze out instead of staying plush and distinct inside.
Glaze Consistency Counts: If your glaze is too thick, it will clump. If too thin, it will slide right off. Aim for the texture of honey, adding cream drop by drop to adjust.
Essential Tools for Donut Success
You do not need a professional kitchen to create these beauties, but a few key pieces of equipment will streamline the process and elevate your results. Investing in proper donut pans eliminates the need for frying and gives you that perfect shape every time. A sturdy piping bag with a narrow tip is essential for injecting the cheesecake filling cleanly without tearing the delicate cake.
Donut Pans: Two standard six-cavity baked donut pans allow you to bake a full dozen simultaneously, ensuring uniform size and shape.
Piping Bags: Disposable bags work perfectly for both filling the donut molds with batter and injecting the cheesecake center later.
Long Narrow Piping Tip: A bismarck tip or any long, narrow nozzle helps you reach the center of the donut without poking through the other side.
Wire Cooling Rack: Essential for allowing air to circulate around the donuts, preventing soggy bottoms and ensuring they cool evenly.
Mixing Bowls: A set of nesting bowls in various sizes keeps your dry and wet ingredients organized and ready to combine.
The Building Blocks of Flavor
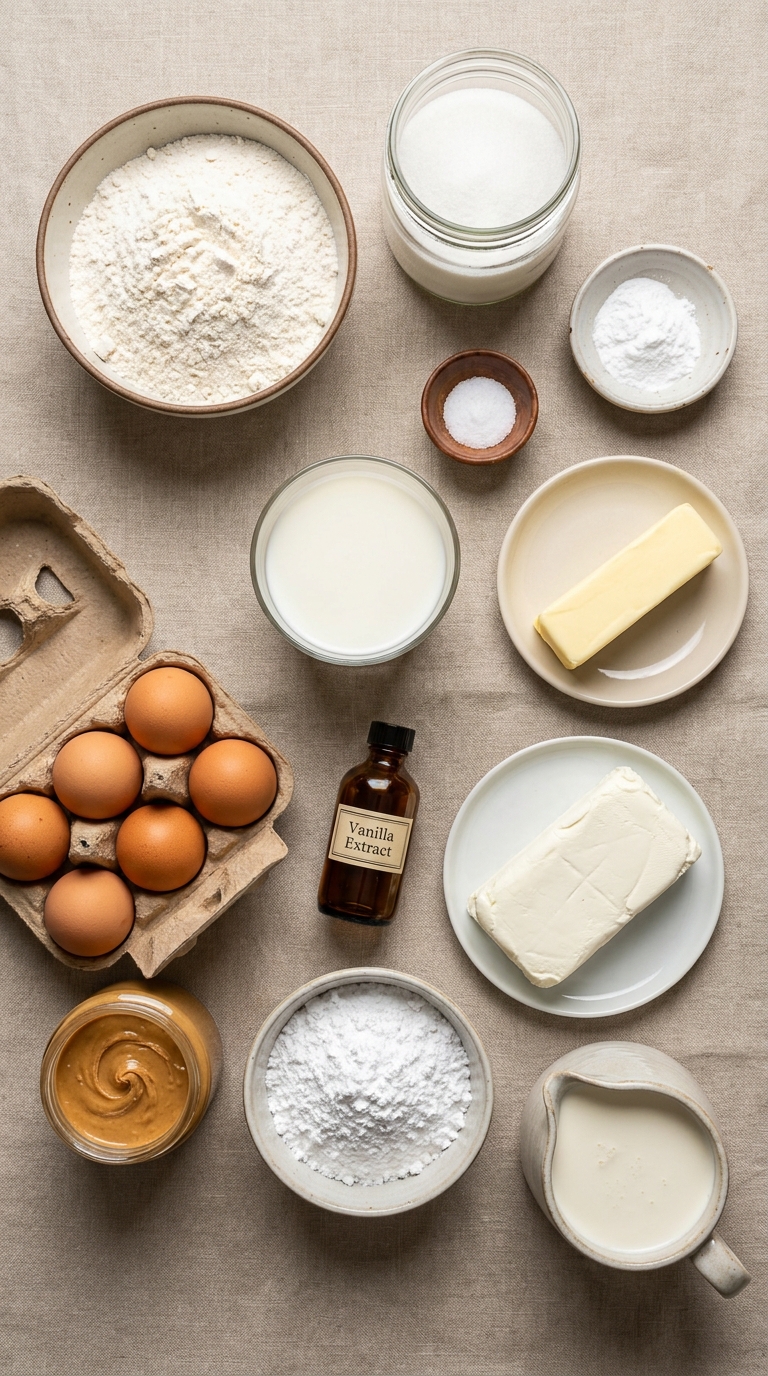
Great donuts start with quality ingredients that each play a vital role in the final texture and taste. The batter relies on the perfect ratio of flour to fat to create a cake that is moist but not heavy, while the filling balances tangy cheese with sweet, salty peanut butter for complexity. Gather everything before you begin, and you will find the assembly process smooth and enjoyable.
- All-Purpose Flour: 2 cups (240g) providing structure and that classic cake donut crumb.
- Granulated Sugar: 3/4 cup (150g) for sweetness and tender texture.
- Baking Powder: 2 teaspoons to create the perfect rise and airy interior.
- Salt: 1/2 teaspoon to balance the sweetness and amplify the peanut butter notes.
- Whole Milk: 3/4 cup (180ml) room temperature, adding moisture and richness.
- Unsalted Butter: 4 tablespoons (57g) melted and cooled, contributing to the soft, velvety crumb.
- Large Eggs: 2 eggs, room temperature, binding the batter and adding richness.
- Vanilla Extract: 1 teaspoon for warm aromatic depth.
- Cream Cheese: 8 ounces (227g) softened, the tangy foundation of our cheesecake filling.
- Creamy Peanut Butter: 1 cup (240g) divided, half for the filling and half for the glaze.
- Powdered Sugar: 1 1/2 cups (180g) for the smooth, glossy glaze.
- Heavy Cream: 5 tablespoons total, with 2 tablespoons for the filling and 3 tablespoons for the glaze, creating silky textures.
Smart Swaps for Every Pantry
Not everyone keeps heavy cream on hand, and dietary needs vary. These substitutions maintain the spirit of the recipe while accommodating what you have available. Remember that substitutions may slightly alter texture, but the flavor will still deliver that signature peanut butter cheesecake experience.
All-Purpose Flour: You can use a 1-to-1 gluten-free baking blend if needed, though the texture may be slightly more delicate.
Whole Milk: Two percent milk or even buttermilk works well, though buttermilk will add a slight tang that complements the filling beautifully.
Cream Cheese: Neufchatel cheese offers a lighter option with less fat, though the filling will be slightly softer.
Heavy Cream: For the filling, sour cream thinned with a teaspoon of milk substitutes nicely. For the glaze, milk works but creates a thinner coating.
Creamy Peanut Butter: Natural peanut butter works if thoroughly stirred, though the glaze may separate slightly. Crunchy peanut butter adds textural interest to the filling.
Spotlight on the Stars
Creamy Peanut Butter: This is the heart and soul of the recipe, appearing in both the cheesecake filling and the glaze. Choose a high-quality brand with minimal additives for the cleanest flavor. The salt content in standard peanut butter actually helps balance the sweetness of the donut and glaze, creating a more sophisticated taste profile than sugar alone could achieve.
Cream Cheese: Full-fat block cream cheese provides the structure and tang essential to the cheesecake component. Avoid whipped or spreadable varieties packaged in tubs, as they contain stabilizers that prevent the filling from setting properly and can make it weepy.
Bringing It All Together
Now comes the fun part where simple ingredients transform into something extraordinary. The process moves quickly, so read through all the steps before you begin. Working methodically ensures your donuts bake evenly and fill beautifully. This is the moment where your kitchen becomes a bakery, and the anticipation builds with every step.
- Preheat Your Equipment: Preheat your oven to 350°F (175°C) and position the rack in the center. Grease two donut pans thoroughly with butter or nonstick spray, ensuring every ridge is coated so your donuts release perfectly.
- Combine Ingredients: In a large bowl, whisk together the flour, granulated sugar, baking powder, and salt. In a separate bowl, whisk the milk, melted butter, eggs, and vanilla until smooth. Pour the wet ingredients into the dry and fold gently with a spatula until just combined, which creates a tender crumb without toughness.
- Prepare Your Cooking Vessel: Transfer the batter into a piping bag or a large zip-top bag with the corner snipped off. This gives you control when filling the donut molds evenly without messy spills.
- Assemble the Dish: Pipe the batter into the prepared donut pans, filling each cavity about three-quarters full. Smooth the tops slightly with a damp finger or offset spatula if needed, then tap the pan gently on the counter to release any air bubbles.
- Cook to Perfection: Bake for 12 to 14 minutes, rotating the pan halfway through, until the donuts spring back when lightly touched and a toothpick inserted comes out clean. The aroma of vanilla and butter will fill your kitchen, signaling they are ready.
- Finishing Touches: While the donuts cool for 5 minutes in the pan, prepare the cheesecake filling by beating the cream cheese, 1/2 cup peanut butter, and 2 tablespoons heavy cream until fluffy. Transfer to a piping bag fitted with a long narrow tip. Invert the donuts onto a wire rack to cool completely. Meanwhile, whisk the remaining 1/2 cup peanut butter with powdered sugar and 3 tablespoons heavy cream until smooth for the glaze.
- Serve and Enjoy: Once cooled, insert the piping tip into the side of each donut and squeeze gently to fill with the peanut butter cheesecake mixture. Dip the tops into the peanut butter glaze, letting excess drip off, and sprinkle with crushed peanuts if desired. Allow the glaze to set for 10 minutes before serving.
Pitfalls to Sidestep on Your Donut Journey
Even experienced bakers encounter bumps in the road, but forewarned is forearmed. These common mistakes are easily avoided with a little attention to detail, ensuring your first batch looks as good as it tastes.
- Overmixing the batter develops gluten, which results in tough, chewy donuts rather than tender, cake-like ones. Mix only until you no longer see dry flour.
- Filling the donut pans too full causes the batter to overflow and create muffins with holes rather than neat rings. Stick to three-quarters full.
- Attempting to fill warm donuts melts the cheesecake mixture into the cake, creating soggy spots instead of a distinct creamy center. Patience is key.
- Using cold cream cheese creates lumps in the filling that will clog your piping tip. Always soften it completely.
- Glazing donuts before they are cool causes the glaze to melt and slide off completely. Wait until they are room temperature.
Nutrition Snapshot
Servings: 12 donuts
Calories per serving: approximately 380 calories
Note: These are approximate values based on standard ingredients and will vary depending on specific brands and any substitutions made.
Timing Your Baking Adventure
Prep Time: 20 minutes
Cook Time: 14 minutes
Total Time: 34 minutes plus cooling and glazing time
Flavor Adventures Awaiting
Once you master the base recipe, the possibilities for customization are endless. Try these variations to keep your baking fresh and exciting.
Chocolate Peanut Butter Dream: Add 1/4 cup cocoa powder to the batter and substitute chocolate hazelnut spread for half the peanut butter in the filling.
Berry Swirl Surprise: Fold 1/4 cup raspberry jam into the cheesecake filling before piping for a PB&J inspired twist.
Banana Bread Donuts: Replace half the sugar with mashed ripe banana and add a pinch of cinnamon to the batter for a Elvis-inspired flavor profile.
Salted Caramel Drizzle: Skip the peanut butter glaze and drizzle homemade salted caramel sauce over the filled donuts, then sprinkle with flaky sea salt.
Crunch Coating: Roll the glazed donuts in crushed honey roasted peanuts or chocolate cookie crumbs for extra texture and visual appeal.
FAQ’s
1. Can I make these donuts ahead of time?
Yes, you can bake the donuts up to 24 hours in advance. Store them unfilled in an airtight container at room temperature. Prepare the filling and glaze separately, then assemble just before serving for the freshest texture.
2. Do I need a donut pan to make this recipe?
A donut pan is highly recommended for the shape, but you can use a standard muffin tin in a pinch. The baking time will increase to about 18 minutes, and you will need to create a well in the center or simply fill them and inject the filling from the top.
3. Can I use natural peanut butter instead of commercial brands?
Natural peanut butter works, but you must stir it very thoroughly to incorporate the oils. The glaze may be slightly less stable, and the filling might have a softer texture, but the flavor will be excellent.
4. How do I store leftover donuts?
Because of the cream cheese filling, these must be refrigerated. Store in an airtight container for up to 3 days. Bring to room temperature for 10 minutes before eating for the best texture.
5. Can I freeze these donuts?
You can freeze the unfilled baked donuts for up to 2 months. Wrap individually in plastic wrap and place in a freezer bag. Thaw at room temperature and fill with fresh cheesecake mixture. Do not freeze after filling.
6. Why did my glaze turn out too thick or too thin?
Glaze consistency depends on temperature and exact measurements. If too thick, add cream one teaspoon at a time. If too thin, add powdered sugar one tablespoon at a time until you reach the texture of honey.
7. Can I make this recipe gluten-free?
Yes, substitute a 1-to-1 gluten-free all-purpose flour blend. The donuts may be slightly more delicate, so handle gently when filling and glazing.
8. What if I do not have a piping bag to fill the donuts?
You can use a zip-top bag with a small corner cut off, or even a small spoon to gently open a slit in the side and spoon in the filling, though this method is messier.
9. Can I reduce the sugar in this recipe?
You can reduce the granulated sugar in the batter by up to 1/4 cup without affecting texture significantly, but the glaze relies on powdered sugar for structure. Reducing it will create a thinner coating.
10. Why did my donuts stick to the pan?
Insufficient greasing is usually the culprit. Make sure to grease every nook and cranny of the donut pan, or use a silicone pan which releases more easily. Letting them cool 5 minutes in the pan also helps them release cleanly.
Conclusion
These Peanut Butter Cheesecake Donuts represent everything wonderful about home baking. They transform humble ingredients into something that feels celebratory and indulgent, perfect for sharing with people you love or savoring quietly with a cup of coffee. The combination of fluffy cake, creamy filling, and rich glaze creates a harmony of textures and flavors that lingers long after the last crumb disappears. Whether you are an experienced baker or just starting your journey, this recipe welcomes you with open arms and promises delicious results. Go ahead, treat yourself to a batch this weekend, and discover why this might just become your new signature sweet.


