

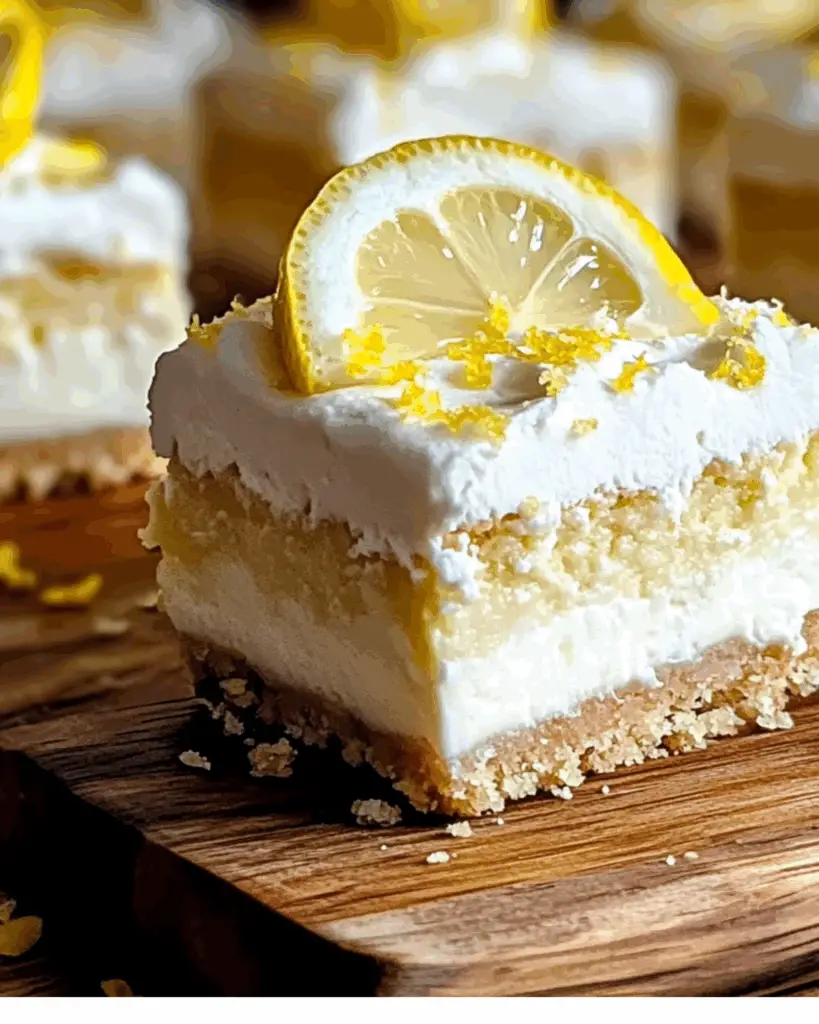
Lush Lemon Dream Bars (No-Bake Ricotta Cheesecake Treats)
Let me introduce you to your new sunny-day favorite: Lush Lemon Dream Bars. These no-bake ricotta cheesecake bars are what dessert dreams are made of—creamy, light-as-air filling with just the right kiss of lemony zing, nestled on top of a buttery, slightly crunchy crust. No oven, no stress, just pure citrusy bliss in every bite.
If cheesecake and lemon bars had a delicious little baby, this would be it. And let me tell you—this one’s a game-changer. It’s the kind of dessert you whip up when you want something impressive but effortless. It’s fresh, it’s bright, it melts in your mouth… and it might just make you the most popular person at any get-together. Trust me, your taste buds are going to thank you.
Why You’ll Love Lush Lemon Dream Bars
This recipe isn’t just about the ingredients—it’s about creating moments. Whether you’re cooking for a casual family dinner, hosting a get-together with friends, or simply indulging in some comforting flavors for yourself, this dish is versatile enough to fit the occasion. Here’s why it’s a favorite:
Versatile: Perfect for brunches, baby showers, holidays, or just because. Imagine serving these chilled bars on a hot day—pure heaven.
Budget-Friendly: Made with common, affordable ingredients you probably already have on hand. No fancy gadgets or boutique groceries needed.
Quick and Easy: No oven, no water bath, no stress. You’ll have these chilling in the fridge before you know it.
Customizable: Not a lemon fan? Swap in orange or lime zest. Want to make it fancier? Top with berries or a dollop of whipped cream.
Crowd-Pleasing: Light enough for those who don’t love heavy desserts, but decadent enough to feel indulgent. Everyone goes back for seconds—every time.
Disclosure: This post contains affiliate links.If you click and make a purchase, I may earn a small commission at no extra cost to you.


Ingredients in Lush Lemon Dream Bars
Here’s the magic of this recipe—it’s made with just a few pantry staples and fridge favorites, but the result is pure dessert gold. Let’s break it down:
Graham Cracker Crumbs: The foundation of the crust. Slightly sweet, buttery, and crunchy—just the right base for a creamy topping.
Butter: Melted and mixed with the crumbs to hold everything together and add richness.
Ricotta Cheese: The creamy star of the filling. It brings a light, slightly tangy flavor that plays perfectly with lemon.
Cream Cheese: For that classic cheesecake body and smooth texture. It balances beautifully with the ricotta.
Powdered Sugar: Adds sweetness while keeping the filling fluffy and smooth.
Fresh Lemon Zest: Bursts with citrusy fragrance and flavor—this is where the zing lives.
Lemon Juice: Brings brightness and a little tang. Use fresh-squeezed if you can—it makes a difference!
Vanilla Extract: A little warm, sweet depth to round out the tartness.
Whipped Topping or Whipped Cream: Folded in for an airy, mousse-like finish. It gives the filling that light, cloud-like texture.
(Note: the full ingredients list, including measurements, is provided in the recipe card directly below.)
Instructions
Let’s dive into the steps to create this flavorful masterpiece:
Preheat Your Equipment
No oven needed here! But make sure you have an 8×8 or 9×9 inch pan ready to go. Line it with parchment paper for easy removal later.
Combine Ingredients
In a bowl, mix the graham cracker crumbs and melted butter until it feels like wet sand. Press this mixture firmly into the bottom of your prepared pan to form the crust. Pop it in the fridge to chill while you work on the filling.
Prepare Your Cooking Vessel
No baking here, but prepping your pan is key. Lining it with parchment helps you lift the bars out cleanly later—no sticky messes!
Assemble the Dish
In a large bowl, beat together the ricotta, cream cheese, powdered sugar, lemon zest, lemon juice, and vanilla until smooth and creamy. Fold in the whipped topping gently until just combined. Spoon the mixture over the chilled crust and smooth it out evenly.
Cook to Perfection
Well… chill to perfection. Cover the pan and refrigerate for at least 4 hours, or overnight if you can wait. The flavors deepen, and the bars set into dreamy, sliceable perfection.
Finishing Touches
Right before serving, feel free to add a little flourish—extra lemon zest, a sprig of mint, or some fresh berries on top. These little details make them feel bakery-worthy.
Serve and Enjoy
Cut into bars and serve chilled. Each bite is creamy, citrusy, and refreshing. They’re light but indulgent, like sunshine in dessert form.
How to Serve Lush Lemon Dream Bars
There’s more than one way to enjoy these no-bake beauties. Try these ideas:
With Fresh Berries: Blueberries, raspberries, or sliced strawberries make a stunning and delicious topping.
As Part of a Dessert Spread: Pair with chocolate treats or cookies for a beautiful dessert board.
With Tea or Coffee: Serve alongside your favorite brew for a relaxing afternoon bite.
As a Frozen Treat: Pop them in the freezer for 30 minutes before serving for a cool, firm version—like a mini frozen cheesecake bar.
Dressed Up: Add a dollop of whipped cream or a drizzle of lemon glaze for a little extra flair.
Presentation tip: Use a hot knife (dip in hot water, then wipe dry) to slice cleanly for those pretty, Instagram-worthy bars.
Additional Tips
Prep Ahead: These bars are even better the next day, so they’re perfect for make-ahead planning.
Zest First: Always zest your lemons before you juice them—it’s way easier.
Flavor Boost: Add a tablespoon of lemon curd to the filling for extra lemony punch.
Dairy-Free Option: Use dairy-free cream cheese and whipped topping. You can also sub in silken tofu blended smooth for the ricotta.
Storage Tips: Store in an airtight container in the fridge for up to 5 days. They keep beautifully.
Double the Batch: Making these for a crowd? Just double everything and use a 9×13 pan.
FAQ Section
Q1: Can I substitute ricotta with something else?
A1: Absolutely! Mascarpone or full-fat Greek yogurt works well as a sub.
Q2: Can I make this dish ahead of time?
A2: Yes, and you should! The flavor and texture are even better the next day.
Q3: How do I store leftovers?
A3: Store them in an airtight container in the fridge for up to 5 days.
Q4: Can I freeze this dish?
A4: Yes! Freeze individual bars for up to a month. Let them thaw in the fridge before serving.
Q5: What’s the best way to reheat this dish?
A5: No need to reheat—these are best served chilled!
Q6: Can I double the recipe?
A6: For sure! Just use a larger pan and expect slightly longer chill time.
Q7: Is this recipe suitable for gluten-free diets?
A7: Just use gluten-free graham crackers and you’re good to go!
Q8: What side dishes go well with this recipe?
A8: It’s a dessert, but pairs beautifully with fruit salads or after a light summer meal.
Q9: How can I make this dish healthier?
A9: Use reduced-fat ricotta and cream cheese, and cut back a bit on the sugar if you like.
Q10: What’s the best cookware to use for this recipe?
A10: A glass or metal square baking pan works great—just don’t forget that parchment lining!
Conclusion
There you have it—Lush Lemon Dream Bars, a no-bake lemon ricotta cheesecake delight that’s as easy as it is impressive. Whether you’re whipping them up for a party or treating yourself after a long week, these bars are a little slice of sunshine you’ll come back to again and again. So go ahead, grab your whisk (no oven mitts required!) and make some dessert magic happen.
Print
Lush Lemon Dream Bars (No-Bake Ricotta Cheesecake Treats)
Description
These No-Bake Lemon Ricotta Cheesecake Bars are a refreshing, creamy dessert featuring a graham cracker crust, a zesty lemon ricotta filling, and a sprinkle of pistachios. Perfect for summer gatherings or anytime you crave a citrusy treat. #NoBakeDessert #LemonCheesecake #RicottaDessert #SummerTreats #EasyDessert #CheesecakeBars #PistachioDessert #CitrusDessert
Ingredients
- 6 tablespoons unsalted butter, melted
- 3 tablespoons firmly packed light brown sugar
- 1 pinch salt
- 1 pinch ground nutmeg
- 1 ⅓ cups finely ground graham cracker crumbs (from about 9 crackers)
- ½ cup finely chopped roasted, unsalted pistachios
- ⅛ teaspoon almond extract
- 1 ½ cups whole milk ricotta cheese, drained
- 16 ounces full-fat cream cheese, softened
- 1 cup confectioners sugar (or to taste)
- 2 tablespoons freshly grated lemon zest
- 3 tablespoons freshly squeezed lemon juice
- ½ teaspoon vanilla extract
- 1 pinch salt
- 2 tablespoons finely chopped roasted, unsalted pistachios (optional)
Instructions
- Drain Ricotta: Place ricotta into a fine mesh strainer set over a bowl and allow it to drain for at least 1 hour before using.
- Prepare the Pan: Line an 8×8-inch square pan with parchment paper, leaving overhang on all sides for easy removal later.
- Make the Crust: In a microwave-safe bowl, combine butter, brown sugar, salt, and nutmeg. Microwave in 30-second intervals, stirring after each, until the mixture starts to foam and bubble, and the sugar is mostly dissolved (about 2 minutes). Stir in the graham cracker crumbs, chopped pistachios, and almond extract until evenly moistened.
- Press the Crust: Press the crust mixture very firmly and evenly into the bottom of the prepared pan. Freeze until chilled and set, about 20 minutes.
- Make the Filling: In a large bowl, combine the drained ricotta and cream cheese. Beat with an electric mixer on medium speed until smooth. Add the confectioners sugar, lemon zest, lemon juice, vanilla, and salt. Beat until well combined and smooth.
- Assemble the Bars: Remove the crust from the freezer. Pour the filling over the crust and smooth it into an even layer. Return the pan to the freezer and chill until the filling is set, at least 3 hours.
- Cut the Bars: To cut the bars, remove the pan from the freezer using the parchment paper overhang. Place onto a cutting board. Run a sharp knife under hot water for several seconds, then wipe it dry. Cut the bars with the hot knife, wiping it off between each cut and rewarming it under hot water as needed.
- Serve: Sprinkle chopped pistachios over the bars before serving. Keep bars stored in the freezer, but allow them to sit at room temperature for about 30 minutes to soften before serving.
Notes
- Use vegetarian-friendly ingredients to make this dessert suitable for vegetarians.
- Ensure the ricotta is well-drained to avoid a watery filling.
- For a sweeter taste, adjust the amount of confectioners sugar to your preference.
- Chill the bars for at least 3 hours to allow them to set properly.
- Allow the bars to sit at room temperature for about 30 minutes before serving for optimal texture.


