

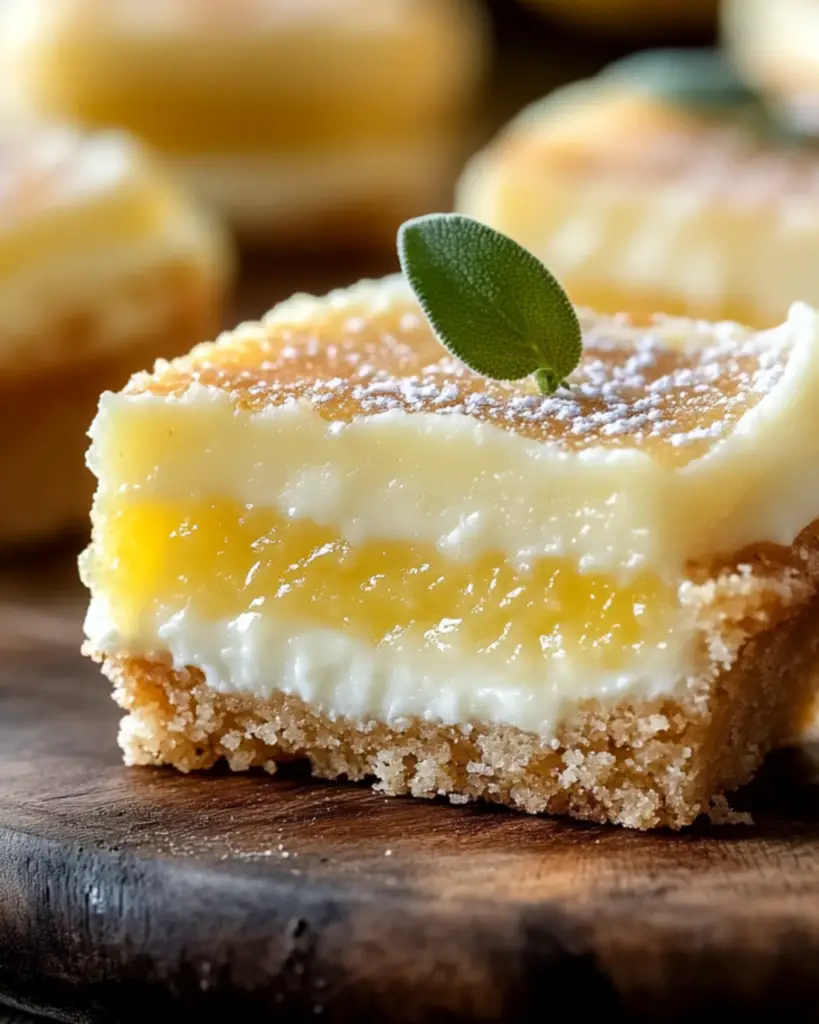
Lemon Cream Cheese Bars Recipe
Okay, stop what you’re doing—because I’m about to introduce you to a dessert that will rock your world. Lemon Cream Cheese Bars. Seriously, this treat is like a sunshine-filled bite of heaven. Imagine a buttery, crisp crust that melts into a creamy, tangy lemon filling topped with a luscious cream cheese layer. You’ll get that perfect balance of tart and sweet, and it’s one of those desserts that instantly elevates any gathering. Whether it’s a casual weeknight, a fancy brunch, or just a sweet pick-me-up, these bars will have everyone asking for the recipe. So, let’s dive in, because trust me—you’re going to LOVE these.
Why You’ll Love Lemon Cream Cheese Bars
It’s not just about the ingredients here—it’s about creating memories with each bite. These bars are the perfect way to treat yourself or share with others. Here’s why this recipe is a total winner:
Versatile
Whether you’re baking for a family get-together or a picnic, these bars are always a hit. They’re the perfect blend of refreshing citrus flavor and creamy sweetness. And if you’re craving something simple yet fancy, these bars check all the boxes.
Budget-Friendly
Don’t be fooled by how fancy these taste! You’ll find most of the ingredients in your pantry already. Simple ingredients like cream cheese, butter, and lemons come together to create a dessert that feels indulgent, without breaking the bank.
Quick and Easy
No complicated steps here! These bars are straightforward to make, even for beginners. Just mix, pour, and bake—it’s that simple. Before you know it, you’ll have a dessert that looks and tastes like it came from a bakery.
Customizable
Love extra lemony zing? Go ahead and add a bit more zest to the filling. Want to make it even richer? You can easily add a layer of whipped cream on top for that extra indulgence. You can tweak this recipe to fit your personal taste.
Crowd-Pleasing
You know how some desserts just wow everyone? This is one of those. It’s refreshing yet decadent, making it a universal favorite. Plus, it’s perfect for all ages—whether you’re baking for kids or adults, these bars never disappoint.
Disclosure: This post contains affiliate links.If you click and make a purchase, I may earn a small commission at no extra cost to you.


Ingredients
Let’s talk about the magic behind these lemon cream cheese bars. Here’s what you’ll need:
Crust
The crust is the perfect foundation for these bars. It’s buttery, slightly sweet, and perfectly crisp. It pairs beautifully with the tangy lemon and cream cheese layers.
Cream Cheese
The cream cheese filling is the heart of this dessert. It gives the bars that rich, creamy texture and a slight tang that balances out the sweetness from the other ingredients.
Lemons
Fresh lemon juice and zest bring all the citrusy goodness to these bars. The zingy flavor is what makes these bars so refreshing and irresistible. You’ll want to use the zest for extra punch!
Sugar
Sugar brings sweetness to the filling, balancing the tartness of the lemons and cream cheese. It’s the magic ingredient that makes everything come together perfectly.
Eggs
Eggs help bind the filling and give it that smooth, custardy texture when it’s baked. You’ll notice they add that perfect creaminess!
(Note: The full ingredient measurements are included in the recipe card below.)
Instructions
Ready to make these Lemon Cream Cheese Bars? Let’s break it down into simple steps:
Preheat Your Oven
First things first—preheat your oven to 350°F (175°C). This ensures that the bars cook evenly and develop that perfect golden top.
Prepare Your Crust
In a mixing bowl, combine your crust ingredients and press them into the bottom of a greased baking dish. Use a spoon to make sure it’s even. This will create the buttery, crisp base that perfectly supports the creamy filling.
Make the Filling
In another bowl, mix together the cream cheese, sugar, eggs, lemon juice, and zest. Beat until smooth and creamy. You want the filling to be silky and fully combined—no lumps here!
Pour and Bake
Pour the cream cheese mixture over the prepared crust and spread it evenly. Bake for about 25-30 minutes, or until the filling is set but still slightly jiggly in the center. You want that perfect creamy texture once it cools.
Cool and Slice
Allow the bars to cool completely in the pan. This step is super important—it helps the filling set and makes slicing easier. Once they’ve cooled down, cut them into squares, dust with powdered sugar if you like, and get ready to dig in.
Serve and Enjoy
Serve them chilled or at room temperature, and enjoy! These bars are the perfect combination of creamy, tangy, and sweet, making them a perfect treat for any occasion
How to Serve Lemon Cream Cheese Bars
These bars are perfect on their own, but if you want to make them even more special, here are a few serving ideas:
Fresh Berries
Top your bars with fresh berries like raspberries or blueberries for a pop of color and a burst of juicy flavor. The tartness of the berries complements the sweetness of the bars perfectly.
Whipped Cream
For an extra indulgence, add a dollop of freshly whipped cream on top. The creamy texture is the perfect pairing with the zesty lemon bars.
Mint Garnish
Sprinkle a little fresh mint on top for a touch of freshness and color. It’ll look fancy and add a subtle hint of flavor.
Additional Tips
Here are some extra tips to make sure your lemon cream cheese bars turn out perfect every time:
- Prep Ahead: You can make these bars a day ahead of time. Just store them in the fridge, and they’ll be ready to serve when you need them.
- Lemon Variations: If you love lemon, feel free to add more zest or juice. The more lemony, the better!
- Storage Tips: Store leftovers in an airtight container in the fridge for up to 3-4 days. They’ll stay fresh and creamy.
- Freeze for Later: These bars freeze well! Just wrap them tightly and store them in the freezer for up to a month. Thaw before serving.
FAQ Section
Q1: Can I use bottled lemon juice?
A1: While fresh lemon juice is best for flavor, bottled lemon juice can work in a pinch. Fresh zest, however, is key for that burst of citrus flavor.
Q2: Can I make these bars ahead of time?
A2: Yes! You can make them the day before, and they’ll be just as delicious the next day. Just store them in the fridge to keep them fresh.
Q3: How do I store leftovers?
A3: Store any leftover bars in an airtight container in the fridge for up to 3-4 days. They’ll stay nice and creamy!
Q4: Can I freeze these bars?
A4: Absolutely! These bars freeze beautifully. Wrap them in plastic wrap and foil, and store in a freezer-safe container. Thaw before serving.
Q5: How do I reheat them?
A5: These bars are best served chilled or at room temperature, so there’s no need to reheat. Just pull them out of the fridge and enjoy!
Q6: Can I double the recipe?
A6: Yes! You can double the recipe and bake it in a larger pan. You may need to adjust the baking time slightly.
Q7: Is this recipe suitable for gluten-free diets?
A7: Yes! You can easily make these bars gluten-free by swapping out the flour in the crust for a gluten-free alternative.
Q8: What’s the best way to cut these bars?
A8: Use a sharp knife and cut the bars while they’re fully cooled. A warm knife will give you clean, smooth cuts without messing up the filling.
Conclusion
There you have it—Lemon Cream Cheese Bars that are as refreshing as they are indulgent. These little squares of sunshine are the perfect balance of tart, creamy, and sweet, and they’ll have everyone coming back for seconds. Whether you’re baking for a special occasion or just because, this recipe is sure to be a new favorite. So go ahead, give them a try—and get ready for some happy taste buds!
Print
Lemon Cream Cheese Bars Recipe
- Prep Time: 10 minutes
- Cook Time: 15 minutes
- Total Time: 25 minutes
- Yield: 4 servings
- Category: Main Dish
- Method: Stovetop, Stir-Frying
- Cuisine: Asian, Chinese-Inspired
- Diet: Vegetarian
Description
This Stir-Fried Shrimp and Broccoli recipe is a quick, healthy, and flavorful dish that’s perfect for busy weeknights. Packed with protein, fiber, and savory Asian flavors, it’s a dish everyone will love!
Ingredients
- 1 lb shrimp, peeled and deveined
- 1 head broccoli, cut into florets
- 1 carrot, sliced
- 2 cloves garlic, minced
- 1 tablespoon vegetable oil (or peanut oil)
- 2 tablespoons soy sauce
- 1 tablespoon oyster sauce (optional, for added flavor)
- 1 tablespoon cornstarch
- 2 tablespoons water
- 1 teaspoon sesame oil (optional, for finishing)
- ½ teaspoon ginger, minced (or ginger powder)
- Optional: Red pepper flakes, to taste (for heat)
- Optional: Sesame seeds, for garnish
- Optional: Cooked rice or noodles, for serving
Instructions
-
Prepare Ingredients:
Peel and devein the shrimp.
Cut the broccoli into florets and slice the carrot.
Mince the garlic and ginger (if using).
In a small bowl, whisk together the cornstarch and water to make a slurry. -
Cook Broccoli and Carrots:
Heat 1 tablespoon of vegetable oil in a large skillet or wok over medium-high heat.
Add the broccoli florets and sliced carrots.
Stir-fry for 3-5 minutes, or until the broccoli is tender-crisp.
Remove the broccoli and carrots from the skillet and set aside. -
Cook Shrimp:
In the same skillet, add the minced garlic and ginger (if using).
Cook for about 30 seconds, until fragrant.
Add the shrimp and stir-fry for 2-3 minutes, or until pink and cooked through.
Remove the shrimp from the skillet and set aside. -
Make the Sauce:
Pour the soy sauce, oyster sauce (if using), and red pepper flakes (if using) into the skillet.
Bring the sauce to a simmer.
Add the cornstarch slurry and stir until the sauce thickens slightly. -
Combine All Ingredients:
Return the cooked broccoli, carrots, and shrimp to the skillet.
Toss until everything is coated in the sauce.
-
Finish and Serve:
Drizzle with sesame oil (if using).
Garnish with sesame seeds (if using).
Serve immediately over cooked rice or noodles, if desired.
Notes
- Feel free to add other vegetables like bell peppers, snap peas, or mushrooms for more variety.
- For extra heat, add more red pepper flakes or a dash of chili paste.
- This dish can also be made with chicken or tofu instead of shrimp for different variations.
Nutrition
- Serving Size: 1 serving
- Calories: 220
- Sugar: 7g
- Sodium: 870mg
- Fat: 9g
- Saturated Fat: 1g
- Unsaturated Fat: 7g
- Trans Fat: 0g
- Carbohydrates: 15g
- Fiber: 4g
- Protein: 24g
- Cholesterol: 175mg


