

Easter Dirt Cake Casserole
Alright, friend—gather around because this Easter Dirt Cake Casserole is about to steal the show! Picture this: layers of creamy, dreamy, melt-in-your-mouth goodness, all tucked into a casserole dish, and it’s packed with that nostalgic dirt cake vibe we all know and love. Seriously, if you’ve been craving something that combines rich, sweet, and a little bit of fun, then this is your new go-to recipe. It’s like a celebration in every bite! Trust me, you’re going to love this. And just to make it even more magical—it’s all in casserole form, making it perfect for feeding a crowd (or just indulging on your own!). Plus, there’s a chance to get creative with toppings. Easter gatherings? Game-changer. Weeknight treat? Absolutely. This dessert checks all the boxes, and I can’t wait for you to dive in.
Why You’ll Love Easter Dirt Cake Casserole
This isn’t just about throwing ingredients together; it’s about creating moments. Whether you’re prepping for a cozy night in or ready to impress your guests at your next celebration, this casserole will be a hit. Here’s why:
Versatile
You’ll love how easy this recipe is to whip up, whether it’s Easter, a birthday, or any random day that’s begging for something fun and festive. This casserole fits the vibe perfectly—whether you’re serving it at a big family gathering or having a quiet night with your favorite people.
Budget-Friendly
No need to splurge on crazy ingredients—this recipe uses simple, accessible items that you probably already have in your kitchen. But even though it’s easy on the wallet, the flavor is anything but basic. Prepare to wow everyone without breaking the bank!
Quick and Easy
No complicated steps here. It’s simple enough for beginners to dive into and impress even the most seasoned bakers. I’ve made this foolproof, so you can just focus on enjoying the process (and of course, the end result!).
Customizable
If you’re someone who loves tweaking recipes, you’ll appreciate how easily this one can be adjusted. Want to add more candy? Go for it! A different topping, maybe? You do you. It’s all about making this dirt cake casserole your own.
Crowd-Pleasing
Let’s face it, kids (and adults) absolutely love anything with chocolate and cookies, and this casserole has both. The layers, the textures, the sweetness—it all combines in a way that everyone can’t get enough of. Trust me, you’re going to have people asking for seconds (and the recipe) before they even finish their first helping.
Disclosure: This post contains affiliate links.If you click and make a purchase, I may earn a small commission at no extra cost to you.


Ingredients in Easter Dirt Cake Casserole
Let’s break it down—these are the ingredients that come together to create this creamy, indulgent dessert. It’s the perfect mix of simplicity and decadence.
- Chocolate Sandwich Cookies: These are the base of the whole “dirt” theme! Crushed into crumbs, they create the perfect “dirt” texture to pile on top of your creamy layers.
- Butter: Ah, the foundation of any great dish. It brings everything together with a rich, smooth texture.
- Cream Cheese: The creamy layer that adds a bit of tang to balance out the sweetness. Trust me—it makes all the difference.
- Powdered Sugar: Sweetness in the best way. It adds the perfect level of sugar to complement the cream cheese without being overpowering.
- Vanilla Pudding Mix: This is what brings the smooth, dreamy texture to the filling. It thickens everything just right.
- Whipped Topping: Light and fluffy, this adds a layer of airiness that makes the casserole feel so indulgent without being too heavy.
- Milk: To bring it all together and make sure the pudding mix turns into the perfect consistency.
- Gummy Worms (Optional): For that playful, classic dirt cake feel. These are totally optional, but they bring a bit of whimsy that takes this casserole from good to unforgettable.
(Note: the full ingredients list, including measurements, is provided in the recipe card directly below.)
Instructions
Alright, let’s get baking (well, technically no baking—this is a no-bake treat!):
Preheat Your Equipment
I know, I know—this is a no-bake recipe, but just to make sure everything is chilled perfectly, get your fridge ready for this beauty.
Crush Your Cookies
Take those chocolate sandwich cookies and give them a good crush! You can either pop them in a bag and smash them with a rolling pin or use a food processor. You want them to be nice, fine crumbs—think of it like dirt (in a delicious way). Set those aside for now.
Mix Your Creamy Layers
In a large bowl, combine the cream cheese and powdered sugar. Mix until it’s smooth and creamy—no lumps allowed! Then, in a separate bowl, whisk together the vanilla pudding mix and milk. Stir it up until it thickens and becomes the perfect, luscious pudding consistency.
Add the Whipped Topping
Fold the whipped topping into your pudding mix. This is what’s going to make the filling airy and soft—giving it that melt-in-your-mouth texture we love.
Layer the Casserole
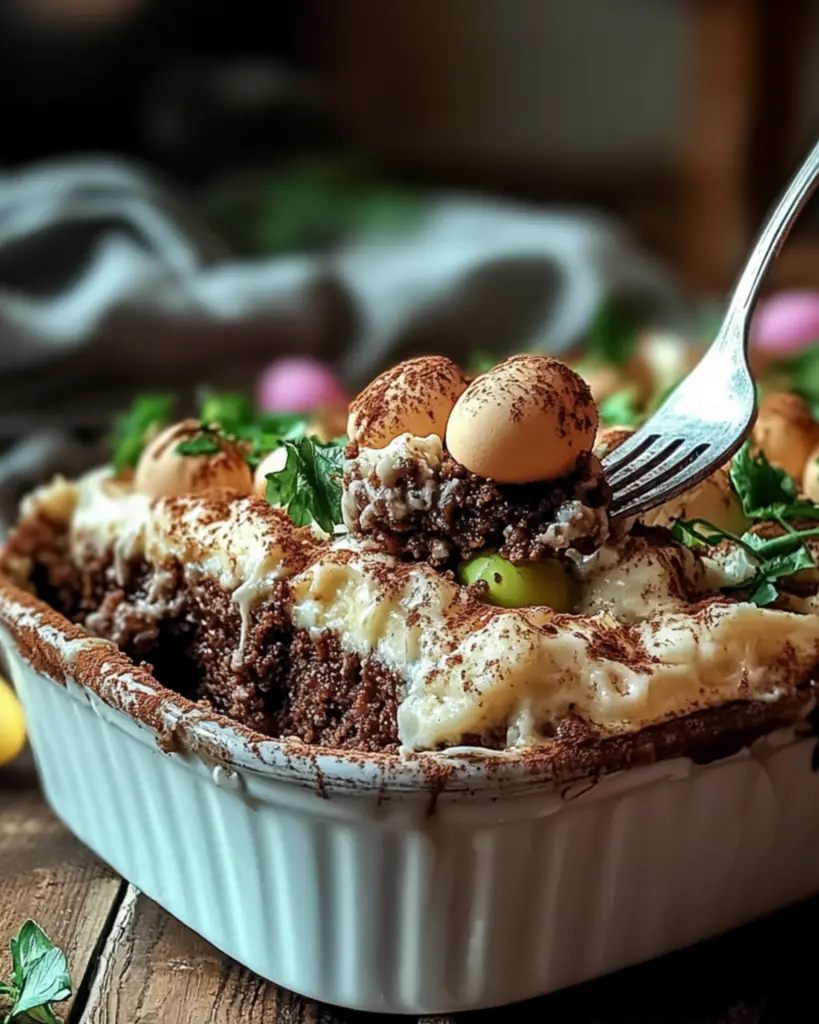
Now, in your casserole dish, spread a layer of your crushed cookies as the base. Then, gently spoon over your cream cheese mixture, spreading it evenly. Follow that with the pudding mixture, and top with the remaining crushed cookies to make your “dirt” layer. Don’t forget to have fun with the gummy worms! Throw them on top for that perfect dirt-cake vibe.
Chill and Let Set
Pop the casserole in the fridge and let it chill for at least 4 hours (overnight is even better!). This allows everything to set and come together into a glorious, creamy, crumbly dessert.
Serve and Enjoy
Once it’s set, serve this beauty chilled and enjoy all the oohs and aahs that are sure to come your way.
How to Serve Easter Dirt Cake Casserole
This dessert is perfect on its own, but if you want to elevate it a bit, here are some serving suggestions:
Fresh Fruit
A bowl of fresh strawberries or blueberries can add a refreshing contrast to the rich and creamy layers of the casserole.
Coffee or Tea
This dessert pairs perfectly with a warm cup of coffee or a light, herbal tea. It’s a fun way to balance out the sweetness with something cozy.
Ice Cream
For extra indulgence, serve it with a scoop of vanilla ice cream. The combination of cold, creamy, and crunchy is pure bliss.
Additional Tips
Here are some extra tips to help you get the most out of this recipe:
Prep Ahead
You can make this ahead of time and let it chill overnight. It makes it so much easier when it’s time to serve.
Spice It Up
If you love chocolate, you can always add a drizzle of melted chocolate over the top before chilling.
Storage Tips
Store leftovers in an airtight container in the fridge for up to 3 days. Just make sure you cover it well to keep all that deliciousness fresh.
Double the Batch
This recipe is perfect for making a bigger batch if you have a larger crowd. Just grab a bigger dish, and you’re good to go!
FAQ Section
Q1: Can I substitute the cream cheese?
A1: Sure! You can swap it for a dairy-free cream cheese or even mascarpone for a slightly different flavor.
Q2: Can I make this ahead of time?
A2: Yes, it’s perfect for prepping ahead! Just assemble it, chill, and serve when you’re ready.
Q3: How do I store leftovers?
A3: Store leftovers in an airtight container in the fridge. It should last about 3 days.
Q4: Can I freeze this dish?
A4: Freezing is not recommended as it may change the texture of the whipped topping and pudding mixture.
Q5: Can I double the recipe?
A5: Absolutely! Just make sure you use a larger casserole dish.
Q6: Can I use other cookies?
A6: Yes! You can experiment with other types of cookies like Oreos with different fillings.
Q7: Can I add more candy or toppings?
A7: Yes! Get creative—add mini eggs, sprinkles, or even crumbled chocolate bars for an extra touch.
Q8: What side dishes go well with this?
A8: This is a dessert all on its own, but pairing it with a refreshing fruit salad could be a perfect complement.
Q9: How can I make this healthier?
A9: Consider swapping the cream cheese for a lightened version or using a sugar substitute for the pudding mix.
Q10: What’s the best way to reheat this dish?
A10: This dessert is best served cold, so no need to reheat—just keep it in the fridge and enjoy when you’re ready!
Conclusion
There you have it! This Easter Dirt Cake Casserole is a showstopper, and once you make it, you’ll see why it’s a crowd favorite. It’s the perfect dessert to bring to any gathering, or just to enjoy at home when you’re in the mood for something sweet, fun, and totally irresistible. Ready to make this masterpiece? Let’s do it!
Print
Easter Dirt Cake Casserole
- Prep Time: 20 minutes
- Cook Time: 2 hours
- Total Time: 2 hours 20 minutes
- Yield: 12 servings
- Category: Dessert, Easter Treat
- Method: No-bake
- Cuisine: American
- Diet: Gluten Free
Description
This fun and festive Easter Dirt Cake Casserole is a crowd-pleasing treat that combines creamy layers, crushed Oreos, and candy-coated chocolate eggs for the perfect spring dessert. A no-bake dessert that’s sure to delight kids and adults alike
Ingredients
- 1 package (14.3 oz) Oreos, crushed
- ½ cup unsalted butter, softened
- 1 package (8 oz) cream cheese, softened
- 1 cup powdered sugar
- 2 packages (3.9 oz each) instant chocolate pudding mix
- 3 ½ cups cold milk
- 1 container (12 oz) whipped topping, thawed
- 1 bag of candy-coated chocolate eggs
- Optional: gummy worms, for decoration
Instructions
- Prepare the Oreo Base:
In a large bowl, mix the crushed Oreos and set them aside. - Make the Cream Cheese Mixture:
In another bowl, beat together the softened butter, cream cheese, and powdered sugar until smooth and creamy. - Prepare the Pudding Mixture:
In a separate bowl, whisk together the instant chocolate pudding mix and cold milk until well blended and thickened. Let it sit for 5 minutes to thicken further. - Combine Pudding and Topping:
Fold the whipped topping into the pudding mixture until well combined. - Layer the Dessert:
In a 9×13 inch casserole dish, layer half of the crushed Oreos to form the base. Spread the cream cheese mixture over the Oreo layer evenly. Then, carefully spread the pudding mixture over the cream cheese layer. Top with the remaining crushed Oreos, covering the pudding layer completely. - Decorate:
Decorate the top with candy-coated chocolate eggs and optional gummy worms to create a fun Easter garden scene. - Chill:
Refrigerate for at least 2 hours, or overnight, to allow the layers to set.
Notes
- This dessert can be made ahead of time and refrigerated overnight for easier preparation on the day of serving.
- For a festive touch, you can add more Easter-themed decorations, such as chocolate bunnies or pastel-colored candies.
Nutrition
- Serving Size: 1/12 of the casserole
- Calories: 450 kcal
- Sugar: 33g
- Sodium: 290mg
- Fat: 23g
- Saturated Fat: 12g
- Unsaturated Fat: 9g
- Trans Fat: 0g
- Carbohydrates: 57g
- Fiber: 1g
- Protein: 4g
- Cholesterol: 50mg


