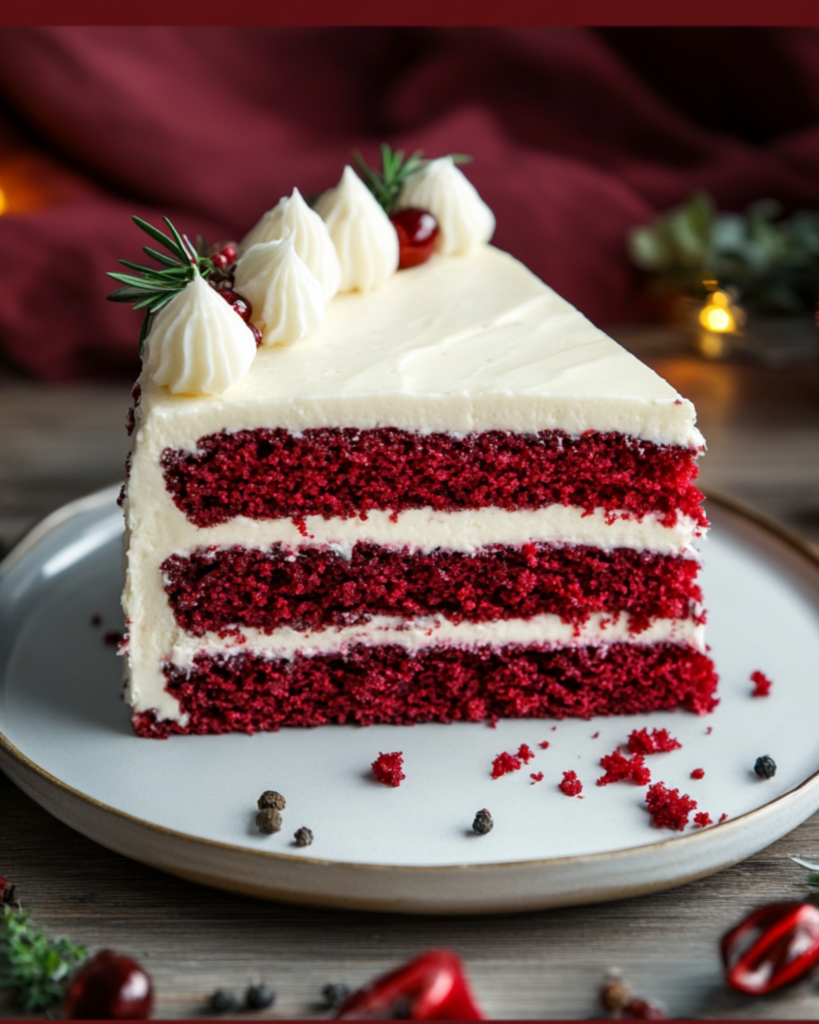
Red Velvet Tree Cake
Imagine a cake so vibrant and indulgent, it feels like a celebration in every bite. Red Velvet Tree Cake is not your average dessert—it’s a striking masterpiece that’s just as fun to make as it is to eat. The rich, velvety texture paired with a slightly tangy cream cheese frosting creates a combination that’s pure bliss. Whether you’re hosting a holiday gathering or treating yourself to something special, this cake is sure to impress. Trust me, once you taste it, you’ll be wondering why you didn’t make this sooner.
Why You’ll Love Red Velvet Tree Cake
This isn’t just any cake—it’s a showstopper that brings joy to every occasion. Here’s why it’s bound to be a favorite:
Fun and Festive: With its tree-shaped design and vibrant red color, this cake is perfect for holidays or any time you want to add some fun to your baking. Picture it on your dining table, a real eye-catcher!
Deliciously Moist: Red velvet cakes are known for their incredibly moist crumb, and this one is no exception. The secret? Buttermilk and a touch of cocoa that give it that irresistible texture and flavor.
Crowd-Pleaser: Everyone loves a good red velvet cake, but this tree shape makes it extra special. Kids, adults, and even guests who usually shy away from sweets will be asking for a slice of this one.
Perfect for Decorating: If you love getting creative in the kitchen, this cake is a canvas for your decorating skills. From sprinkles to little ornaments, you can make it your own.
Easy to Make: While it looks impressive, the process is actually straightforward. A few simple steps and a little patience, and you’ll have a cake that’s worthy of a place at any celebration.
Disclosure: This post contains affiliate links.If you click and make a purchase, I may earn a small commission at no extra cost to you.


Ingredients
Here’s what you’ll need to create this cake that’s a total showstopper:
For the Cake
- All-purpose flour: The base for a soft, tender cake.
- Granulated sugar: Sweetness with a little crunch.
- Unsweetened cocoa powder: Adds just the right amount of chocolatey richness to balance the tang.
- Baking soda: For that perfect rise.
- Salt: To enhance all the flavors.
- Buttermilk: The secret to that tender, melt-in-your-mouth texture.
- Vegetable oil: Keeps the cake moist and soft.
- Eggs: The binding agent for this delicious cake.
- Red food coloring: To make this cake pop with color.
- Vanilla extract: A warm, sweet background flavor.
- White vinegar: Adds a tangy kick that complements the cocoa.
For the Frosting
- Cream cheese: The star of the frosting, creamy and slightly tangy.
- Unsalted butter: Helps create a smooth, rich frosting texture.
- Powdered sugar: Sweetens the frosting without the grittiness.
- Vanilla extract: A hint of vanilla to round out the frosting’s flavor.
- Heavy cream: To give the frosting a silky smooth consistency.
Instructions
Let’s dive into the steps to create this delightful cake:
Preheat Your Oven
Start by preheating your oven to 350°F (175°C). This ensures that your cake bakes evenly from the first moment it enters the oven.
Mix the Dry Ingredients
In a bowl, whisk together your flour, cocoa powder, baking soda, and salt. This will evenly distribute the dry ingredients so your cake rises beautifully.
Combine the Wet Ingredients
In a separate bowl, whisk together the sugar, buttermilk, vegetable oil, eggs, food coloring, vanilla extract, and vinegar. The food coloring gives the batter that deep red hue, so don’t skimp on it!
Combine Wet and Dry Ingredients
Gradually add the dry ingredients to the wet ingredients, mixing until just combined. Be careful not to overmix—this helps keep the cake light and airy.
Bake the Cake
Pour the batter into a greased and floured cake pan shaped like a tree (or use a round pan and get creative with cutting it into a tree afterward). Bake for about 30 minutes or until a toothpick inserted comes out clean.
Cool the Cake
Let the cake cool completely before frosting. It’s tempting to rush this step, but trust me, letting the cake cool helps the frosting stay smooth.
Make the Frosting
Beat the cream cheese and butter together until smooth. Gradually add the powdered sugar, a little at a time, until it’s fully incorporated. Add the vanilla extract and heavy cream, and continue beating until the frosting is light and fluffy.
Frost the Cake
Once the cake is completely cool, spread a generous amount of frosting over it. You can use a spatula for a smooth finish or get creative with a piping bag for extra flair.
Serve and Enjoy
Slice into your masterpiece and watch as everyone’s eyes light up. This cake is a treat for both the eyes and the taste buds.
Nutrition Facts
Servings: 1 slice (based on 12 servings)
Calories per serving: 400 kcal
How to Serve Red Velvet Tree Cake
This cake is perfect for so many occasions. Here are a few ways to serve it:
- Holiday Gatherings: Nothing says “festive” like a red velvet cake shaped like a Christmas tree.
- Party Dessert: It’s great for any celebration, from birthdays to anniversaries. Everyone will love the vibrant color.
- With a Side of Ice Cream: Add a scoop of vanilla or chocolate ice cream to balance out the sweetness.
Additional Tips
- Make it Ahead: You can bake the cake the day before, just keep it wrapped tightly. Frost it the day of serving for the freshest taste.
- Customization: Want to switch it up? Try adding a little bit of almond extract to the frosting for a twist on the classic flavor.
- Storage Tips: Keep leftovers in an airtight container at room temperature for up to 3 days, or refrigerate for up to 5 days.
FAQ Section
Q1: Can I use a different food coloring? A1: Absolutely! You can use gel or liquid food coloring, but gel tends to give a more vibrant result.
Q2: Can I make this cake ahead of time? A2: Yes, you can bake the cake and freeze it. Just make sure it’s well-wrapped to avoid freezer burn.
Q3: Can I make this cake without buttermilk? A3: If you don’t have buttermilk, you can substitute it with regular milk and a little vinegar or lemon juice.
Q4: How should I store leftovers? A4: Keep leftovers in an airtight container at room temperature for up to 3 days or in the fridge for up to 5 days.
Q5: Can I freeze this cake? A5: Yes! You can freeze the cake layers before frosting for up to 3 months. Let them thaw before frosting.
Q6: Can I double the recipe? A6: Definitely! Just be sure to adjust the baking time depending on the size of the pans you’re using.
Q7: Can I use store-bought frosting? A7: Sure! If you’re in a rush, store-bought frosting will work, but homemade cream cheese frosting takes this cake to the next level.
Q8: How do I make my frosting smoother? A8: Beat the frosting well to incorporate air, and make sure your butter and cream cheese are at room temperature before starting.
Q9: How do I make my cake even more colorful? A9: You can add sprinkles, edible glitter, or small candies to give your tree cake a festive touch.
Q10: What’s the best way to slice this cake? A10: For clean slices, use a serrated knife and make sure the cake is completely cool.
Conclusion
Red Velvet Tree Cake is not just a dessert, it’s an experience. From the stunning color to the rich, melt-in-your-mouth flavor, this cake will quickly become a favorite for all your special occasions. It’s simple, yet stunning, and absolutely delicious. So, what are you waiting for? Grab your ingredients and make your own tree-shaped masterpiece!
Print
Red Velvet Tree Cake
- Prep Time: 30 minutes
- Cook Time: 25 minutes
- Total Time: 55 minutes
- Yield: 12 servings
- Category: Dessert, Cake
- Method: Baking, Mixing
- Cuisine: American
- Diet: Vegetarian
Description
This Red Velvet Tree Cake is a stunning holiday dessert, combining rich red velvet cake layers with creamy frosting and festive decorations. It’s perfect for your Christmas or New Year’s celebration!
Ingredients
-
For the Cake:
- 2½ cups (315g) all-purpose flour – Provides structure to the cake.
- 1½ cups (300g) granulated sugar – Sweetens the cake.
- 1 tsp baking soda – Helps the cake rise.
- 1 tsp salt – Balances the sweetness.
- 1 tsp cocoa powder – Adds depth to the flavor.
- 1½ cups (360ml) vegetable oil – Keeps the cake moist and tender.
- 1 cup (240ml) buttermilk, at room temperature – Adds tang and moisture.
- 2 large eggs, at room temperature – Bind the ingredients together.
- 2 tbsp (30ml) red food coloring – Gives the cake its signature vibrant red color.
- 1 tsp white vinegar – Enhances the color and texture.
- 2 tsp vanilla extract – Adds a rich vanilla flavor.
For the Cream Cheese Frosting:
- 8 oz (225g) cream cheese, softened – The creamy base for the frosting.
- ½ cup (115g) unsalted butter, softened – Adds richness and smoothness.
- 4 cups (500g) powdered sugar – Sweetens and thickens the frosting.
- 2 tsp vanilla extract – Enhances the frosting’s flavor.
For Decoration:
- Edible silver and red baubles – For a festive, elegant touch.
- Small edible glitter stars – To add sparkle and glamour.
- White chocolate shavings – Creates a snowy, wintery look.
- A star-shaped topper – To crown the tree cake.
Instructions
Prepare the Cake Batter:
- Preheat your oven to 350°F (175°C). Grease and line multiple round cake pans of decreasing sizes (e.g., 9-inch, 7-inch, 5-inch, and 3-inch pans).
- In a large bowl, sift together the flour, sugar, baking soda, salt, and cocoa powder.
- In a separate bowl, whisk together the vegetable oil, buttermilk, eggs, food coloring, vinegar, and vanilla extract.
- Gradually add the wet ingredients to the dry ingredients, mixing until smooth and well combined.
Bake the Cakes:
- Divide the batter evenly among the prepared pans.
- Bake each layer for 20-25 minutes or until a toothpick inserted into the center comes out clean.
- Let the cakes cool in their pans for 10 minutes, then transfer them to a wire rack to cool completely.
Prepare the Cream Cheese Frosting:
- In a mixing bowl, beat the cream cheese and butter until smooth.
- Gradually add the powdered sugar, beating until the frosting is fluffy.
- Stir in the vanilla extract.
Assemble the Cake:
- Place the largest cake layer on a serving plate. Spread a thin layer of cream cheese frosting over the top.
- Stack the next largest cake layer on top and repeat with the frosting. Continue until all the layers are stacked.
- Trim the edges if necessary to create a conical tree shape.
Decorate:
- Using a piping bag fitted with a star tip, pipe swirls of frosting around the cake.
- Decorate with edible baubles and glitter stars.
- Sprinkle white chocolate shavings for a snowy effect.
- Top with the star-shaped topper.
Serve and Enjoy:
- Slice the cake and enjoy the festive layers of red velvet and cream cheese frosting!
Notes
- The cake layers can be made a day ahead and stored tightly wrapped to keep them fresh.
- If you prefer a less sweet frosting, reduce the powdered sugar to taste.
- Decorate the cake just before serving for the best presentation.
Nutrition
- Serving Size: 1 slice (based on 12 servings)
- Calories: 400 kcal
- Sugar: 45g
- Sodium: 250mg
- Fat: 18g
- Saturated Fat: 8g
- Unsaturated Fat: 8g
- Trans Fat: 0g
- Carbohydrates: 55g
- Fiber: 1g
- Protein: 4g
- Cholesterol: 50mg