

Cheesy Garlic Butter Chicken – Comfort Food at Its Best!
Alright, imagine this: crispy, tender chicken breasts smothered in a rich, cheesy garlic butter sauce that’s so indulgent, you’ll want to dive in right away. Trust me when I say that this Cheesy Garlic Butter Chicken is a game-changer. Whether you’re cooking for yourself on a cozy night in or serving it at a dinner party, it’s the kind of comfort food that makes everyone gather around the table and dig in. The buttery garlic sauce is silky and savory, and every bite is like a warm hug from the inside. If you love rich, flavorful, and oh-so-satisfying dishes, you’re going to fall head over heels for this one. So, grab your apron and get ready—let’s get cooking!
Why You’ll Love Cheesy Garlic Butter Chicken
This recipe isn’t just about the ingredients—it’s about creating moments. Whether you’re cooking for a casual family dinner, hosting a get-together with friends, or simply indulging in some comforting flavors for yourself, this dish is versatile enough to fit the occasion. Here’s why it’s a favorite:
Versatile
Perfect for busy weeknights or as a standout dish at gatherings. Imagine coming home after a long day, knowing you can whip up something delicious and comforting in no time. Or envision serving this at a party, where guests ask for the recipe before the night ends.
Budget-Friendly
Uses ingredients you likely already have in your kitchen. No need for exotic items; this dish proves that simple ingredients can create extraordinary flavors. It’s perfect for when you’re trying to stick to a budget but still want something hearty and satisfying.
Quick and Easy
Straightforward steps that even beginners can follow. If you’re someone who usually avoids complex recipes, this one is for you. It’s designed to be foolproof, so you can enjoy cooking without stress.
Customizable
Easy to tweak with different flavors to suit your preferences. For example, if you love bold flavors, add a pinch of cayenne or smoked paprika. Prefer something milder? You can adjust the seasoning to make it kid-friendly.
Crowd-Pleasing
A guaranteed hit with both kids and adults. It’s always a win when a single dish can satisfy everyone at the table. This recipe strikes the perfect balance of flavor and comfort, making it a universal favorite.
Disclosure: This post contains affiliate links.If you click and make a purchase, I may earn a small commission at no extra cost to you.


Ingredients
Here’s the magic of this cheesy garlic butter chicken—it’s made with just a few pantry staples, but the result is so much more than the sum of its parts. Let’s break it down:
Chicken Breasts
The star of the show. Boneless, skinless chicken breasts become melt-in-your-mouth tender as they soak up all those dreamy flavors. Juicy and succulent, they’re the perfect base for the garlic butter sauce.
Garlic
Oh, garlic, you’re the flavor hero in this dish. The aromatic, savory punch from garlic sautéed in butter is what makes this chicken next-level delicious.
Butter
What’s a garlic butter dish without, well, butter? It creates the luxurious, silky sauce that coats the chicken and brings everything together with richness.
Cheese
We’re not skimping here. A good handful of melted cheese (think mozzarella or parmesan) adds a savory, melty texture that takes this dish to the top of comfort food lists.
Herbs
Fresh herbs like parsley or thyme take this dish from “good” to “wow.” They add a pop of color and a refreshing contrast to the richness of the butter and cheese.
Instructions
Let’s dive into the steps to create this flavorful masterpiece:
Preheat Your Pan
Start by heating your pan over medium heat. You want to get it nice and hot so the chicken sears perfectly, creating a golden, crispy crust while staying juicy inside.
Sear the Chicken
Add a bit of oil to the pan, and once it’s shimmering, add your chicken breasts. Let them cook for 5-6 minutes per side until they’re golden brown and cooked through. Don’t rush this step—it’s all about getting that crispy exterior and juicy interior!
Make the Garlic Butter Sauce
While the chicken is cooking, melt butter in a separate pan. Once it’s melted, add in the minced garlic and cook for about 1 minute, or until it’s fragrant (but be careful not to burn it!). Stir in a pinch of salt, pepper, and any other seasoning you like. Add in the fresh herbs for a little extra flavor!
Cheese, Please!
Once the chicken is done, pour the garlic butter sauce over it and top with cheese. Let the cheese melt beautifully, creating that dreamy, gooey finish.
Serve and Enjoy
Serve the chicken warm, garnished with fresh parsley for that extra touch of color and flavor. It’s simple, it’s satisfying, and it’s downright delicious.
How to Serve Cheesy Garlic Butter Chicken
This dish pairs wonderfully with a variety of sides and accompaniments. Here are a few serving suggestions to elevate your meal:
Fresh Salads
Pair it with a crisp green salad dressed with a light vinaigrette for a refreshing contrast to the rich flavors of the chicken.
Crusty Bread
Serve with warm, crusty bread to soak up every last drop of the buttery sauce. Garlic bread or a simple baguette works wonderfully.
Creamy Accompaniments
Add a dollop of sour cream, Greek yogurt, or a creamy dip to complement the dish’s rich flavor profile.
Vegetable Sides
Roasted vegetables like carrots, zucchini, or asparagus are excellent pairings that add color and nutrients to the meal.
Additional Tips
Here are some extra tips to help you get the most out of this recipe:
Prep Ahead
Save time by chopping and measuring ingredients the night before. Store them in airtight containers in the fridge to keep them fresh.
Spice It Up
Experiment with spices like cumin, paprika, or chili flakes to give the dish a unique twist.
Dietary Adjustments
If you’re catering to specific dietary needs, swap ingredients like regular butter for vegan butter or cheese for a plant-based alternative.
Storage Tips
Store leftovers in an airtight container for up to 3 days. Reheat gently in the oven to preserve the texture.
FAQ Section
Q1: Can I substitute chicken breasts with thighs?
A1: Absolutely! Chicken thighs are a great alternative—they’re juicier and have more flavor, so the dish will be even more tender.
Q2: Can I make this dish ahead of time?
A2: Yes, this recipe is great for make-ahead meals. Just prepare it, store it in the fridge, and reheat when you’re ready to serve.
Q3: How do I store leftovers?
A3: Store leftovers in an airtight container in the fridge for up to 3 days. Reheat in the oven or microwave.
Q4: Can I freeze this dish?
A4: Yes! You can freeze it for up to 3 months. Just make sure to store it in a freezer-safe container, and thaw it overnight in the fridge before reheating.
Q5: What’s the best way to reheat this dish?
A5: Reheat in the oven at 350°F for about 15-20 minutes or in the microwave for 1-2 minutes, depending on your microwave’s strength.
Conclusion
This Cheesy Garlic Butter Chicken is one of those dishes that will make your taste buds sing and your kitchen smell like heaven. It’s comforting, indulgent, and oh-so-satisfying, all while being simple to make. Whether you’re feeding your family or impressing friends, this recipe is sure to be a hit. Trust me, you’re going to want to make it again and again. Enjoy!
Print
Cheesy Garlic Butter Chicken – Comfort Food at Its Best!
- Prep Time: 10 minutes
- Cook Time: 15 minutes
- Total Time: 25 minutes
- Yield: 4 servings
- Category: Main Course
- Method: Stovetop
- Cuisine: Asian, Chinese
- Diet: Vegetarian
Description
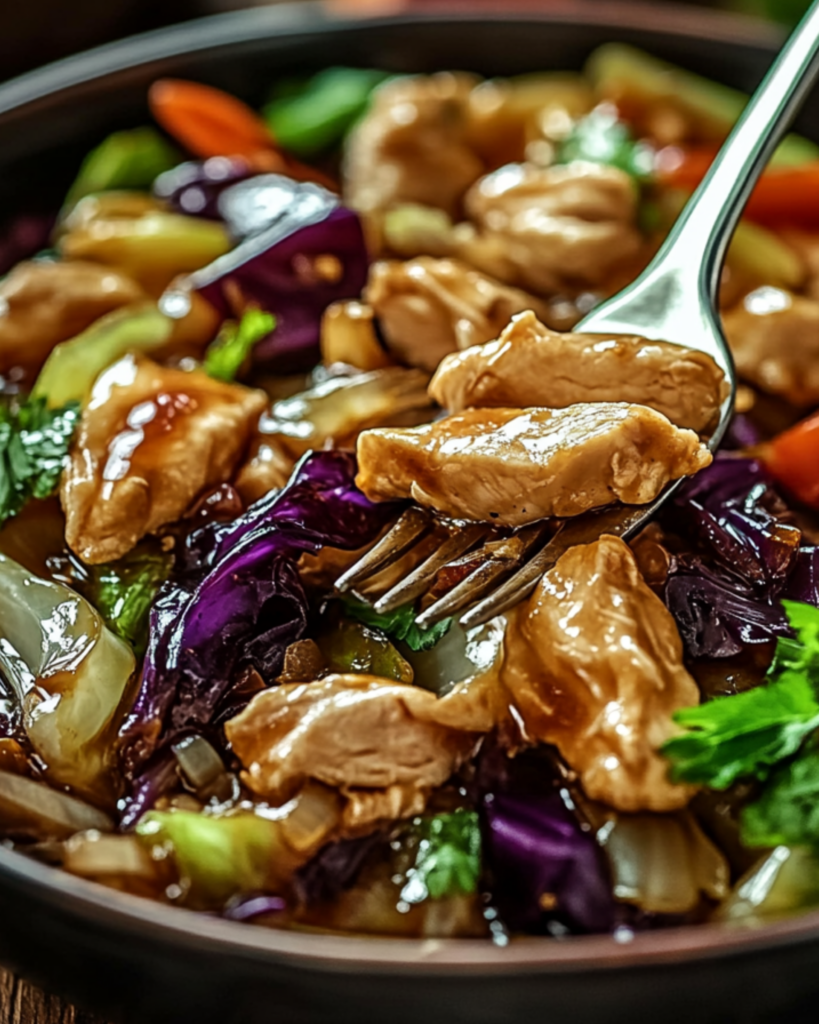
This Chicken and Cabbage Stir-Fry is the perfect weeknight dinner – packed with lean protein, crunchy veggies, and a savory sauce! It’s quick, easy, and full of flavor, making it ideal for a light and healthy meal. Whether served on its own or with rice, this dish is sure to satisfy!
Ingredients
- For the Stir-Fry:
- 1 lb chicken breast, thinly sliced or cubed
- 4 cups cabbage, shredded (green or napa cabbage works well)
- 1 medium carrot, julienned or thinly sliced
- 1/2 onion, thinly sliced
- 2 tablespoons olive oil (or sesame oil for extra flavor)
- 2 cloves garlic, minced
- 1 tablespoon ginger, grated (fresh or jarred)
- 2 tablespoons soy sauce (or tamari for gluten-free)
- 1 tablespoon rice vinegar
- 1 tablespoon sesame oil (for stir-frying)
- 1/2 teaspoon chili flakes (optional for heat)
- 2 teaspoons sesame seeds (optional, for garnish)
- 2 green onions, chopped (for garnish)
Instructions
-
Prepare the Ingredients:
Slice the chicken breast into thin strips or bite-sized cubes for easy cooking.
Shred or chop the cabbage, julienne the carrot, and slice the onion.
Mince the garlic and grate the ginger for extra flavor. -
Cook the Chicken:
Heat 1 tablespoon of sesame oil (or olive oil) in a large pan or wok over medium-high heat.
Add the sliced chicken and cook for about 5-7 minutes or until the chicken is browned and fully cooked through.
Remove the chicken from the pan and set aside. -
Stir-Fry the Vegetables:
In the same pan, add another 1 tablespoon of sesame oil.
Add the onion, carrot, and garlic to the pan. Stir-fry for about 3 minutes until the onion becomes translucent.
Toss in the shredded cabbage and cook for another 3-4 minutes, stirring occasionally, until the cabbage starts to soften but still retains a bit of crunch. -
Combine Everything:
Add the cooked chicken back into the pan with the vegetables.
Pour in the soy sauce, rice vinegar, and chili flakes (if using). Stir everything together to coat evenly and heat through.
Cook for an additional 2-3 minutes, allowing the flavors to meld.
-
Garnish & Serve:
Remove from heat and garnish with sesame seeds and chopped green onions for a fresh, crunchy finish.
Serve hot on its own or with a side of rice (or cauliflower rice for a low-carb option).
Notes
- Spicy Option: If you like it spicy, feel free to increase the chili flakes or drizzle some sriracha sauce.
- Low-Carb Version: Serve with cauliflower rice for a low-carb alternative.
- Storage: Leftovers can be stored in an airtight container in the fridge for up to 3 day
Nutrition
- Serving Size: 1 portion
- Calories: 290
- Sugar: 5g
- Sodium: 600mg
- Fat: 14g
- Saturated Fat: 2g
- Unsaturated Fat: 11g
- Trans Fat: 0g
- Carbohydrates: 13g
- Fiber: 5g
- Protein: 33g
- Cholesterol: 70mg


