

Perfectly Pink Deviled Eggs
Okay, let’s talk about the game-changer that is Perfectly Pink Deviled Eggs! Trust me when I say, these eggs are so much more than just a snack or appetizer. They’re rich, creamy, and a little bit tangy—all the flavors you love in a deviled egg, but with a fun, vibrant twist that’ll make everyone ask, “How did you get them so pink?” It’s as easy as it is fun, and the result is totally Instagram-worthy. Whether you’re prepping for a party or simply craving a little snack, these eggs will steal the spotlight every time. Go ahead, give it a try—this recipe will definitely become one of your go-tos!
Why You’ll Love Perfectly Pink Deviled Eggs
This recipe is all about vibrancy—both in color and flavor. Here’s why these eggs are a total win:
- Versatile: Perfect for almost any occasion! Whether it’s a casual get-together or a special holiday meal, they fit right in. And let’s be real—who doesn’t love the wow factor of deviled eggs at a party?
- Budget-Friendly: Eggs are such an affordable pantry staple. You’ll get a mouthwatering treat without spending a ton! Perfect for those budget-conscious yet flavor-hungry moments.
- Quick and Easy: There’s no need to stress with long, complicated recipes. These deviled eggs come together quickly, and they’re beginner-friendly too!
- Crowd-Pleasing: Kids, adults, and everyone in between loves deviled eggs. The fun pink hue adds a touch of magic, and you’ll see how fast they disappear from the plate. No one can resist!
- Customizable: Want a spicier bite? Add some sriracha! Prefer something milder? Just leave out the heat. You can make this recipe yours in an instant.
Disclosure: This post contains affiliate links.If you click and make a purchase, I may earn a small commission at no extra cost to you.


Ingredients in Perfectly Pink Deviled Eggs
Here’s what you’ll need to create these gorgeous deviled eggs—nothing too fancy, just simple ingredients with a burst of flavor:
- Hard-Boiled Eggs: The base of our dish. Firm whites, creamy yolks—everything you expect in the perfect deviled egg.
- Mayonnaise: Creamy and smooth, this will give the yolk filling that dreamy texture.
- Mustard: Just a dash of mustard adds a bit of tang, making the filling pop with flavor.
- Pickle Juice: That zingy flavor we all love—pickle juice adds a subtle tartness that balances the richness of the filling.
- Beet Juice: Here’s the secret ingredient that brings out that perfectly pink color. Just a few drops of beet juice, and you’ll be amazed at the result.
- Paprika or Cayenne Pepper: A sprinkle on top brings the dish to life with a little bit of smokiness or heat.
(Note: the full ingredient list, including measurements, is provided in the recipe card directly below.)
Instructions
Let’s dive into how to make these beautiful deviled eggs:
1. Boil and Peel Your Eggs
Start by bringing your eggs to a boil. Place them in a pot, cover with cold water, and bring it to a boil over medium-high heat. Once boiling, reduce the heat and let them cook for 10 minutes. After they’re done, transfer them to an ice bath or rinse them under cold water to stop the cooking process. Peel them gently, making sure to preserve the whites!
2. Prepare the Filling
Once your eggs are peeled, slice them in half lengthwise and scoop out the yolks into a bowl. Add your mayonnaise, mustard, and pickle juice to the yolks and mash everything together until it’s smooth and creamy.
3. Add the Pink Touch
Now for the fun part! Add a tiny bit of beet juice to the yolk mixture—just a few drops will do. Mix it until it reaches that beautiful pink hue. You’ll be so amazed at how vibrant it gets!
4. Pipe the Filling
Spoon or pipe the creamy, pink yolk filling back into the egg whites. You can use a piping bag or a simple plastic bag with the tip cut off for that professional-looking swirl.
5. Garnish and Serve
Sprinkle a little paprika or cayenne pepper on top for a pop of color and a bit of heat. Optional: garnish with fresh herbs or a tiny pickle slice for some extra flair.
6. Serve and Enjoy
It’s time to dig in! Whether you’re serving them at a party or indulging in a little snack at home, these deviled eggs are guaranteed to impress
How to Serve Perfectly Pink Deviled Eggs
These deviled eggs are so tasty and beautiful on their own, but they pair wonderfully with:
- Fresh Salads: A simple green salad or something with a tangy vinaigrette will balance the richness of the eggs.
- Crusty Bread: A side of crusty bread is always a welcome pairing with deviled eggs. Think a toasted baguette or some soft dinner rolls.
- Light Soup: A light and brothy soup, like a tomato bisque or chicken noodle, complements the richness of these eggs perfectly.
- As a Snack: Honestly, these eggs are great anytime you’re craving something delicious. Serve them as a light snack or appetizer whenever the mood strikes.
Additional Tips
- Prep Ahead: These eggs are perfect for making ahead of time! You can assemble the yolk mixture and store it separately in the fridge, then pipe it into the whites right before serving.
- Make It Spicy: If you’re a fan of heat, don’t be shy! Add a pinch of cayenne pepper or a few dashes of hot sauce to the yolk filling.
- Storage Tips: Store leftovers in an airtight container in the fridge for up to 3 days. They’re best enjoyed fresh, but they still taste amazing the next day!
- Double the Batch: Trust me, these deviled eggs will disappear quickly. You might want to double the batch, especially if you’re serving a crowd.
FAQ Section
Q1: Can I substitute beet juice with anything else for color? A1: Beet juice is the best for that stunning pink color, but if you don’t have it, you can use a tiny bit of red food coloring as an alternative!
Q2: Can I make these eggs ahead of time? A2: Absolutely! You can boil the eggs and prepare the yolk filling a day ahead. Just pipe the filling into the whites right before serving.
Q3: How do I store leftovers? A3: Store leftovers in an airtight container in the fridge for up to 3 days. Reheat them gently or enjoy them cold!
Q4: Can I freeze these eggs? A4: Unfortunately, deviled eggs don’t freeze well due to the texture of the filling. But they’re so quick to make, you won’t need to freeze them!
Q5: Can I double the recipe? A5: Yes! Simply double the ingredients and follow the same steps. Just make sure you have enough room in the fridge to chill them!
Q6: What’s the best way to reheat these eggs? A6: Deviled eggs are best served chilled, but if you prefer them slightly warmed, microwave them in 10-second intervals. Be careful not to overheat them!
Q7: What side dishes go well with these deviled eggs? A7: Some fantastic sides include fresh veggie trays, smoked salmon, or even a cheese board for a party spread.
Q8: How can I make these eggs healthier? A8: You can swap out some of the mayonnaise for Greek yogurt to lighten the filling. It’s still creamy but with added protein!
Q9: Are these eggs suitable for a gluten-free diet? A9: Yes, these deviled eggs are naturally gluten-free—so they’re perfect for your gluten-sensitive friends!
Conclusion
These Perfectly Pink Deviled Eggs are about to become your new favorite snack or party treat. With just the right balance of creamy, tangy, and a little spice, they’re sure to impress everyone who takes a bite. So go ahead, embrace the fun and flavor—these eggs are ready to take center stage!
Print
Perfectly Pink Deviled Eggs
- Prep Time: 15 minutes (not including pickling time)
- Cook Time: 10 minutes (for simmering beet liquid)
- Total Time: At least 6 hours (including pickling time)
- Yield: 12 deviled eggs (6 servings)
- Category: Appetizer, Side Dish, Party Food
- Method: Pickling, Boiling, Mixing
- Cuisine: American
- Diet: Vegetarian
Description
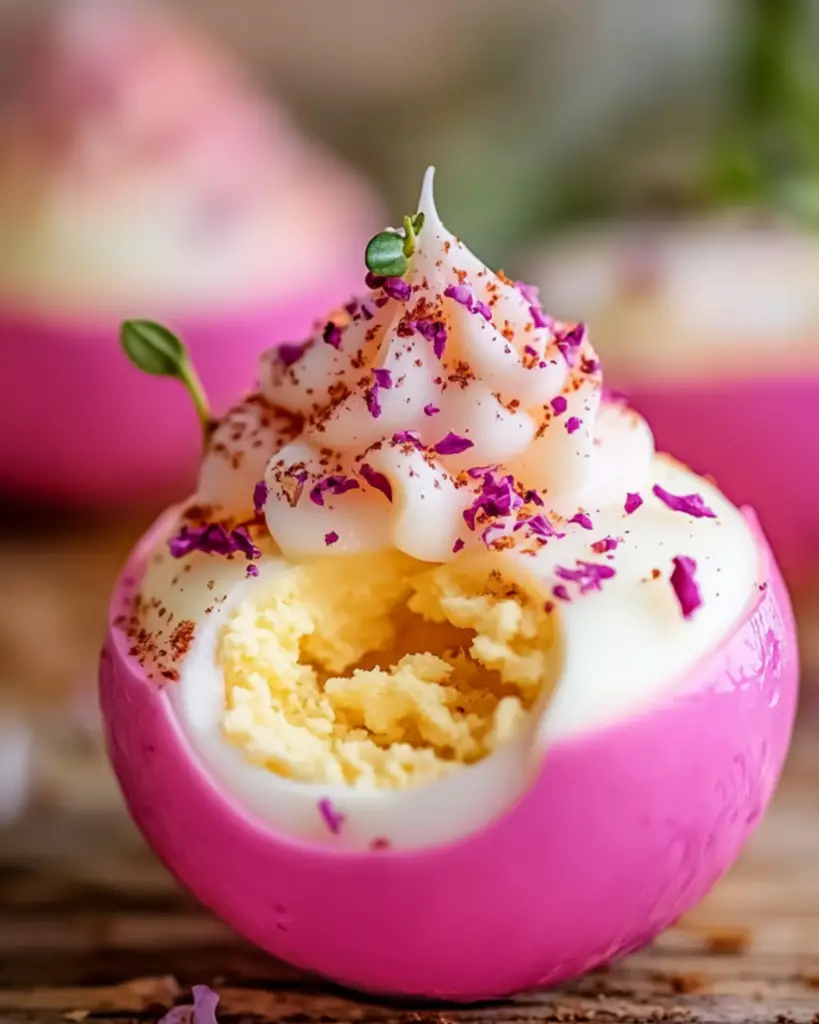
These Perfectly Pink Deviled Eggs are a stunning and delicious twist on the classic deviled egg! The vibrant pink hue comes from a beet-infused pickling process, making them a showstopper for Easter, spring gatherings, or any festive occasion. These creamy, tangy bites will steal the spotlight at your next celebration!
Ingredients
-
For the Pickled Pink Eggs:
- 6 large hard-boiled eggs, peeled
- 1 medium beet, peeled and sliced
- 1 cup water
- 1 cup white vinegar
- 1/2 cup sugar
- 1 tsp salt
For the Deviled Egg Filling:
- 3 tbsp mayonnaise
- 1 tsp Dijon mustard
- 1/2 tsp white vinegar or pickle juice
- 1/4 tsp salt (or to taste)
- 1/8 tsp black pepper
- 1/4 tsp smoked paprika (plus extra for garnish)
- 1 tsp finely chopped chives (optional, for garnish)
Instructions
-
Make the Pickled Pink Eggs:
- In a small pot, combine the sliced beet, water, vinegar, sugar, and salt. Bring to a simmer, stirring to dissolve the sugar.
- Remove from heat and let the mixture cool slightly.
- Pour the beet liquid into a glass jar or bowl and add the peeled hard-boiled eggs.
- Cover and refrigerate for at least 6 hours, or overnight for a deeper pink color.
-
Prepare the Deviled Egg Filling:
- Remove the pickled eggs from the beet liquid and pat them dry.
- Cut the eggs in half lengthwise and carefully scoop out the yolks into a bowl.
- Mash the yolks with a fork, then mix in mayonnaise, mustard, vinegar, salt, pepper, and paprika until smooth.
-
Fill and Garnish:
- Spoon or pipe the yolk mixture back into the pink egg whites.
- Sprinkle with smoked paprika and chopped chives for an elegant touch.
Notes
- The pickling process can be done overnight for a richer pink color.
- Garnish with extra smoked paprika and chives for an added flavor and beautiful presentation.
Nutrition
- Serving Size: 2 deviled eggs
- Calories: 150 kcal
- Sugar: 6g
- Sodium: 300mg
- Fat: 12g
- Saturated Fat: 2g
- Unsaturated Fat: 8g
- Trans Fat: 0g
- Carbohydrates: 8g
- Fiber: 2g
- Protein: 6g
- Cholesterol: 150mg


