

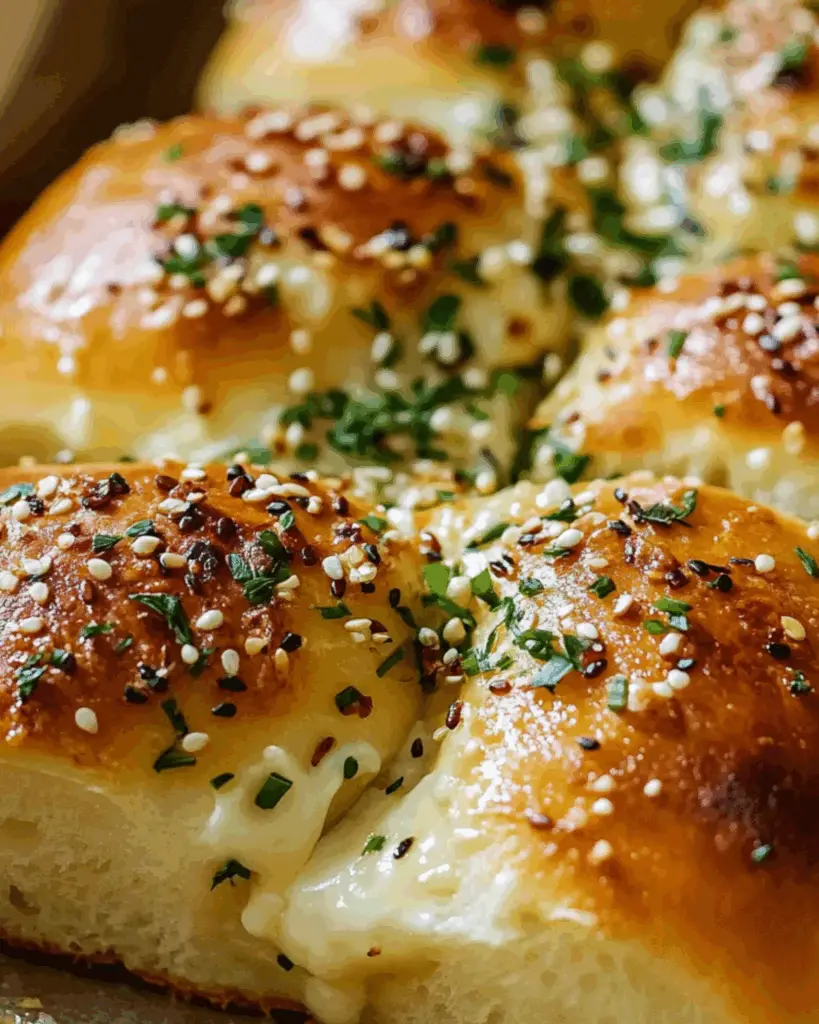
Korean Garlic Cheese Bread
Hey friend, if you haven’t yet discovered the magic of Korean Garlic Cheese Bread, you’re in for a treat! Imagine golden, buttery bread, crispy on the outside, soft and pillowy inside, oozing with molten cheese, and infused with that irresistible garlicky sweetness that makes you want to dive in bite after bite. Trust me, this one’s a total game-changer. Whether you’re craving a cozy snack or a show-stopping side, this recipe brings all the warm, melty, savory goodness you never knew you needed. Ready to get cheesy? Let’s do this!
Why You’ll Love Korean Garlic Cheese Bread
This isn’t just bread — it’s a little moment of joy wrapped in garlic butter and melty cheese, perfect for any occasion. Here’s why it’s a keeper:
Versatile: Whip it up for an indulgent snack, a comforting breakfast, or a side that steals the show at your next get-together.
Budget-Friendly: Made with simple ingredients that you likely already have hanging out in your kitchen. No fancy gadgets or rare spices needed here.
Quick and Easy: Straightforward steps that are perfect for beginners or anyone looking to impress without the fuss.
Customizable: Love extra heat? Add a pinch of chili flakes. Prefer more herbs? Toss in some fresh parsley or oregano.
Crowd-Pleasing: Kids, adults, cheese lovers, garlic fans — everyone will be asking for seconds.
Disclosure: This post contains affiliate links.If you click and make a purchase, I may earn a small commission at no extra cost to you.


Ingredients in Korean Garlic Cheese Bread
Here’s the secret behind this mouthwatering bread:
- Soft, fluffy bread rolls — the perfect canvas for all that garlic and cheese magic
- Creamy mozzarella cheese — gooey and irresistible when melted inside
- Garlic butter sauce — a luscious blend of butter, fresh garlic, and a touch of sweetness
- Parsley and sugar — for that iconic sweet-savory finish that keeps you coming back
(Note: the full ingredients list, including measurements, is provided in the recipe card directly below.)
Instructions
Let’s dive into the steps to create this flavorful masterpiece:
Preheat Your Oven
Start by preheating your oven to 350°F (175°C). A warm oven ensures that bread gets perfectly crispy on the outside while melting all that cheese inside.
Prepare the Garlic Butter Sauce
In a small saucepan, melt butter and gently sauté minced garlic until fragrant. Stir in sugar and a pinch of salt to balance out the flavors.
Slice the Bread Rolls
Carefully slice each bread roll almost all the way through in a crosshatch pattern, creating little pockets for the cheese and garlic butter to seep into.
Stuff the Cheese
Generously stuff the mozzarella cheese into the cuts. Don’t be shy — this is where the melty goodness happens.
Brush with Garlic Butter
Brush the garlic butter sauce all over the bread, making sure to get it deep into the crevices for maximum flavor.
Bake to Perfection
Place the bread on a baking tray and bake for 10-15 minutes or until the bread is golden and the cheese is beautifully melted and bubbly.
Garnish and Serve
Sprinkle with freshly chopped parsley and a light dusting of sugar for that signature sweet-savory finish. Serve warm and prepare to be amazed
How to Serve Korean Garlic Cheese Bread
This bread shines brightest on its own, but here are some ideas to elevate your meal:
- Pair with a fresh green salad tossed in a tangy vinaigrette to balance richness
- Serve alongside a bowl of warm soup for a comforting combo
- Enjoy with a cup of tea or coffee for a cozy afternoon snack
- Add a side of pickled veggies for a refreshing contrast
Additional Tips
- Prep Ahead: Make your garlic butter sauce ahead of time and store it in the fridge. It’ll save time when you’re ready to bake.
- Spice It Up: Add chili flakes or a sprinkle of smoked paprika to the garlic butter for a smoky kick.
- Dietary Adjustments: Swap mozzarella for a vegan cheese alternative if needed.
- Storage Tips: Store leftovers in an airtight container in the fridge and reheat in the oven to bring back that crispiness.
- Double the Batch: This recipe freezes well — perfect for prepping ahead or feeding a crowd.
FAQ Section
Q1: Can I use other types of cheese?
A1: Absolutely! Cheddar or Monterey Jack work well, but mozzarella is best for that gooey stretch.
Q2: Can I make the garlic butter sauce in advance?
A2: Yes, store it in the fridge for up to 3 days and warm it before using.
Q3: What type of bread is best?
A3: Soft, fluffy rolls like brioche or milk bread are ideal for that perfect texture contrast.
Q4: Can I freeze the bread after assembling?
A4: Yes, freeze before baking. Thaw overnight and bake as usual.
Q5: How do I store leftovers?
A5: Keep in an airtight container in the fridge for up to 2 days.
Q6: Can I make this recipe gluten-free?
A6: Yes, use gluten-free bread rolls to make it work.
Q7: How long does it take to bake?
A7: About 10-15 minutes at 350°F (175°C), until cheese is melted and bread is golden.
Q8: Can I add herbs to the garlic butter?
A8: Definitely! Parsley, oregano, or thyme all add great flavor.
Q9: Is this recipe kid-friendly?
A9: Yes, the mild garlic and cheese flavors are usually a hit with kids.
Q10: What’s the best way to reheat the bread?
A10: Warm in the oven at 350°F (175°C) for 5-7 minutes to keep it crispy.
Conclusion
There you have it — your very own Korean Garlic Cheese Bread, a sensational blend of sweet, savory, and gooey goodness that’s bound to become a fast favorite. Whether you’re baking this for a cozy night in, impressing friends, or simply treating yourself to something a little extra special, this recipe delivers all the comfort and flavor you could wish for. Trust me, once you get a whiff of that garlicky butter and pull apart that melty cheese, you’ll be hooked. So go ahead, give it a try — your taste buds will thank you!
Print
Korean Garlic Cheese Bread
- Prep Time: 20 minutes
- Cook Time: 10 minutes
- Total Time: 30 minutes
- Yield: 2 sandwiches 1x
- Category: Lunch
- Method: Frying
- Cuisine: American-inspired
Description
Get ready to savor the ultimate crispy chicken sandwich that’s bursting with bold flavors! Tender chicken cutlets, perfectly seasoned and coated in crunchy panko, are fried to golden perfection. Slathered with a zesty, fresh Green Goddess dressing and topped with a vibrant carrot-cabbage slaw, all nestled inside a buttery brioche bun. This sandwich is juicy, tangy, and irresistibly crunchy — trust me, it’s a flavor-packed delight you’ll crave again and again! #CrispyChicken #GreenGoddessDressing #SandwichGoals
Ingredients
Chicken Cutlets
- 2 thinly sliced chicken cutlets
- All-purpose flour, for dredging
- Sea salt, to taste
- Pepper, to taste
- Panko breadcrumbs, for coating
- 2 eggs, whisked
- Oil, for frying
Green Goddess Dressing
- ¼ cup Sir Kensington Avocado Oil Mayo
- 1 teaspoon Dijon mustard
- ½ lemon, juiced
- ¼ cup fresh basil
- 2 scallions
- Sea salt, to taste
- Pepper, to taste
The Rest
- 3 small carrots, thinly sliced
- Chopped cabbage mix
- 1 tablespoon chopped fresh mint
- 1 scallion, chopped
- Brioche bun(s)
Instructions
Prepare Chicken
- Season chicken cutlets with sea salt and pepper.
- Dredge each cutlet in flour, then dip into whisked eggs, and finally coat evenly with panko breadcrumbs.
- Heat oil in a skillet over medium heat.
- Fry the chicken cutlets until golden brown and cooked through, about 3-4 minutes per side.
- Drain on paper towels to remove excess oil.
Make Green Goddess Dressing
- Blend together mayo, Dijon mustard, lemon juice, fresh basil, scallions, sea salt, and pepper until smooth and vibrant.
Prepare Slaw
- Toss together thinly sliced carrots, chopped cabbage mix, fresh mint, and chopped scallion.
Assemble Sandwich
- Spread a generous layer of Green Goddess dressing onto the cut sides of the brioche buns.
- Layer the crispy chicken cutlet on the bottom bun.
- Top with the fresh carrot-cabbage slaw mixture.
- Place the top bun on and serve immediately for maximum crunch and flavor.
Notes
- For extra flavor, brine your chicken cutlets in a simple Dijon mayo brine overnight before dredging and frying.
- Use a neutral oil with a high smoke point for frying to get that perfect crispy crust.
- The Green Goddess dressing can be made ahead and refrigerated for up to 2 days.
- Feel free to swap the brioche bun for a sturdy ciabatta or sourdough roll.
- Serve with your favorite fries or a crisp pickle on the side for a classic combo.
Nutrition
- Serving Size: 1 sandwich
- Calories: 600
- Sugar: 5g
- Sodium: 700mg
- Fat: 30g
- Saturated Fat: 8g
- Unsaturated Fat: 15g
- Trans Fat: 0g
- Carbohydrates: 50g
- Fiber: 3g
- Protein: 35g
- Cholesterol: 120mg


