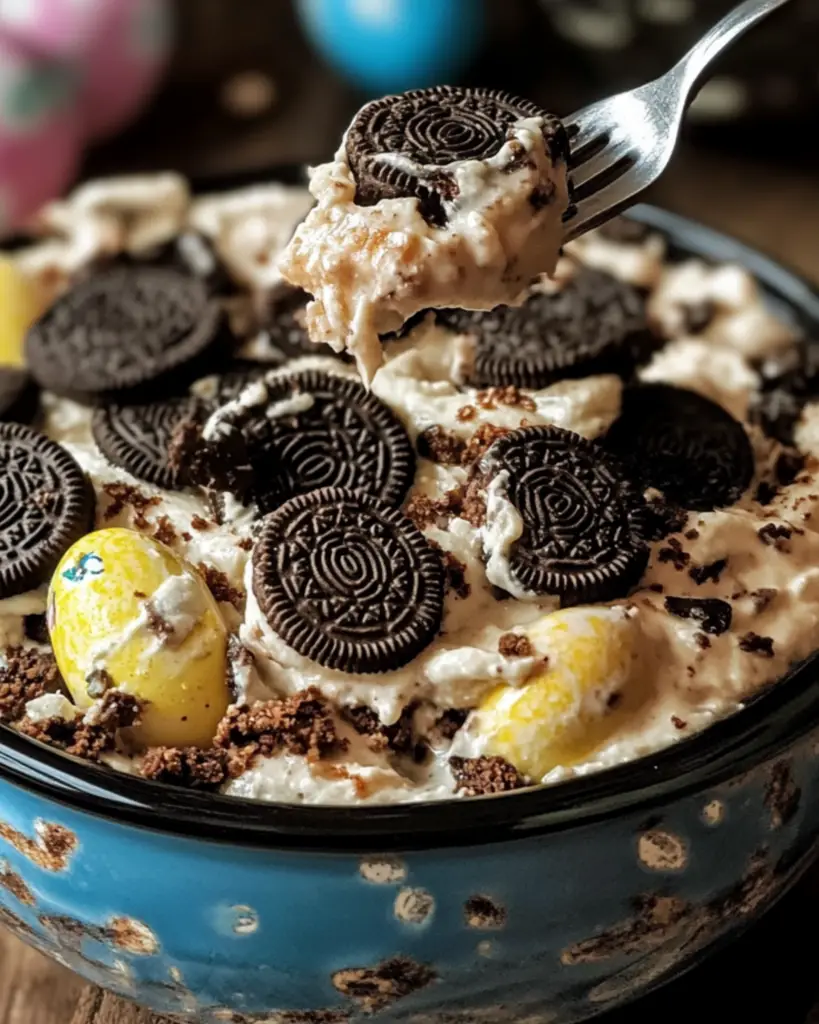
Easter Oreo Cookie Casserole
Alright, let’s talk about dessert, my friend. This Easter Oreo Cookie Casserole is one of those dishes that’s almost too good to be true. Picture this: a rich, creamy filling nestled between layers of Oreo cookies, all baked to perfection with a golden, slightly crispy top. It’s like if cheesecake and Oreos had a love affair—and they did it just in time for Easter. Whether you’re hosting a family gathering, need a fun treat to bring to a party, or simply want to spoil yourself with something indulgent, this casserole is your new go-to. Trust me, this one will have everyone asking for the recipe. Ready to dive into this irresistible, creamy, Oreo-packed creation? Let’s go!
Why You’ll Love Easter Oreo Cookie Casserole
This isn’t just about a dessert; it’s about making memories. Here’s why this Easter Oreo Cookie Casserole is a total showstopper:
Versatile: This dish is perfect for Easter, but don’t be surprised if you make it again for birthdays, barbecues, or any other gathering. It’s just that good! You can even change up the cookies for different holidays or themes.
Budget-Friendly: You don’t need to break the bank for an indulgent dessert. With simple ingredients that you probably already have, you can whip up something that feels extravagant without spending a fortune.
Quick and Easy: The beauty of this casserole is in its simplicity. Even if you’re new to baking, this dish has a handful of ingredients and a super easy process. You’ll feel like a pro in no time.
Customizable: You can tweak the flavors to suit your preferences. Want to add a swirl of peanut butter or a handful of crushed candy bars? Go for it! It’s a flexible recipe that can take on different twists.
Crowd-Pleasing: Let’s be real—Oreos. Creamy layers. Dessert casserole. This is one of those dishes that’s loved by kids and adults alike. It’s the kind of dessert that makes everyone’s eyes light up when it’s served.
Disclosure: This post contains affiliate links.If you click and make a purchase, I may earn a small commission at no extra cost to you.


Ingredients
Let’s talk about what makes this casserole so irresistible. It’s a perfect blend of crunchy, creamy, and sweet all in one!
- Oreos: The stars of the show! Crushed Oreos form the base and add a delicious crunch and chocolatey goodness. They bring the flavor and the texture we crave in every bite.
- Cream Cheese: This creates that creamy, dreamy filling that’s both rich and smooth. The tang of cream cheese is a perfect balance to the sweetness of the cookies.
- Butter: A little melted butter adds richness to the crust and binds everything together, giving it that perfectly golden, crispy texture on top.
- Sugar: Sweetness is key here, so a bit of sugar is added to the filling to balance out the tangy cream cheese and make everything just right.
- Vanilla Extract: A dash of vanilla extract brings an aromatic warmth that complements the flavors in the casserole beautifully.
- Cool Whip: This is what gives the dessert its light, fluffy texture. It adds a creamy airiness that contrasts perfectly with the crunch of the Oreos.
- Milk: A little splash of milk helps bring the creamy filling together and makes it smooth and luscious.
(Note: The full ingredients list, including measurements, is provided in the recipe card directly below.)
Instructions
Now, let’s get into the fun part—making this decadent dessert! Follow these simple steps, and you’ll have a showstopper ready in no time.
Prepare Your Equipment
Preheat your oven to [temperature]. Preheating ensures that everything cooks evenly and that you get that perfect golden top. Don’t skip this step!
Make the Crust
Start by crushing the Oreos into fine crumbs. You can do this by placing them in a ziplock bag and crushing them with a rolling pin or by using a food processor. Once you’ve got those fine crumbs, stir in melted butter. Mix until the butter is fully incorporated, and the crumbs stick together when pressed.
Prepare the Creamy Filling
In a large bowl, beat the cream cheese with sugar until smooth and creamy. Add in the vanilla extract and milk, and continue to mix until the texture is smooth and velvety. Now, fold in the Cool Whip until it’s light and fluffy. This is the creamy magic that’s going to make your casserole extra special.
Layer the Casserole
Now comes the fun part—layering! In a greased baking dish, start by pressing half of the Oreo crust mixture into the bottom. Then, spread the creamy filling on top, smoothing it out evenly. Top the filling with the remaining Oreo crust, pressing it lightly to create an even layer.
Bake to Perfection
Pop the casserole in the preheated oven and bake for [time duration]. You’re looking for a slightly golden, crispy top, and the filling should be set but still creamy.
Finishing Touches
Once it’s done, remove the casserole from the oven and let it cool for about [time]. This step is important so that the flavors can settle and the texture can firm up just right.
Serve and Enjoy
Slice into this irresistible dessert, and get ready to enjoy the perfect balance of creamy, crunchy, and sweet. Serve it chilled for the best experience, and enjoy the smiles that come with each bite
How to Serve Easter Oreo Cookie Casserole
This casserole is a treat all on its own, but here are some fun ways to serve it and enhance your dining experience:
With Whipped Cream: Add an extra dollop of whipped cream for some added indulgence. A little sprinkle of cocoa powder or crushed Oreo crumbs on top never hurts either.
With Ice Cream: A scoop of vanilla or chocolate ice cream on the side would be the ultimate pairing for this dessert. Creamy + creamy = heaven.
As a Sweet Breakfast Treat: Who says dessert is only for after dinner? This casserole makes a fun, sweet breakfast or brunch treat, especially around the holidays!
With Fresh Berries: Serve it with a side of fresh strawberries or raspberries for a light contrast to the richness of the casserole.
Additional Tips
Here are a few extra tips to help you make this dessert even better:
- Prep Ahead: This casserole can be made the night before. Just refrigerate it overnight to let the flavors develop and the texture set.
- Customize the Toppings: Feel free to add your favorite candies or toppings like chocolate chips, marshmallows, or crushed nuts for a personalized twist.
- Storage Tips: Leftovers can be stored in an airtight container in the fridge for up to 3 days. It actually tastes even better the next day as the flavors continue to meld!
- Freeze It: If you want to make this dessert ahead of time, you can freeze it for up to a month. Just let it thaw in the fridge for a few hours before serving.
FAQ Section
Q1: Can I substitute the Cool Whip with whipped cream?
A1: Yes, absolutely! You can use homemade whipped cream or any other whipped topping, but Cool Whip gives it that extra lightness and smoothness.
Q2: Can I make this casserole gluten-free?
A2: Sure! Just use gluten-free Oreos for the crust, and you’re good to go. This makes the dessert accessible for those with dietary restrictions.
Q3: How do I store leftovers?
A3: Store leftovers in an airtight container in the fridge for up to 3 days. It actually keeps its creamy texture really well, so it’s great for snacking later!
Q4: Can I double the recipe?
A4: Yes! Just make sure to use a larger baking dish and adjust the baking time slightly.
Q5: Can I add other mix-ins to the filling?
A5: Absolutely! Feel free to add chocolate chips, peanut butter, or even mini marshmallows to the filling for extra flavor and texture.
Conclusion
This Easter Oreo Cookie Casserole is an indulgent, creamy, and super easy dessert that will steal the spotlight at your next gathering. With just a handful of ingredients, you’ll create something everyone will love. Whether you’re celebrating Easter, a birthday, or just treating yourself, this casserole will be a guaranteed hit. Go ahead, grab your ingredients, and enjoy the delicious magic you’re about to create!
Print
Easter Oreo Cookie Casserole
- Prep Time: 20 minutes
- Cook Time: No baking required
- Total Time: 4 hours 20 minutes (includes chilling time)
- Yield: 12-16 servings
- Category: Dessert, No-Bake, Holiday Recipes
- Method: No-Bake
- Cuisine: American, Holiday
- Diet: Vegetarian
Description
This Easter Oreo Cookie Casserole is a fun and festive dessert that combines layers of crushed Oreos, creamy vanilla pudding, and a fluffy cream cheese mixture. Topped with colorful Easter candies, it’s the perfect sweet treat for your Easter celebration!
Ingredients
- 1 (14.3 ounce) package Oreo cookies, coarsely crushed (reserve some for topping)
- 1 (5.1 ounce) package instant vanilla pudding mix
- 3 cups milk
- 8 ounces cream cheese, softened
- 1 cup powdered sugar
- 1 (8 ounce) container frozen whipped topping, thawed
- Assorted Easter candies (such as jelly beans, Cadbury Mini Eggs, and pastel M&M’s)
Instructions
-
Prepare the Pudding:
In a large bowl, whisk together the instant vanilla pudding mix and milk. Let stand for 5 minutes to thicken. -
Make the Cream Cheese Mixture:
In a separate bowl, beat the softened cream cheese until smooth. Gradually add the powdered sugar and beat until well combined. -
Combine Pudding and Cream Cheese:
Gently fold the cream cheese mixture into the vanilla pudding until well combined. -
Fold in Whipped Topping:
Gently fold in the thawed whipped topping until the mixture is light and fluffy. -
Layer the Casserole:
In a 9×13 inch baking dish, spread a layer of crushed Oreo cookies. -
Add Filling and Toppings:
Pour half of the pudding mixture over the Oreo cookies. Sprinkle with some of the Easter candies. Repeat the layers with the remaining Oreo cookies, pudding mixture, and Easter candies. -
Chill to Perfection:
Cover and refrigerate for at least 4 hours, or preferably overnight, to allow the flavors to meld and the casserole to set.
-
Garnish and Serve:
Before serving, garnish with additional crushed Oreo cookies and Easter candies, if desired. Serve chilled and enjoy this festive Easter Oreo Cookie Casserole!
Notes
- For best results, refrigerate the casserole overnight for a firmer set and richer flavor.
- Feel free to get creative with your choice of Easter candies; mini chocolate eggs, pastel M&M’s, or jelly beans work beautifully.
- You can make this dessert ahead of time, making it perfect for holiday entertaining.
Nutrition
- Serving Size: 1 serving (1/12 of the recipe)
- Calories: 320
- Sugar: 35g
- Sodium: 220mg
- Fat: 18g
- Saturated Fat: 7g
- Unsaturated Fat: 8g
- Trans Fat: 0g
- Carbohydrates: 38g
- Fiber: 1g
- Protein: 3g
- Cholesterol: 30mg