

Cheesy Chile Crave Loaf with Buttery Garlic Bliss
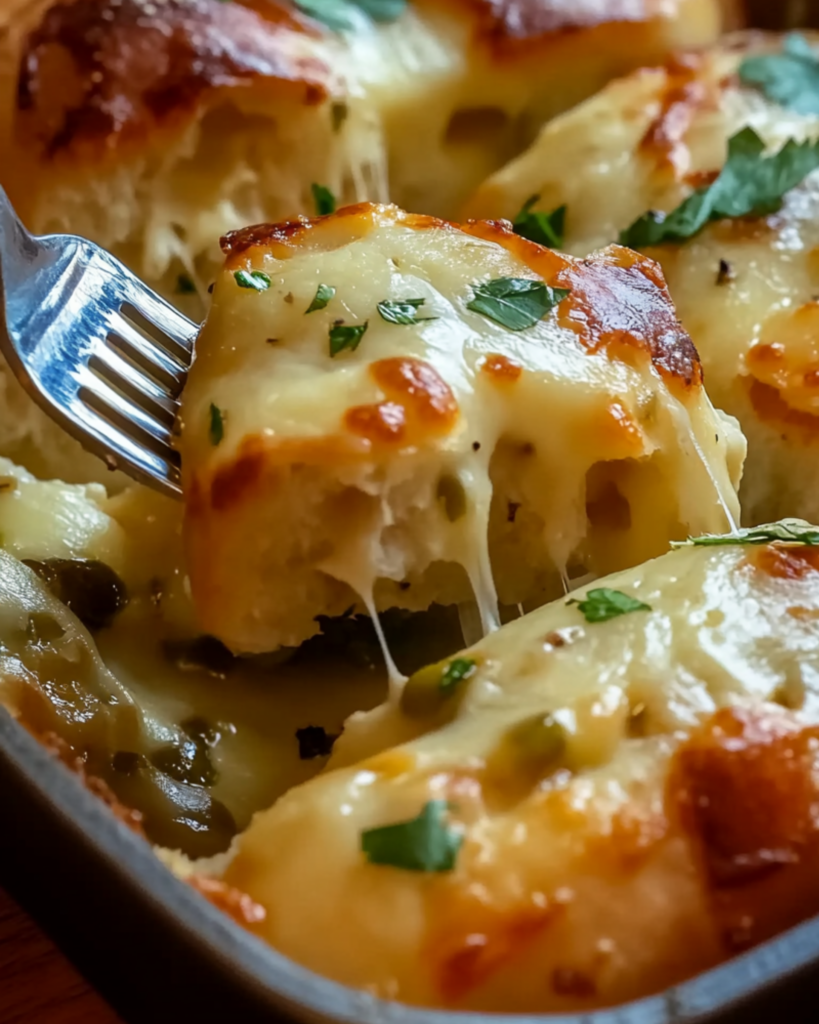
Okay, I have to say it—this one is dangerously good. We’re talking soft, golden pull-apart bread, each fluffy piece soaked in rich garlic butter, stuffed with gooey cheese, and studded with the warm, smoky heat of green chiles. It’s like garlic bread and queso had a delicious baby, and let me tell you—Cheesy Chile Crave Loaf is going to be your new obsession.
This isn’t just bread, it’s an experience. You pull off a piece and it’s steamy, melty, garlicky perfection. It’s the kind of snack that disappears minutes after it hits the table, with everyone shamelessly going back for more (yourself included). Whether you’re serving it up with chili, soup, or as the main attraction at a cozy gathering, this one’s a total game-changer. Trust me—one bite and you’ll be hooked.
Why You’ll Love Cheesy Chile Crave Loaf
This recipe isn’t just about the ingredients—it’s about creating moments. Whether you’re cooking for a casual family dinner, hosting a get-together with friends, or simply indulging in some comforting flavors for yourself, this dish is versatile enough to fit the occasion. Here’s why it’s a favorite:
Versatile: Perfect for busy weeknights or as a standout dish at gatherings. Imagine setting this in the middle of the table and watching it vanish within minutes.
Budget-Friendly: Uses ingredients you likely already have in your kitchen. No fancy bakery runs needed—just pantry staples and a little cheese magic.
Quick and Easy: Straightforward steps that even beginners can follow. No complicated kneading or proofing involved—just layer, drizzle, bake, and devour.
Customizable: Easy to tweak with different flavors to suit your preferences. Swap in pepper jack for extra heat or try sun-dried tomatoes for a twist.
Crowd-Pleasing: A guaranteed hit with both kids and adults. There’s just something about gooey cheese and buttery bread that no one can resist.
Disclosure: This post contains affiliate links.If you click and make a purchase, I may earn a small commission at no extra cost to you.


Ingredients
Here’s the magic of this loaf—it’s made with familiar, feel-good ingredients that come together to create something unforgettable.
Store-Bought Biscuit Dough
Your shortcut to fluffy, golden layers without the fuss. It puffs up beautifully and holds all the goodness inside.
Shredded Cheese
The ooey-gooey hero of this loaf. Use cheddar, Monterey Jack, mozzarella—or a combo for extra cheesy goodness.
Diced Green Chiles
Mild, smoky, and just a little spicy, these bring serious flavor and Southwestern flair to every bite.
Butter
Melted and infused with garlic, it coats every layer in rich, savory flavor.
Fresh Garlic
The real deal. Minced garlic gets melted into the butter, turning it into liquid gold.
Fresh Parsley
Sprinkled on top for a burst of color and freshness. Optional, but highly recommended for that finishing touch.
Salt & Pepper
To round out the flavors and keep everything balanced.
(Note: the full ingredients list, including measurements, is provided in the recipe card directly below.)
Instructions
Let’s dive into the steps to create this flavorful masterpiece:
Preheat Your Equipment
Preheat your oven to 350°F. A properly heated oven is key to getting that perfectly golden top and melty middle.
Combine Ingredients
In a bowl, mix the shredded cheese, diced green chiles, and a pinch of salt and pepper. Melt your butter in a separate dish and stir in the minced garlic.
Prepare Your Cooking Vessel
Grease a loaf pan or bundt pan with butter or nonstick spray. This prevents sticking and makes cleanup a breeze.
Assemble the Dish
Cut the biscuit dough into quarters. Dip each piece in the garlic butter, then toss in the cheese-chile mix. Layer the coated pieces in the pan, pressing lightly so they stick together but aren’t packed too tightly. Pour any remaining butter and cheese mixture on top.
Cook to Perfection
Bake for 30–35 minutes or until the top is golden brown and the center is cooked through. If it’s browning too quickly, cover loosely with foil halfway through.
Finishing Touches
Remove from the oven and let cool for 5–10 minutes in the pan. Sprinkle with fresh parsley before serving.
Serve and Enjoy
Serve warm and watch it disappear! Whether you’re pulling apart pieces for dipping or slicing it like a loaf, every bite is buttery, cheesy heaven.
How to Serve Cheesy Chile Crave Loaf
This dish pairs wonderfully with all sorts of meals or can absolutely stand on its own. Here are a few serving ideas to make it shine:
With Chili or Soup: Dunk it into a hearty bowl of chili, tomato soup, or tortilla soup for the ultimate comfort combo.
As a Party Appetizer: Place the loaf in the center of your spread and let guests pull apart gooey, savory bites.
With a Salad: Serve alongside a fresh, crisp salad to balance the richness of the bread.
With Dips: Ranch, queso, marinara—this bread loves a good dip.
As a Standalone Snack: Honestly, it doesn’t need anything. Just pull, eat, repeat.
Additional Tips
Here are some extra tips to help you get the most out of this recipe:
Prep Ahead: Assemble the loaf in the pan and refrigerate up to 4 hours before baking. Great for planning ahead.
Spice It Up: Add jalapeños, chili flakes, or a pinch of cayenne if you like things spicy.
Dietary Adjustments: Use vegan cheese and plant-based butter to make it dairy-free.
Storage Tips: Store leftovers in an airtight container at room temp for 1–2 days, or refrigerate for up to 4 days. Reheat in the oven for best texture.
Double the Batch: Feeding a crowd? Make two loaves—trust me, it will go fast.
FAQ Section
Q1: Can I use homemade dough instead of biscuit dough?
A1: Absolutely! Just make sure it’s a soft, enriched dough that bakes up fluffy.
Q2: Can I make this ahead of time?
A2: Yes! You can assemble it a few hours ahead and refrigerate until ready to bake.
Q3: How do I store leftovers?
A3: Keep in an airtight container in the fridge. Reheat in the oven for best results.
Q4: Can I freeze this loaf?
A4: You can freeze it after baking. Just wrap tightly and reheat at 300°F until warmed through.
Q5: What other cheeses work well in this recipe?
A5: Pepper Jack, mozzarella, provolone, or a Mexican blend are all amazing options.
Q6: Can I add cooked bacon or sausage?
A6: Yes, and you should. Crumbled bacon or breakfast sausage makes it extra hearty and flavorful.
Q7: Is this recipe vegetarian?
A7: Yep—just check your biscuit dough and cheese to make sure they’re vegetarian-friendly.
Q8: What side dishes go well with this recipe?
A8: Try it with chili, creamy dips, salad, or even scrambled eggs for brunch vibes.
Q9: How can I make this dish healthier?
A9: Use reduced-fat cheese, light butter, and whole wheat dough if you’d like a lighter version.
Q10: What’s the best pan to use?
A10: A loaf pan or bundt pan works best. A bundt pan gives a fun shape and even baking.
Conclusion
And there it is—Cheesy Chile Crave Loaf with Buttery Garlic Bliss. It’s melty, pull-apart perfection with just the right kick of heat and a whole lotta flavor. Serve it at your next gathering, make it for a cozy night in, or honestly, just bake it to treat yourself. One thing’s for sure: once you try it, plain garlic bread just won’t cut it anymore.
Print
Cheesy Chile Crave Loaf with Buttery Garlic Bliss
- Prep Time: 10 minutes
- Cook Time: 30 minutes
- Total Time: 40 minutes
- Yield: 8 servings
- Category: Appetizer, Side Dish
- Method: Baking
- Cuisine: American, Southwestern
- Diet: Vegetarian
Description
These Green Chile Cheese with Garlic Butter Pull Apart Loaves are the ultimate savory, cheesy comfort food! Loaded with gooey cheddar, Colby Jack, and roasted green chiles, this easy pull-apart bread is perfect as a side dish, appetizer, or party snack
Ingredients
16 jumbo refrigerated biscuits, cut into pieces
1½ cups shredded cheddar cheese
1½ cups shredded Colby Monterey Jack cheese
1 (4 oz) can diced green chiles, drained
2 tablespoons melted butter (for greasing)
Optional: 2 tablespoons garlic butter (for drizzling)
Instructions
Preheat oven to 350°F (175°C).
Cut each biscuit into smaller bite-sized pieces and place in a large mixing bowl.
Add cheddar cheese, Colby Jack cheese, and drained green chiles to the bowl. Toss everything together until evenly coated.
Grease a 9×13-inch baking dish with melted butter.
Evenly spread the biscuit mixture into the baking dish.
Bake for 25–30 minutes, or until biscuits are puffed and golden brown.
Let stand for 10 minutes before serving. Optionally drizzle with garlic butter before serving hot.
Notes
Add a sprinkle of chopped green onions or crispy bacon for extra flavor. You can substitute Pepper Jack for added spice. Best served warm, straight from the oven.
Nutrition
- Serving Size: 1/8 of recipe
- Calories: 340
- Sugar: 4g
- Sodium: 810mg
- Fat: 20g
- Saturated Fat: 10g
- Unsaturated Fat: 8g
- Trans Fat: 0g
- Carbohydrates: 30g
- Fiber: 1g
- Protein: 10g
- Cholesterol: 35mg


