

Butterfinger Balls Recipe: The Sweet Treat You’ll Crave Again and Again
Let me tell you, if you’re looking for a sweet snack that’s a total game-changer, these Butterfinger Balls are exactly what you need. Imagine the perfect balance of smooth peanut butter and crunchy Butterfinger bars, all wrapped up in a silky chocolate coating—sounds dreamy, right? These little bites of bliss are incredibly easy to make, and trust me, they’re going to disappear faster than you can say “yum.” Whether you’re making them for a party, a family gathering, or just because you deserve something delicious, these treats will quickly become your new favorite. Seriously, once you try them, you’ll be hooked! Ready to dive in? Let’s go!
Why You’ll Love Butterfinger Balls
If you’re a fan of those irresistible Butterfinger bars, then brace yourself because this recipe is about to rock your world. These little bites of sweet, crunchy, peanut-buttery goodness are just the kind of treat that’ll make your taste buds dance. Trust me, you’re going to love these Butterfinger Balls—they’re fun to make, easy to devour, and perfect for any occasion!
Here’s why you’ll be coming back for more:
- Versatile: Whether you’re hosting a party, celebrating a special occasion, or just craving something sweet, these Butterfinger Balls fit the bill. They’re a crowd-pleaser that everyone will enjoy, from kids to adults. Imagine their faces when they take that first bite!
- Budget-Friendly: No need to break the bank—these goodies use simple, everyday ingredients that you probably already have in your pantry. Who doesn’t love a delicious treat without the expensive shopping list?
- Quick and Easy: The best part? You don’t need any special skills or fancy equipment to make them. With just a few simple steps, you’ll have a batch of these crunchy, creamy balls ready in no time.
- Customizable: Feel free to get creative! Add a sprinkle of sea salt for a sweet-salty twist, or drizzle them with a little extra chocolate. These Butterfinger Balls are totally open to your personal touch.
- Crowd-Pleasing: No matter who you’re serving, they’re guaranteed to impress. It’s the kind of recipe that disappears fast—and everyone will be asking for seconds.
Disclosure: This post contains affiliate links.If you click and make a purchase, I may earn a small commission at no extra cost to you.


Ingredients for Butterfinger Balls
Here’s everything you need to whip up these irresistible treats. Don’t worry, the ingredients are simple, but the result? Pure magic.
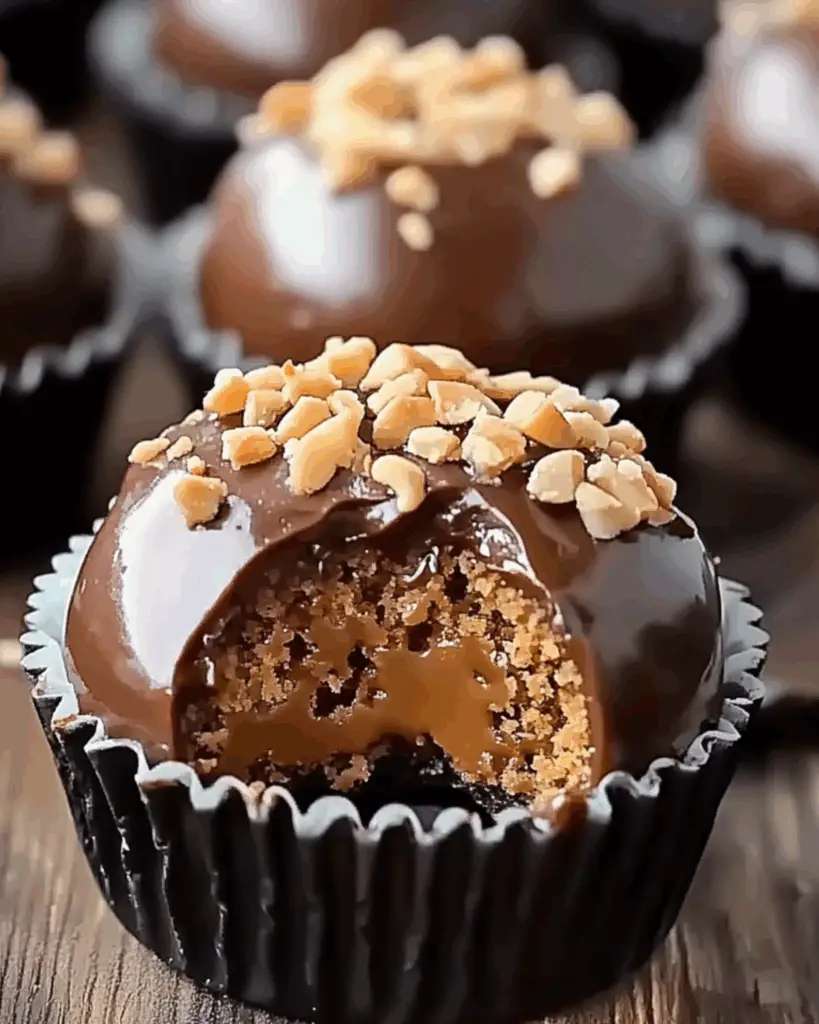
- Butterfinger Bars: The heart and soul of these treats! Their crunchy, peanut buttery flavor is what makes them a true indulgence.
- Creamy Peanut Butter: This adds the smoothness and extra peanut buttery flavor that makes each bite melt in your mouth.
- Powdered Sugar: To bring everything together and add that perfect sweetness.
- Chocolate Chips: These will be melted and used for the delicious coating that takes these treats to the next level.
(Note: The full ingredients list, including measurements, is provided in the recipe card directly below.)
Instructions for Making Butterfinger Balls
Now, let’s dive into the steps to create this sweet, crunchy masterpiece. I promise, they’re as easy to make as they are to eat!
1. Prep Your Workspace
First, clear some space on your counter and line a baking sheet with parchment paper. You’ll want this ready to go before you start shaping the balls.
2. Crush the Butterfingers
Take those Butterfinger bars and chop them up into small, bite-sized pieces. You can even put them in a plastic bag and smash them with a rolling pin if you’re feeling a little stress relief moment. It’s all about getting that signature crunchy texture!
3. Mix It Up
In a large bowl, combine the crushed Butterfingers, peanut butter, and powdered sugar. Stir until everything is nicely combined and forms a sticky dough. Don’t worry if it seems a little thick—it’ll all come together beautifully.
4. Roll into Balls
Now comes the fun part: roll the mixture into small balls using your hands. Aim for about the size of a golf ball, but feel free to adjust according to your preferences. Place them on the prepared baking sheet.
5. Chill to Firm Up
Pop the baking sheet into the fridge and let the balls chill for about 30 minutes. This helps them firm up so they’re easy to dip in chocolate.
6. Dip in Chocolate
While the balls are chilling, melt your chocolate chips in a microwave-safe bowl, stirring every 30 seconds until smooth. Once the Butterfinger balls are firm, dip each one into the melted chocolate, making sure it’s fully coated. Place them back on the baking sheet and let the chocolate set.
7. Let the Chocolate Harden
Once the chocolate coating has hardened (this usually takes about 30 minutes in the fridge), you’re ready to dig in!
How to Serve Butterfinger Balls
These Butterfinger Balls are perfect for any occasion! Here are a few ways to serve them:
- On Their Own: Sometimes, the best way to enjoy these is simply by themselves. They’re that good!
- As Party Favors: Package them in cute little bags for a sweet party favor. Trust me, your guests will rave about them.
- With a Glass of Milk: Because, let’s be real—everything is better with milk. Enjoy these with a nice cold glass for that nostalgic treat vibe.
- Gift-Worthy: If you’re feeling generous, make a batch and give them to friends and family. They’re perfect for homemade gifts that will surely impress.
Additional Tips
Here are some fun tips to make these Butterfinger Balls even better:
- Make Them Ahead: These can be made a day in advance! Just store them in an airtight container in the fridge.
- Add a Crunch: Want a bit more crunch? Add chopped peanuts to the mix for an extra layer of texture.
- Storage Tips: Store any leftovers (if there are any!) in the fridge for up to a week. They also freeze beautifully—just make sure they’re in an airtight container.
- Double the Recipe: This recipe is so easy, you’ll want to make a double batch. They’re the perfect treat to keep on hand when cravings hit.
FAQ Section
Q1: Can I substitute peanut butter with something else?
A1: You could try using almond butter or sunbutter if you have nut allergies, though the flavor will be slightly different. It’s all about experimenting!
Q2: Can I make these balls ahead of time?
A2: Absolutely! These are great to make ahead and store in the fridge for a day or two. Perfect for a stress-free dessert.
Q3: How do I store leftovers?
A3: Keep any leftovers in an airtight container in the fridge for up to a week. If you freeze them, they’ll last even longer!
Q4: Can I freeze Butterfinger Balls?
A4: Yes, they freeze wonderfully. Just store them in a freezer-safe container, and they’ll last up to 3 months. Thaw them in the fridge before enjoying.
Q5: How can I make these healthier?
A5: You could swap out the regular chocolate for dark chocolate, or use natural peanut butter to reduce the sugar content. The good news is, even with those changes, they’ll still be delicious!
Q6: How do I make sure the chocolate coating is smooth?
A6: Melt the chocolate in short intervals, stirring in between. This way, you’ll avoid overheating it and get that silky smooth texture you want.
Q7: Can I make a larger batch?
A7: Definitely! Just be sure to use a larger baking sheet and adjust the chill time if needed. No one will complain about more of these treats!
Conclusion
And there you have it—the perfect, melt-in-your-mouth Butterfinger Balls! These little bites of heaven are sure to become your go-to treat for everything from casual snacking to special occasions. I promise, once you try them, you’ll be hooked!
Print
Butterfinger Balls Recipe: The Sweet Treat You’ll Crave Again and Again
- Prep Time: 20 minutes
- Cook Time: 0 minutes
- Total Time: 50 minutes
- Yield: 24 balls
- Category: Dessert, Candy
- Method: No-bake
- Cuisine: American
Description
Delicious Butterfinger Balls made with crushed Butterfinger candy, peanut butter, and a smooth chocolate coating—perfect for a sweet treat or gift.
Ingredients
- 2 cups crushed Butterfinger candy bars
- 1 cup creamy peanut butter
- 1/2 cup unsalted butter, softened
- 2 cups powdered sugar
- 2 cups semi-sweet chocolate chips
- 1 tbsp vegetable oil or coconut oil (for melting chocolate)
Instructions
- In a large bowl, mix crushed Butterfinger candy bars, peanut butter, softened butter, and powdered sugar until a smooth, cohesive dough forms.
- Using your hands or a small cookie scoop, roll the mixture into 1-inch balls. Place them on a parchment-lined baking sheet and refrigerate for at least 30 minutes.
- In a microwave-safe bowl, melt the chocolate chips and oil in 30-second intervals, stirring between each, until smooth and glossy.
- Using a fork or dipping tool, dip each chilled ball into the melted chocolate, coating completely. Allow excess chocolate to drip off, then place the coated ball back on the parchment-lined sheet.
- Let the chocolate set at room temperature or refrigerate until firm. Serve chilled or at room temperature.
Notes
- Garnish with crushed Butterfinger pieces or a drizzle of melted peanut butter for extra flair.
- Store in an airtight container in the refrigerator for up to 1 week.
Nutrition
- Serving Size: 1 ball
- Calories: 180
- Sugar: 18 g
- Sodium: 50 mg
- Fat: 10 g
- Saturated Fat: 3 g
- Unsaturated Fat: 7 g
- Trans Fat: 0 g
- Carbohydrates: 22 g
- Fiber: 1 g
- Protein: 3 g
- Cholesterol: 10 mg


