

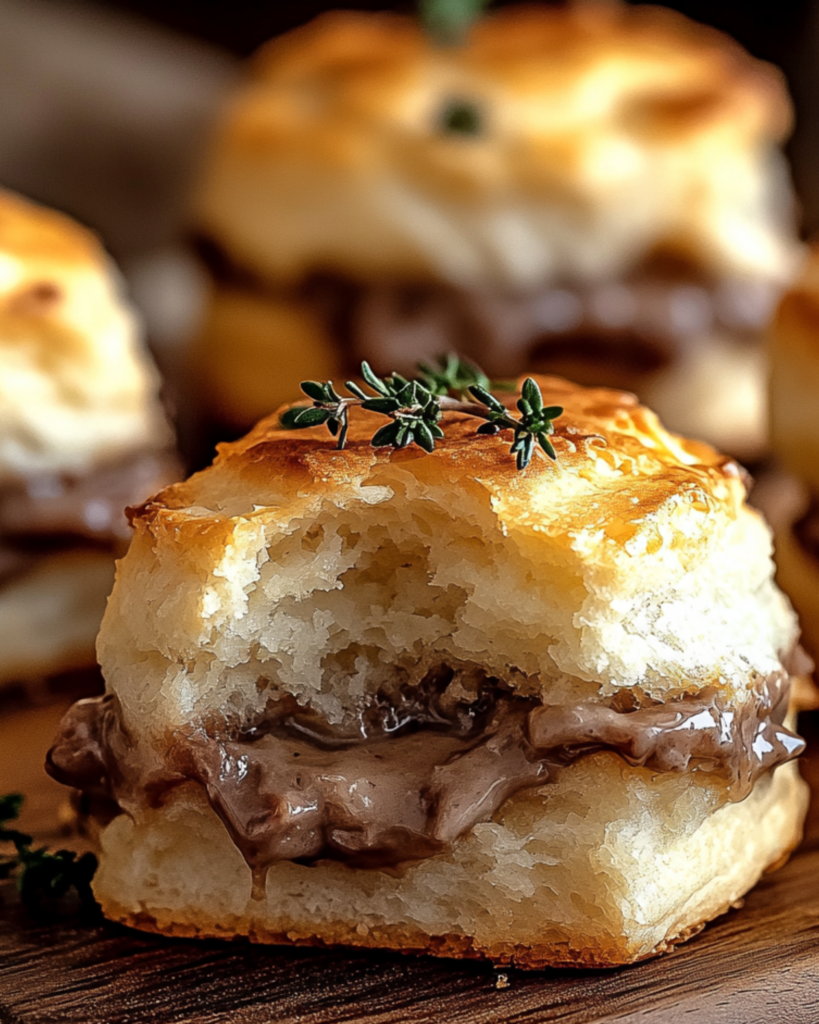
Baked French Dip Biscuits
If you love the hearty, mouthwatering flavors of a French dip sandwich, but wish it came in a cozy, biscuit form, then my Baked French Dip Biscuits recipe is here to make your dreams come true. Picture this: buttery, flaky biscuits stuffed with tender, savory beef, and topped with melted cheese, all baked to golden perfection. And don’t even get me started on that au jus dipping sauce—it’s absolutely to die for! Trust me, you’re going to love this one. It’s the perfect mix of comforting and indulgent, with just the right amount of crispy and cheesy goodness to satisfy all your cravings.
Why You’ll Love Baked French Dip Biscuits
This recipe isn’t just about filling your belly—it’s about making memories. Whether you’re feeding a hungry family on a busy weeknight or impressing friends at a casual dinner party, these Baked French Dip Biscuits are the perfect combination of flavor and fun. Here’s why this dish will quickly become a favorite:
Versatile: Whether it’s a weeknight dinner or an impromptu get-together, these biscuits can be the star of any occasion. Imagine cozying up with a warm biscuit after a long day, or serving these beauties at a casual party where they’ll disappear in no time.
Budget-Friendly: Made with simple ingredients you likely already have in your kitchen, this recipe proves that comfort food doesn’t have to break the bank. You’ll create something totally crave-worthy without spending a fortune.
Quick and Easy: This recipe is as easy as it is delicious. Even if you’re a beginner in the kitchen, I promise you’ll feel like a pro. The steps are straightforward, and the result is a big win.
Customizable: Love a little extra kick? Throw in some hot sauce or cayenne pepper to spice things up. Or keep it mild for the kiddos—either way, these biscuits will hit the spot.
Crowd-Pleasing: Kids, adults, and even picky eaters will be begging for seconds. These Baked French Dip Biscuits strike the perfect balance of savory, cheesy, and oh-so-comforting, making them a universal favorite.
Disclosure: This post contains affiliate links.If you click and make a purchase, I may earn a small commission at no extra cost to you.


Ingredients
Here’s where the magic happens—simple ingredients that come together to create something amazing:
Beef (Roast or Steak): Tender, juicy beef is the star of this recipe. As it bakes inside those warm, flaky biscuits, it absorbs all the rich flavors, making every bite a delight.
Biscuits: Buttery, soft, and flaky, these biscuits are the perfect vessel for all that savory beef and melted cheese. You can use store-bought or homemade biscuits—either way, they’ll provide the perfect crispy exterior.
Swiss Cheese: Melty, gooey Swiss cheese adds just the right creamy, salty flavor to every bite. It melts beautifully over the beef and biscuits, creating the most satisfying gooey goodness.
Au Jus Sauce: Oh, this sauce is what takes everything to the next level. It’s savory, tangy, and perfect for dipping those tender, beef-filled biscuits into. You’ll be dunking and savoring every bite.
(Note: The full ingredient list, including measurements, is provided in the recipe card directly below.)
Instructions
Let’s dive into the steps to create these mouthwatering Baked French Dip Biscuits!
Preheat Your Oven
Start by preheating your oven to 375°F (190°C). This ensures the biscuits bake evenly and turn golden brown and crispy on the outside while staying soft and delicious on the inside.
Prepare the Beef
In a skillet, cook your beef until it’s browned and tender. If you’re using roast beef, just slice it thinly; if it’s steak, cut it into bite-sized pieces. Make sure it’s nice and juicy! If you like, you can season it with a bit of salt, pepper, and garlic powder for an extra flavor boost.
Assemble the Biscuits
Cut your biscuits in half and layer the bottom half with the cooked beef. Top it with a generous amount of Swiss cheese. Place the top half of the biscuit over the cheese and beef. If you like, you can drizzle a little melted butter over the tops of the biscuits to help them brown beautifully.
Bake to Perfection
Place the assembled biscuits on a baking sheet and pop them in the oven. Bake for about 15-20 minutes, or until the biscuits are golden brown and the cheese has melted to perfection.
Prepare the Au Jus
While the biscuits are baking, make your au jus dipping sauce. Simply heat up some beef broth with a splash of Worcestershire sauce and a dash of garlic powder. Let it simmer until it’s hot and flavorful.
Serve and Enjoy
Once the biscuits are baked and the cheese is perfectly melted, remove them from the oven. Serve them warm with a side of that delicious au jus sauce for dipping. Enjoy!
How to Serve Baked French Dip Biscuits
These biscuits are fantastic on their own, but here are a few ways to make your meal even more complete:
Fresh Salads: A light, refreshing green salad is a perfect contrast to the rich, savory biscuits. Toss with a simple vinaigrette for added freshness.
Crusty Bread: Serve with some extra bread to soak up all that delicious au jus sauce. You can’t have enough of that dipping goodness!
Roasted Vegetables: Roasted carrots, green beans, or potatoes make a perfect side to balance the richness of the biscuits.
Simple Fries: Let’s be real—crispy, golden fries never hurt anyone. Serve with a side of ketchup for a satisfying finish to your meal.
Additional Tips
- Prep Ahead: To save time, you can prepare the beef and au jus ahead of time, then just assemble and bake the biscuits when you’re ready to eat.
- Customize the Cheese: Try different cheeses like provolone, cheddar, or even pepper jack for a different twist.
- Dietary Adjustments: To make it dairy-free, swap out the cheese for a dairy-free version, and use a plant-based biscuit.
- Storage Tips: Store leftovers in an airtight container for up to 2-3 days. Reheat in the oven to keep the biscuits crispy.
FAQ Section
Q1: Can I substitute the beef with chicken?
A1: Absolutely! Chicken works wonderfully in this recipe. Just make sure it’s cooked through and seasoned well.
Q2: Can I make this recipe ahead of time?
A2: Yes, you can prep the beef, biscuits, and sauce ahead of time, then just assemble and bake when you’re ready to eat.
Q3: How do I store leftovers?
A3: Store leftovers in an airtight container in the refrigerator for up to 2-3 days. Reheat in the oven for the best results.
Q4: Can I freeze these biscuits?
A4: Yes, these biscuits freeze beautifully! Just bake, cool, and wrap them tightly in foil or plastic wrap before freezing.
Q5: What’s the best way to reheat these biscuits?
A5: Reheat in the oven at 350°F for about 10-15 minutes until warmed through.
Q6: Can I double the recipe?
A6: Yes! Simply adjust the baking time slightly, and make sure your baking sheet is large enough for all the biscuits.
Q7: Can I use store-bought biscuits?
A7: Of course! Store-bought biscuits save time, and they work perfectly for this recipe.
Q8: What’s the best way to serve this dish?
A8: Serve the biscuits warm, with the au jus sauce on the side for dipping. Don’t forget to have plenty of napkins!
Q9: How can I make this dish spicier?
A9: Add some hot sauce, red pepper flakes, or cayenne pepper to the beef before baking to give it an extra kick.
Q10: What side dishes go well with this?
A10: A light salad or some crispy roasted potatoes are the perfect complements to these savory biscuits.
Conclusion
These Baked French Dip Biscuits are a fun, delicious twist on the classic French dip sandwich. With melt-in-your-mouth beef, gooey Swiss cheese, and that irresistible au jus dipping sauce, they’re perfect for any meal—whether it’s a cozy dinner or a get-together with friends. Give this recipe a try, and I promise you’ll be hooked!
Print
Baked French Dip Biscuits
- Prep Time: 15 minutes
- Cook Time: 25 minutes
- Total Time: 40 minutes
- Yield: 8 biscuits
- Category: Appetizer, Dinner
- Method: Baking
- Cuisine: American
- Diet: Vegetarian
Description
These delicious Baked French Dip Biscuits are filled with savory roast beef and melted provolone cheese, all wrapped in flaky biscuit dough. Brushed with a flavorful herb butter and served with warm beef broth for dipping, this is a perfect comfort food for any meal.
Ingredients
- For the Biscuits:
- 1 can (16.3 oz) refrigerated biscuit dough
- 8 slices deli roast beef
- 8 slices provolone cheese
For the Herb Butter:
- 1/4 cup butter, melted
- 1 tablespoon Worcestershire sauce
- 1 teaspoon garlic powder
- 1 teaspoon onion powder
- 1/2 teaspoon dried thyme
- 1/2 teaspoon dried rosemary
- 1/2 teaspoon salt
- 1/2 teaspoon black pepper
For Dipping:
- 1 cup beef broth
Instructions
- Preheat your oven to 350°F (175°C).
- Separate the biscuit dough into 8 biscuits and flatten each one slightly with your hands.
- Place a slice of roast beef and a slice of provolone cheese on each biscuit.
- Fold the edges of the biscuit dough over the filling and pinch to seal, forming a ball.
- Arrange the filled biscuits seam-side down in a greased baking dish.
- In a small bowl, mix together the melted butter, Worcestershire sauce, garlic powder, onion powder, thyme, rosemary, salt, and pepper.
- Brush the butter mixture generously over the tops of the biscuits.
- Bake in the preheated oven for 20-25 minutes, or until the biscuits are golden brown and cooked through.
- While the biscuits are baking, heat the beef broth in a small saucepan over medium heat until warm.
- Serve the biscuits warm with the beef broth on the side for dipping.
Notes
- Be sure to seal the biscuit dough well to prevent the filling from spilling out during baking.
- Feel free to add extra herbs or seasonings to the butter mixture for a customized flavor.
- You can use different types of cheese if provolone isn’t your favorite.
Nutrition
- Serving Size: 1 biscuit
- Calories: 300 kcal
- Sugar: 2g
- Sodium: 600mg
- Fat: 18g
- Saturated Fat: 9g
- Unsaturated Fat: 7g
- Trans Fat: 0g
- Carbohydrates: 24g
- Fiber: 1g
- Protein: 14g
- Cholesterol: 40mg


