Toasted Milk Marble Cookies
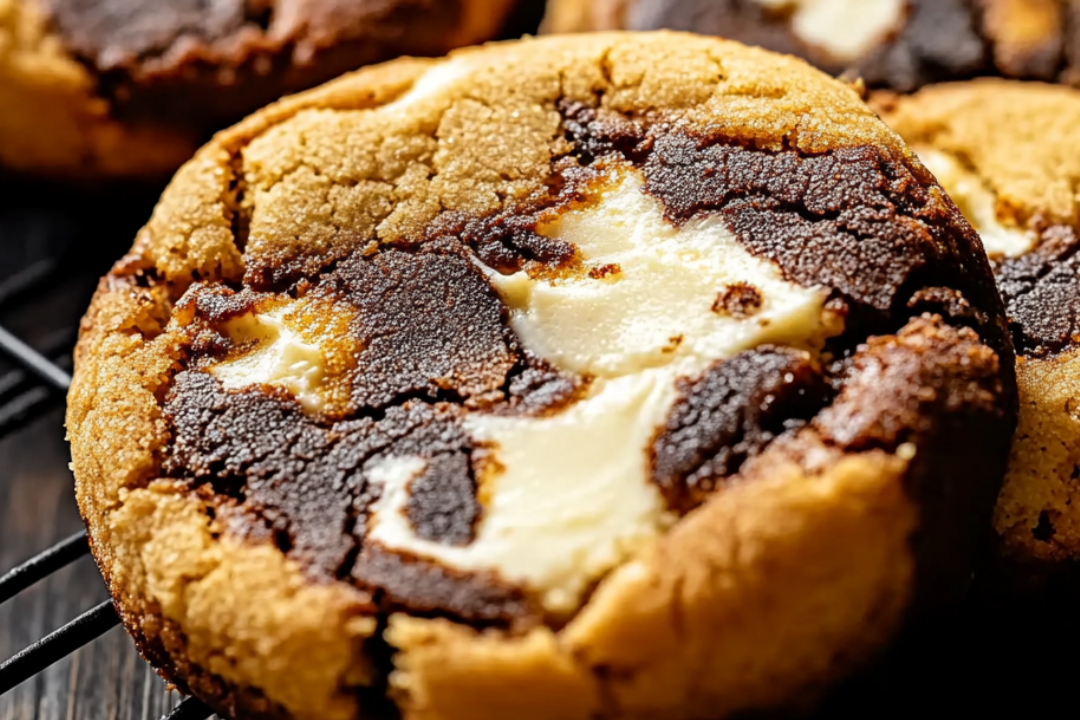
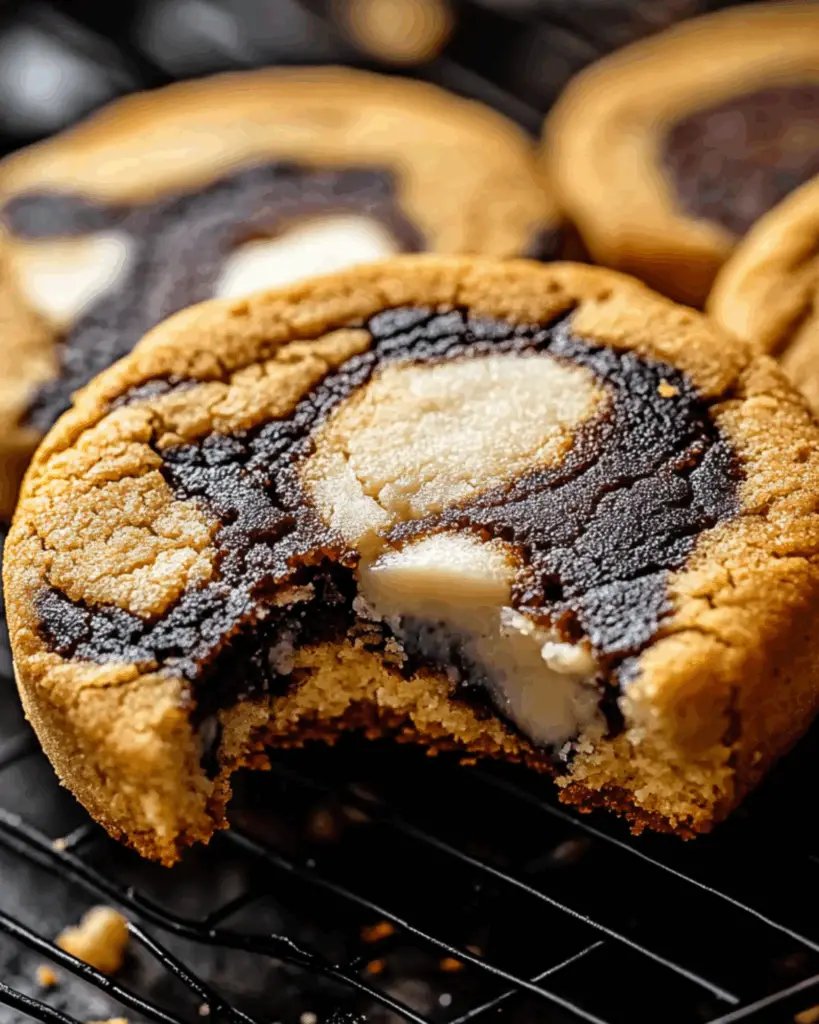
Okay, let me tell you about these Toasted Milk Marble Cookies. They’re not just cookies—they’re a journey for your taste buds. Imagine a warm, golden-brown cookie that perfectly balances a rich, toasted milk flavor with a hint of sweet vanilla. Trust me, you’re going to love these! They’re soft on the inside, just the right amount of crisp on the edges, and packed with an irresistible marble swirl that makes each bite a little bit different and a whole lot of fun.
This recipe is like a cozy hug from your kitchen. Whether you’re making them for a sweet afternoon treat or for a bake sale that will have everyone begging for the recipe, these cookies are guaranteed to impress. They’re the kind of cookie you’ll want to bake again and again because they taste just as amazing as they look!
Why You’ll Love Toasted Milk Marble Cookies
Here’s why these cookies are about to become your new favorite:
Versatile: These cookies are perfect for any occasion, whether you’re having a chill day at home or serving them at a gathering. They’re soft, comforting, and full of flavor—perfect with a cup of tea or coffee.
Budget-Friendly: You don’t need to buy any fancy ingredients—these cookies are made with pantry staples you probably already have. It’s proof that the simplest ingredients can create something special!
Quick and Easy: If you’re someone who gets intimidated by long, complicated recipes, don’t worry! This one’s straightforward, with easy-to-follow steps. You don’t need to be a baking pro to make these delicious cookies.
Customizable: If you’re feeling adventurous, you can tweak this recipe to suit your preferences! Add a sprinkle of cinnamon or even some chocolate chips to the dough. The marbling effect is so fun, you can switch up the flavor combos, too!
Crowd-Pleasing: Kids and adults alike will love these cookies! They strike the perfect balance of sweetness and flavor, making them an instant hit with everyone who tries them. Get ready for some serious “can I have another?” moments.
Disclosure: This post contains affiliate links.If you click and make a purchase, I may earn a small commission at no extra cost to you.
Ingredients in Toasted Milk Marble Cookies
Here’s the magic behind these cookies. Simple ingredients come together to create something truly extraordinary. Let’s break it down:
- Butter: The foundation for any great cookie. It gives the dough a rich, creamy flavor that’s just unbeatable.
- Toasted Milk Powder: This is the secret ingredient that gives these cookies their unique, toasted flavor. It’s like magic in powdered form.
- Sugar: Adds that perfect sweetness. A little sugar goes a long way in bringing the flavor balance to life.
- Vanilla Extract: A must-have in any cookie recipe. It adds depth and warmth to the overall flavor.
- Flour: The base of the dough, ensuring the right texture. It holds everything together beautifully.
- Baking Soda: Helps these cookies rise to perfection, giving them that soft, pillowy inside.
- Salt: Balances the sweetness and brings out the flavor of the other ingredients.
- Eggs: They help bind everything together, giving the cookies their chewy texture.
(Note: The full ingredients list, including measurements, is provided in the recipe card directly below.)
Instructions
Let’s dive into the steps to create these deliciously marbleized cookies!
1. Preheat Your Oven
Start by preheating your oven to 350°F (175°C). This gives your cookies the perfect baking environment—crispy on the outside, soft on the inside.
2. Toast the Milk Powder
In a dry skillet over medium heat, gently toast the milk powder until it turns golden brown and releases a nutty, aromatic fragrance. It’ll only take a few minutes, and you’ll start to see the magic happen! Set it aside to cool.
3. Cream the Butter and Sugar
In a large bowl, cream together your butter and sugar until it’s light and fluffy. This step helps create that melt-in-your-mouth texture we all love in cookies.
4. Add the Eggs and Vanilla
Beat in the eggs one at a time, then stir in the vanilla extract. The dough should be smooth and slightly creamy. This is when the cookies start to feel like they’re taking shape!
5. Combine the Dry Ingredients
In a separate bowl, whisk together your flour, baking soda, and salt. Gradually add this mixture to the wet ingredients, stirring until just combined. Don’t overmix; we want the cookies to stay soft and tender.
6. Incorporate the Toasted Milk Powder
Take the toasted milk powder and fold it gently into the dough. You’ll notice how it starts to give the dough a beautiful, rich flavor. The smell? Absolutely irresistible.
7. Create the Marble Effect
To achieve that gorgeous marble look, divide the dough into two portions. Leave one portion as is, and mix the second portion with a little extra toasted milk powder. Gently swirl the two doughs together without over-mixing—this creates the marble effect in each cookie!
8. Shape the Cookies
Scoop out tablespoon-sized portions of dough and place them on a baking sheet lined with parchment paper. Leave some space between each cookie to allow for spreading.
9. Bake to Perfection
Bake the cookies in your preheated oven for about 10-12 minutes. Keep an eye on them as they bake—the edges should be golden and crisp, but the center should still be soft. Trust your nose here; when they smell divine, they’re ready.
10. Let Cool and Enjoy
Allow the cookies to cool on the baking sheet for a few minutes before transferring them to a wire rack to cool completely. Take a moment to appreciate how beautiful they look before you devour them. You’ve earned it!
How to Serve Toasted Milk Marble Cookies
These cookies are amazing all on their own, but if you want to take things up a notch, here are a few ideas:
- With a Glass of Milk: Sometimes, nothing beats the classic combo of cookies and milk. It’s like a warm hug in a glass.
- Tea Time: Pair these cookies with your favorite tea for the perfect afternoon break. The sweetness of the cookies and the warmth of the tea are a match made in heaven.
- As a Dessert: These cookies would make a wonderful end to any meal. Serve them after dinner with a scoop of vanilla ice cream for a dessert everyone will love!
Additional Tips
- Make-Ahead: You can prep the dough in advance and chill it for up to 2 days. This gives the flavors even more time to develop!
- Storing Leftovers: Store your cookies in an airtight container at room temperature for up to 5 days. If you want to keep them fresh longer, freeze them for up to 3 months.
- Customize: Feel free to add chocolate chips, nuts, or dried fruit for a personalized twist on these cookies!
FAQ Section
Q1: Can I use regular milk powder instead of toasted milk powder?
A1: Absolutely! Toasted milk powder adds a deeper, nuttier flavor, but regular milk powder will work just fine if that’s what you have.
Q2: Can I make these cookies ahead of time?
A2: Yes, the dough can be prepared ahead of time and chilled in the fridge. Just bake them fresh when you’re ready to enjoy them.
Q3: How do I store leftovers?
A3: Store leftovers in an airtight container at room temperature for up to 5 days. For longer storage, freeze them for up to 3 months.
Q4: Can I freeze the dough?
A4: Definitely! Shape the dough into balls, freeze them on a baking sheet, and once frozen, store them in an airtight container or bag. When you’re ready to bake, just pop them straight into the oven without thawing!
Q5: Can I double the recipe?
A5: Of course! Just double all the ingredients and keep an eye on the baking time. You might need to bake them a little longer.
Q6: Are these cookies suitable for [specific diet]?
A6: You can make these cookies vegan by substituting the butter and eggs with plant-based alternatives. You may also use gluten-free flour if needed.
Q7: What’s the best way to reheat these cookies?
A7: Reheat them in the oven at 300°F (150°C) for about 5 minutes to warm them up without drying them out.
Conclusion
There you have it—Toasted Milk Marble Cookies that are sure to steal the show. Whether you’re baking them for a cozy afternoon snack or sharing them with friends and family, these cookies are the perfect blend of comforting flavors and a touch of indulgence. With their irresistible marble swirl and the unique depth of toasted milk, every bite is a little moment of happiness.
What makes these cookies extra special is how easy and fun they are to make, even for beginners. Plus, with just a few simple ingredients, you get a batch of cookies that feels extraordinary. So, go ahead—give them a try. I promise, you’ll be the one everyone’s asking for the recipe from!
So, preheat that oven, roll up your sleeves, and get ready for some seriously delicious cookies. Happy baking, and most importantly—enjoy every bite!
Print
Toasted Milk Marble Cookies
- Prep Time: 30 minutes
- Cook Time: 15 minutes
- Total Time: 1 day (includes overnight refrigeration)
- Yield: 24 cookies 1x
- Category: Dessert
- Method: Baking
- Cuisine: American
- Diet: Vegetarian
Description
These Toasted Milk Marble Cookies combine rich dark chocolate and toasted milk doughs, with a hidden center of frozen white chocolate spread, creating a decadent and unique treat.
Ingredients
- 12 tbsp white chocolate spread
- 225g unsalted butter, cubed
- 100g milk powder
- 150g caster sugar
- 150g light brown sugar
- 3 large egg yolks
- 45ml semi-skimmed milk
- 50g dark chocolate powder
- 110g plain flour
- ¾ tsp baking powder
- ¼ tsp bicarbonate soda
- 1½ tbsp cornstarch
- 100g white chocolate, chopped
- 160g plain flour
- ¾ tsp baking powder
- ¼ tsp bicarbonate soda
- 1½ tbsp cornstarch
- 100g milk chocolate, chopped
Instructions
- Freeze White Chocolate Spread: Measure 12 tbsp of white chocolate spread and place it on a baking sheet lined with parchment paper. Freeze until solid, about 1-2 hours.
- Toast Milk Powder: Preheat the oven to 212°F (100°C). Spread the milk powder evenly on a baking sheet lined with parchment paper and bake for 10-15 minutes, stirring occasionally, until it turns a light golden brown. Let it cool completely.
- Brown the Butter: In a saucepan over medium heat, melt the butter. Continue cooking, stirring frequently, until the butter foams and turns a rich brown color with a nutty aroma, about 5-7 minutes. Pour the browned butter into a large mixing bowl and let it cool slightly.
- Prepare Wet Ingredients: Add the toasted milk powder, caster sugar, and light brown sugar to the browned butter. Cream together until well combined. Add the egg yolks one at a time, beating well after each addition. Mix in the semi-skimmed milk until well combined.
- Divide Dough: Divide the wet ingredients mixture evenly into two separate bowls.
- Prepare Dark Chocolate Dough: In one bowl, sift together the dark chocolate powder, plain flour, baking powder, bicarbonate soda, and cornstarch. Gradually add the sifted dry ingredients to the wet ingredients, mixing until just combined. Fold in the chopped white chocolate.
- Prepare Toasted Milk Dough: In the other bowl, sift together the plain flour, baking powder, bicarbonate soda, and cornstarch. Gradually add the sifted dry ingredients to the wet ingredients, mixing until just combined. Fold in the chopped milk chocolate.
- Form Marble Cookies: Using a cookie scoop or spoon, alternate scooping the dark chocolate dough and toasted milk dough to form a marble effect. Place a frozen piece of white chocolate spread in the center of each cookie ball. Gently roll the dough to enclose the white chocolate spread and create a ball.
- Refrigerate: Place the cookie balls on a baking sheet lined with parchment paper and refrigerate overnight to allow the flavors to meld and the dough to firm up.
- Bake: Preheat the oven to 350°F (175°C). Bake the cookies for 12-15 minutes, until the edges are golden but the centers are still soft. Let them cool on the baking sheet for a few minutes before transferring to a wire rack to cool completely.
Notes
- Ensure the white chocolate spread is completely frozen before using to create a gooey center.
- If you don’t have white chocolate spread, you can use white chocolate chips or a similar white chocolate filling.
- For a crispier cookie, bake for a few minutes longer, keeping an eye on them so they don’t burn.
Nutrition
- Serving Size: 1 cookie
- Calories: 220
- Sugar: 18g
- Sodium: 30mg
- Fat: 12g
- Saturated Fat: 7g
- Unsaturated Fat: 3g
- Trans Fat: 0g
- Carbohydrates: 28g
- Fiber: 1g
- Protein: 2g
- Cholesterol: 25mg

