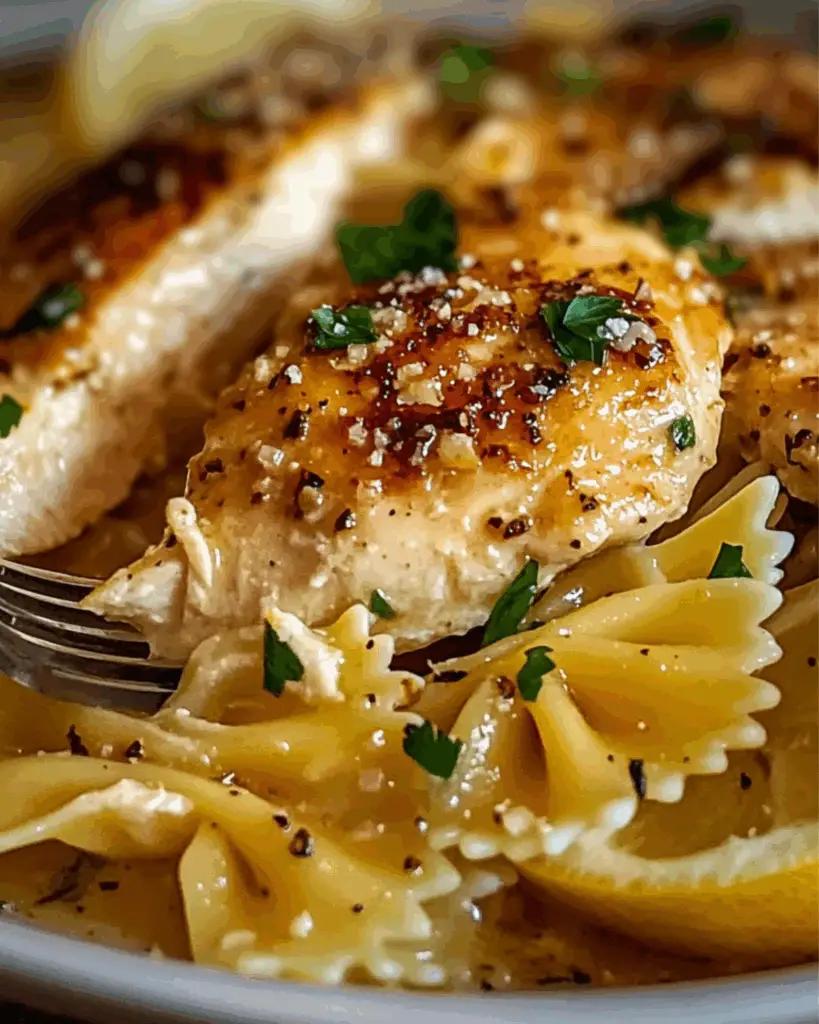
Lemon Garlic Chicken with Parmesan Bowtie Pasta
If you’re ready to elevate your weeknight dinner routine, let me introduce you to Lemon Garlic Chicken with Parmesan Bowtie Pasta. This dish is like a love letter to your taste buds—it’s got the tangy zing of lemon, the savory depth of garlic, and the creamy comfort of Parmesan. Trust me, this is the kind of dish that makes you feel like a five-star chef without breaking a sweat. Whether you’re cooking for your family, a special someone, or just treating yourself to something delicious, this recipe is bound to be a hit.
The pasta swirls beautifully around your fork, each bite bursting with flavor, while the chicken is tender, juicy, and just the right amount of golden brown. And don’t even get me started on the sauce—it’s light but rich, like a perfect little hug for your taste buds. If you’re craving something that’s quick, comforting, and totally irresistible, this is it.
Why You’ll Love Lemon Garlic Chicken with Parmesan Bowtie Pasta
This recipe is the whole package—it’s not just about the flavors, it’s about the experience. Whether you’re whipping it up for a casual weeknight meal or serving it at a get-together, this dish is guaranteed to make your taste buds sing.
Versatile
This recipe is perfect for a weeknight dinner when you don’t have a ton of time, but it’s also fancy enough to serve at a dinner party. Picture it: a cozy evening at home, and in under 30 minutes, you’ve got a stunning dish that feels like a treat.
Budget-Friendly
Everything in this recipe is easily found in your local grocery store, and you probably already have most of the ingredients at home. There’s no need to splurge on fancy, hard-to-find items—simple, pantry staples come together to create something spectacular.
Quick and Easy
If you’re someone who loves easy-to-follow recipes, you’re in luck. This one’s as easy as it gets! All it takes is a little prep, a few minutes on the stove, and voilà—dinner is served.
Customizable
Feel free to mix things up! Want to add some red pepper flakes for a little heat? Go for it! Not a fan of bowtie pasta? Swap it out for penne or spaghetti. This dish is as adaptable as you want it to be.
Crowd-Pleasing
This one’s a crowd-pleaser for sure. Kids, adults, picky eaters, foodies—everyone will love it. It’s the kind of dish that brings people together, making each bite a little moment of happiness.
Disclosure: This post contains affiliate links.If you click and make a purchase, I may earn a small commission at no extra cost to you.


Ingredients in Lemon Garlic Chicken with Parmesan Bowtie Pasta
Here’s what you need to create this showstopper:
- Chicken Breasts: The heart and soul of the dish, they cook up tender, juicy, and perfectly seasoned. You’ll love how they soak up the garlic and lemon flavors.
- Bowtie Pasta: The star pasta of the show! It holds onto that creamy, garlicky sauce just right.
- Garlic: Fresh, aromatic garlic is what brings this dish to life. It’s the secret ingredient that adds depth and fragrance.
- Lemon: A zesty hit of citrus to brighten up the whole dish. You’ll be amazed at how it balances out the richness.
- Parmesan: Creamy, salty, and oh-so-delicious. Parmesan makes everything better, and this recipe is no exception.
- Olive Oil: For cooking and adding a silky richness to the sauce.
- Butter: Adds a rich, velvety touch to the sauce.
- Fresh Parsley: A little green garnish for some color and freshness.
(Note: The full ingredients list, including measurements, is provided in the recipe card directly below.)
Instructions
Let’s dive into the steps to make this flavor-packed dish!
1. Cook the Pasta
Start by cooking your bowtie pasta according to the package instructions. Once it’s perfectly al dente, drain it and set it aside. Don’t forget to save a bit of pasta water—you’ll need it later for that rich, silky sauce!
2. Sauté the Chicken
In a large skillet, heat some olive oil over medium heat. Add your seasoned chicken breasts (don’t forget to sprinkle them with salt, pepper, and garlic powder), and cook them until golden and cooked through—about 6-7 minutes per side. Once done, remove the chicken from the skillet and set it aside to rest.
3. Make the Garlic Lemon Sauce
In the same skillet, melt a little butter and sauté the minced garlic until fragrant (about 30 seconds). Then, add the lemon juice and zest, scraping up any delicious browned bits from the chicken. Add a splash of pasta water and let it simmer to thicken.
4. Combine Pasta and Sauce
Once the sauce has thickened up a bit, toss the cooked pasta right into the skillet with the garlic lemon sauce. Stir it around so that every bowtie gets coated in that creamy, tangy goodness. Add a good handful of Parmesan cheese and toss again until everything’s melty and delightful.
5. Slice the Chicken
While the pasta is soaking up all that flavor, slice your cooked chicken into thin strips. Place the slices on top of the pasta or toss them right in for extra flavor.
6. Serve and Enjoy
Finish things off with a sprinkle of fresh parsley for a burst of color and a little extra flavor. Serve hot, and get ready for everyone to ask for seconds!
How to Serve Lemon Garlic Chicken with Parmesan Bowtie Pasta
This dish is a complete meal on its own, but here are a few suggestions to round out your dining experience:
- Fresh Salad: Pair it with a light, crisp green salad dressed with a tangy vinaigrette to balance out the rich flavors.
- Garlic Bread: Warm, buttery garlic bread is perfect for soaking up any extra sauce left on your plate.
- Roasted Vegetables: Consider roasting some zucchini, carrots, or asparagus for a colorful and healthy side.
- As a Standalone: Sometimes, a dish this good is perfect all on its own. Just add some fresh herbs like parsley or basil for a finishing touch.
Additional Tips
- Prep Ahead: If you’re short on time, you can prep the chicken and pasta in advance. Just store them separately in the fridge until you’re ready to cook.
- Spice It Up: Want a little kick? Toss in some red pepper flakes to add a bit of heat to the dish.
- Dietary Adjustments: For a gluten-free version, use your favorite gluten-free pasta. You can also swap out the Parmesan for a dairy-free alternative if needed.
- Storage Tips: Leftovers? No problem! Store them in an airtight container for up to 3 days. To reheat, just pop it in the microwave or warm it on the stove with a splash of water or broth.
- Double the Batch: This dish is easy to make in large quantities, so don’t hesitate to make a double batch. It’s perfect for meal prep or a bigger crowd.
FAQ Section
Q1: Can I substitute the chicken with something else?
A1: Absolutely! You can swap chicken for shrimp or even grilled veggies if you’re looking for a lighter or vegetarian option.
Q2: Can I make this dish ahead of time?
A2: Yes! You can prep the pasta and sauce ahead of time. Just store them separately in the fridge and combine when ready to eat.
Q3: How do I store leftovers?
A3: Store leftovers in an airtight container in the fridge for up to 3 days. Reheat gently on the stove or in the microwave.
Q4: Can I freeze this dish?
A4: Yes, it freezes well! Just freeze the pasta and sauce separately. When you’re ready, thaw them out and reheat.
Q5: What’s the best way to reheat this dish?
A5: Reheat on the stove with a splash of water or broth to keep the sauce creamy, or microwave in 30-second intervals.
Q6: Can I double the recipe?
A6: Of course! Just make sure you have a large enough pan to handle the extra ingredients.
Q7: Is this recipe suitable for a gluten-free diet?
A7: Yes! Just swap in gluten-free pasta, and you’re good to go!
Q8: What sides go well with this dish?
A8: A green salad or roasted veggies make great sides, but honestly, it’s perfect on its own!
Q9: How can I make this dish healthier?
A9: Use whole-wheat pasta, lower-fat cheese, and add in more veggies like spinach or broccoli to make it a bit lighter.
Q10: What’s the best cookware for this recipe?
A10: A large skillet works best to sauté the chicken and make the sauce all in one pan. If you don’t have one, a wide saucepan will do.
Conclusion
This Lemon Garlic Chicken with Parmesan Bowtie Pasta is your new weeknight hero. It’s easy, delicious, and will have everyone asking for seconds. With just a few simple ingredients, you’ve got a dish that feels fancy but is totally doable. Whether it’s a cozy dinner for two or a meal to feed the family, this recipe is one you’ll keep coming back to time and time again. Happy cooking, and trust me—you’re going to love this one!
Print
Lemon Garlic Chicken with Parmesan Bowtie Pasta
- Prep Time: 15 minutes
- Cook Time: 12 minutes
- Total Time: 27 minutes
- Yield: Approximately 18 cookies 1x
- Category: Dessert
- Method: Baking
- Cuisine: American
- Diet: Vegetarian
Description
These irresistible Strawberry Banana Pudding Cookies are a sweet and soft treat, packed with the flavors of banana and strawberry pudding, and paired with a creamy cheesecake dip. Perfect for any occasion, and great for satisfying your sweet tooth! Serve with fresh fruit or graham cracker crumbs for a fun twist
Ingredients
For the Cookies:
-
1/2 cup unsalted butter, softened
-
1/2 cup granulated sugar
-
1/4 cup brown sugar
-
1 tsp vanilla extract
-
1 cup all-purpose flour
-
1/4 tsp salt
-
1/2 cup finely diced fresh strawberries
-
Optional: 1/4 cup white chocolate chips or chopped nuts
1 box banana pudding mix (small, 3.4 oz box)
1 large egg, room temperature
1/2 tsp baking powder
1/2 cup finely diced ripe banana
For the Cheesecake Dip:
-
1/2 cup powdered sugar, sifted
-
1 tsp vanilla extract
-
1/4 cup heavy cream (optional, for a lighter texture)
8 oz cream cheese, softened
Optional Garnish:
-
Banana slices
-
Fresh strawberry slices
Instructions
-
Preheat the oven to 350°F (175°C) and line a baking sheet with parchment paper.
-
Make the cookie dough: In a mixing bowl, beat together the softened butter, granulated sugar, and brown sugar until creamy. Add in the egg and vanilla extract and mix until combined.
-
Add the dry ingredients: Stir in the banana pudding mix, flour, baking powder, and salt until fully incorporated.
-
Add the fruit: Gently fold in the diced strawberries, diced banana, and optional white chocolate chips or nuts.
-
Shape and bake: Drop spoonfuls of dough onto the prepared baking sheet, spacing them about 2 inches apart. Bake for 10–12 minutes, or until the edges are lightly golden.
-
Make the cheesecake dip: In a separate bowl, beat together the softened cream cheese, powdered sugar, and vanilla extract until smooth. Add the heavy cream (if desired) for a lighter texture and mix until combined.
-
Serve: Once the cookies have cooled, serve them with the cheesecake dip and garnish with fresh fruit or graham cracker crumbs.
Notes
-
For a lighter cheesecake dip, you can reduce the cream cheese and increase the heavy cream.
-
If you prefer a nuttier flavor, try adding chopped walnuts or pecans to the cookie dough.
Nutrition
- Serving Size: 1 cookie
- Calories: 120
- Sugar: 10g
- Sodium: 50mg
- Fat: 6g
- Saturated Fat: 4g
- Unsaturated Fat: 2g
- Trans Fat: 0g
- Carbohydrates: 17g
- Fiber: 0g
- Protein: 1g
- Cholesterol: 25mg