

Hot Chocolate Slice
Imagine indulging in the rich, comforting taste of hot chocolate, but in slice form—perfect for any occasion. If you’re someone who craves chocolatey desserts, this Hot Chocolate Slice will steal your heart in no time. Think decadent chocolate flavors, a silky texture, and just the right amount of sweetness. Trust me, you’re going to love this one! It’s the kind of treat that’s just perfect for cozy nights, family get-togethers, or simply indulging yourself with a warm, comforting bite.
Why You’ll Love Hot Chocolate Slice
This recipe isn’t just about the ingredients—it’s about making memories. Whether you’re baking for a holiday gathering, a special occasion, or just to satisfy your sweet tooth, this Hot Chocolate Slice will fit the bill. Here’s why it’s such a fan favorite:
Versatile:
Whether it’s for an afternoon snack, a dessert after dinner, or a special treat for your next party, this slice works in any setting. It’s a showstopper at gatherings but still simple enough for a casual treat at home.
Budget-Friendly:
The best part? This slice is made with everyday ingredients you probably already have in your pantry. No need to splurge on fancy ingredients—just a few basics and you’re on your way to dessert heaven.
Quick and Easy:
Don’t worry if you’re not an expert baker—this slice is made with simple, foolproof steps. Even beginners can follow this recipe and impress their friends and family. Plus, it’s ready in no time!
Customizable:
Want to make it your own? Add extra toppings like whipped cream, marshmallows, or even a drizzle of caramel sauce. If you’re feeling adventurous, try mixing in a little coffee or cinnamon for an extra flavor boost.
Crowd-Pleasing:
This Hot Chocolate Slice is a guaranteed crowd-pleaser, perfect for both kids and adults. It’s sweet, comforting, and has that magical “I can’t stop eating this” quality. Watch as everyone goes back for seconds!
Disclosure: This post contains affiliate links.If you click and make a purchase, I may earn a small commission at no extra cost to you.


Ingredients
Here’s the magic of this Hot Chocolate Slice—it’s made with simple ingredients, yet it creates a decadent dessert that will have everyone asking for the recipe.
Cocoa Powder:
The rich base that gives this slice its chocolatey goodness. It’s what makes this dessert a dream for chocolate lovers!
Butter:
The secret to a moist and melt-in-your-mouth texture. Butter brings all the ingredients together and helps achieve that smooth, creamy consistency.
Sugar:
A little sweetness to balance the cocoa powder, creating the perfect level of indulgence without being too overpowering.
Eggs:
These provide structure and help give the slice its soft, slightly fudgy texture. Eggs also help hold everything together.
Flour:
Flour binds the ingredients and gives the slice the perfect crumb. It’s essential for achieving that ideal slice texture.
Vanilla Extract:
A dash of vanilla enhances the overall flavor, making the chocolate taste even more luxurious.
(Note: the full ingredients list, including measurements, is provided in the recipe card directly below.)
Instructions
Let’s dive into the steps to create this mouthwatering Hot Chocolate Slice. You’re just a few simple steps away from dessert bliss.
Step 1: Preheat Your Oven
Start by preheating your oven to 350°F (175°C). You want it nice and hot so your slice cooks evenly and develops that rich, comforting flavor.
Step 2: Melt the Butter and Cocoa Powder
In a small saucepan over medium heat, melt the butter and cocoa powder together. Stir until smooth, making sure the cocoa powder is completely dissolved. The smell at this point will be pure chocolate heaven—trust me!
Step 3: Mix Dry Ingredients
In a separate bowl, combine the flour and sugar. Set this aside for a moment while you focus on the wet ingredients.
Step 4: Combine Wet Ingredients
In a large bowl, whisk the eggs and vanilla extract. Once the cocoa and butter mixture has cooled slightly, slowly add it to the eggs, whisking constantly to avoid cooking the eggs. You should end up with a smooth, glossy mixture.
Step 5: Add Dry Ingredients
Gradually add the flour and sugar mixture to the wet ingredients, stirring until everything is well combined. Don’t overmix—just stir until you have a smooth batter.
Step 6: Pour and Bake
Pour the batter into a greased baking dish and spread it out evenly. Bake in the preheated oven for about 25–30 minutes, or until a toothpick inserted into the center comes out clean. Keep an eye on it as it bakes—you’ll know it’s done when it smells irresistible!
Step 7: Let it Cool
Once your Hot Chocolate Slice is done baking, let it cool in the pan for about 10 minutes before transferring it to a wire rack to cool completely. It’s tempting, but wait for it—this makes the texture even better!
Step 8: Slice and Serve
Once cooled, slice it up into squares or rectangles—whatever you prefer! Serve it on its own or with a dollop of whipped cream or marshmallows for the ultimate treat.
How to Serve Hot Chocolate Slice
This Hot Chocolate Slice is perfect on its own, but there are a few extra touches that can take it to the next level:
Whipped Cream:
Add a dollop of freshly whipped cream on top of each slice for an extra creamy finish. Maybe even sprinkle some chocolate shavings or cocoa powder on top to make it look extra fancy.
Marshmallows:
Serve it with a side of mini marshmallows for that classic hot chocolate experience—don’t forget the marshmallow-to-slice ratio!
Ice Cream:
If you’re serving this slice as a dessert, pairing it with a scoop of vanilla or chocolate ice cream will send it over the top.
Berries:
Fresh berries, like raspberries or strawberries, add a refreshing contrast to the rich, chocolatey slice.
Additional Tips
Here are a few extra tips to ensure your Hot Chocolate Slice turns out perfect every time:
Prep Ahead:
You can make this slice a day ahead and store it in an airtight container at room temperature. It will stay soft and delicious!
Spice It Up:
Want a little extra warmth? Try adding a pinch of cinnamon or a dash of instant coffee granules to the batter for an added depth of flavor.
Storage Tips:
Store leftovers (if you have any) in an airtight container. It will stay fresh for up to 3 days. If you’re not planning to eat it all in a few days, you can freeze individual slices for later enjoyment!
Double the Batch:
This recipe is easy to double if you’re feeding a crowd. Just make sure to use a larger baking dish, and you might need to add a few extra minutes to the baking time.
FAQ Section
Q1: Can I substitute cocoa powder with chocolate chips?
A1: Yes! You can melt chocolate chips and use them in place of cocoa powder. Just make sure to adjust the measurements accordingly, as chocolate chips tend to be sweeter than cocoa powder.
Q2: Can I make this ahead of time?
A2: Absolutely! You can bake it the day before and store it in an airtight container. It tastes just as delicious the next day!
Q3: Can I freeze this slice?
A3: Yes, you can freeze individual slices! Just wrap them tightly in plastic wrap and place them in a freezer-safe bag. Thaw at room temperature before serving.
Q4: How do I store leftovers?
A4: Store any leftovers in an airtight container at room temperature for up to 3 days. You can also refrigerate them if you prefer them cold!
Q5: Can I add nuts or other mix-ins?
A5: Absolutely! You can mix in chopped nuts, chocolate chips, or even dried fruit for extra texture and flavor.
Conclusion
This Hot Chocolate Slice is everything you love about hot chocolate, transformed into an indulgent dessert that’s easy to make and impossible to resist. Rich, chocolatey, and comforting, it’s the perfect treat for any occasion. Once you try it, you’ll be making it again and again. Enjoy the cozy vibes, and remember—this slice is all about creating sweet moments. You’re going to love it!
Print
Hot Chocolate Slice
- Prep Time: 20 minutes
- Cook Time: 12 minutes (baking) + 4 hours (refrigeration) + 4 hours (marshmallow setting)
- Total Time: 8 hours 32 minutes
- Yield: 12–16 slices (depending on size) 1x
- Category: Dessert, No-Bake Desserts
- Method: Layered, Refrigerated
- Cuisine: Australian, Western
- Diet: Vegetarian
Description
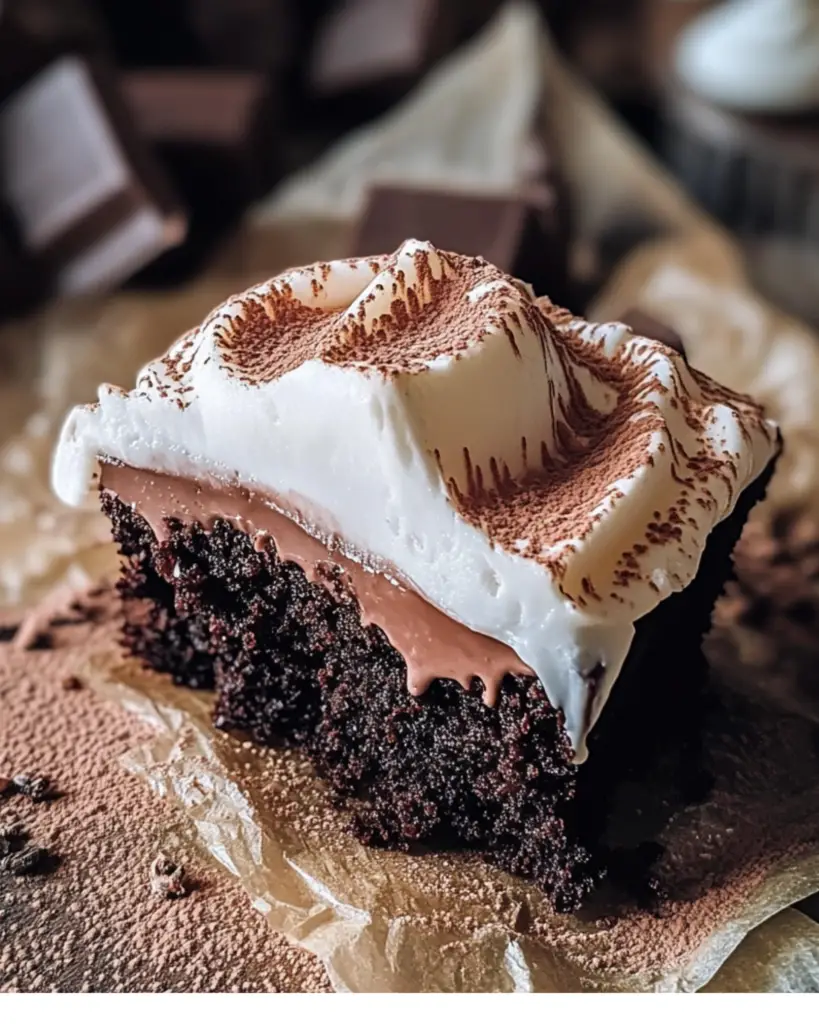
This Hot Chocolate Slice is the ultimate layered dessert! A cinnamon biscuit base is topped with a rich dark hot chocolate mousse and finished with a fluffy vanilla marshmallow layer. Perfect for chocolate lovers, this no-fuss treat is a must-try!
Ingredients
-
Cinnamon Biscuit Base:
- 1 cup self-raising flour
- ¾ cup desiccated coconut
- ½ cup brown sugar
- 2 tsp ground cinnamon
- 150g melted butter
Dark Hot Chocolate Mousse:
- 80g butter
- ¼ cup cocoa powder
- 300g dark chocolate, broken into small pieces
- 3 eggs, separated
- ¼ cup caster sugar
- 1½ cups cream
Vanilla Marshmallow:
- 1 cup caster sugar
- 1 cup water
- 1 tbsp gelatine powder
- 2 tsp vanilla extract
Instructions
Cinnamon Biscuit Base:
- Preheat oven to 180°C (350°F).
- Grease a 16 x 25cm slice pan and line the base with parchment paper.
- In a bowl, mix flour, coconut, brown sugar, and cinnamon.
- Add melted butter and stir until combined.
- Press mixture evenly into the prepared pan.
- Bake for 12 minutes until golden. Let cool.
Dark Hot Chocolate Mousse:
- Melt butter, cocoa, and chocolate in a small saucepan over low heat, stirring until smooth.
- Remove from heat and quickly mix in egg yolks. (The mixture may look lumpy but will smooth out when cream is added.)
- In a separate bowl, whisk egg whites, gradually adding sugar until stiff peaks form.
- Gently fold a spoonful of the chocolate mixture into the egg whites, then fold in the rest.
- Fold in whipped cream until fully combined.
- Pour mousse over the cooled biscuit base, smoothing the top.
- Refrigerate for 4 hours until set.
Vanilla Marshmallow:
- In a small saucepan, combine sugar, water, and gelatine over low heat, stirring until dissolved.
- Increase heat to medium and simmer for 6 minutes, stirring occasionally. Let cool for 5-10 minutes.
- Pour mixture into a stand mixer and beat on high for 9 minutes until thick, white, and fluffy.
- Mix in vanilla extract.
- Spread marshmallow over the set mousse layer, smoothing the top.
- Refrigerate for 4 more hours until firm.
To Serve:
- Heat a knife in hot water, wipe dry, and slice.
- Store in an airtight container in the fridge for up to 3 days
Notes
- Freezing Tip: You can also freeze this Hot Chocolate Slice for up to 1 month. Just let it thaw before serving.
- Serving Suggestion: Add whipped cream or a drizzle of chocolate sauce for extra indulgence.
Nutrition
- Serving Size: 1 slice
- Calories: 350 kcal
- Sugar: 30g
- Sodium: 80mg
- Fat: 22g
- Saturated Fat: 13g
- Unsaturated Fat: 7g
- Trans Fat: 0g
- Carbohydrates: 35g
- Fiber: 3g
- Protein: 5g
- Cholesterol: 95mg


