20-Minute Miracle Bread
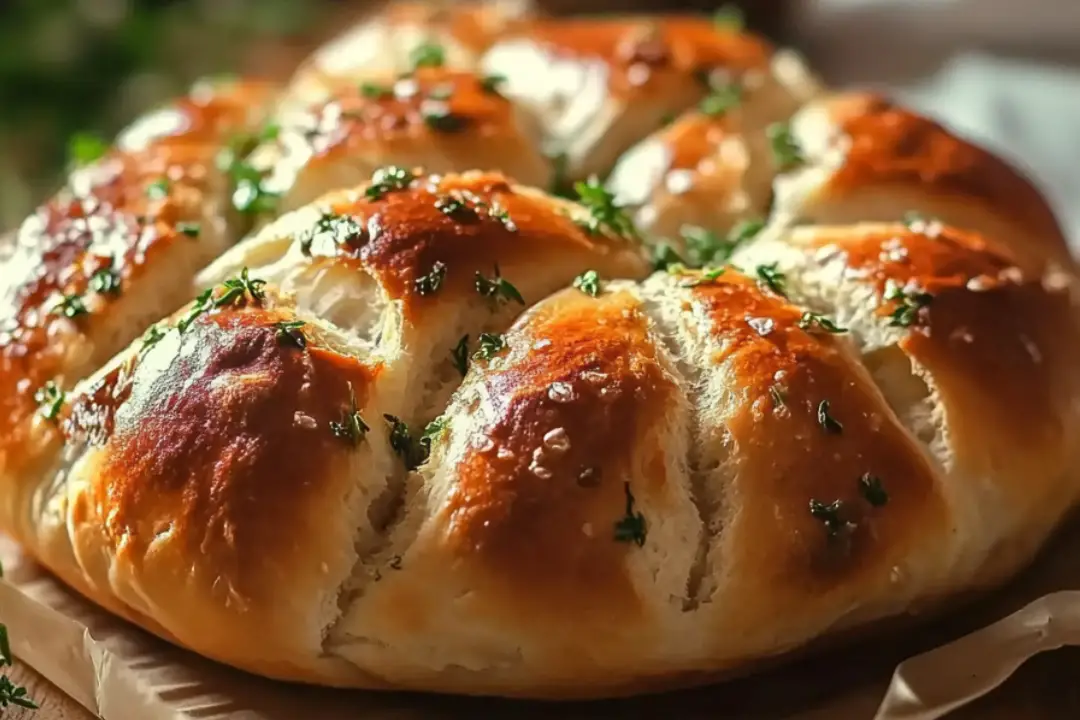
Okay, listen up, bread lovers—because this one’s a total game-changer. Imagine this: it’s a busy day, your stomach is already grumbling, and the thought of kneading dough for an hour sounds… exhausting. But then, like magic, you remember this little gem of a recipe. A golden, fluffy, warm loaf of homemade bread, fresh out of the oven in just 20 minutes. Yes. You heard that right—twenty.
This isn’t just any bread—it’s the kind that fills your kitchen with that irresistible, yeasty, cozy aroma. The kind that’s crispy on the outside, soft on the inside, and practically begs to be slathered in butter or dunked into soup. It’s got that “made-with-love” feel without the hours of proofing and stress. And trust me, once you try it, you’ll wonder how you ever lived without it.
So, grab your mixing bowl, preheat that oven, and get ready to bake your way into bread heaven.
Why You’ll Love 20-Minute Miracle Bread
Versatile
Perfect for busy weeknights or as a standout dish at gatherings. Imagine coming home after a long day, knowing you can whip up something delicious and comforting in no time. Or envision serving this at a party, where guests ask for the recipe before the night ends.
Budget-Friendly
Uses ingredients you likely already have in your kitchen. No need for exotic items; this dish proves that simple ingredients can create extraordinary flavors. It’s perfect for when you’re trying to stick to a budget but still want something hearty and satisfying.
Quick and Easy
Straightforward steps that even beginners can follow. If you’re someone who usually avoids complex recipes, this one is for you. It’s designed to be foolproof, so you can enjoy cooking without stress.
Customizable
Easy to tweak with different flavors to suit your preferences. For example, if you love bold flavors, add a pinch of cayenne or smoked paprika. Prefer something milder? You can adjust the seasoning to make it kid-friendly.
Crowd-Pleasing
A guaranteed hit with both kids and adults. It’s always a win when a single dish can satisfy everyone at the table. This recipe strikes the perfect balance of flavor and comfort, making it a universal favorite.

Disclosure: This post contains affiliate links.If you click and make a purchase, I may earn a small commission at no extra cost to you.
Ingredients in 20-Minute Miracle Bread
Flour
The backbone of our bread. All-purpose flour gives it that soft interior and a golden crust when baked to perfection.
Baking Powder
This is our secret weapon for a quick rise—no yeast, no waiting, just instant puff and fluff.
Salt
Just a pinch brings all the other flavors to life. Don’t skip it—it’s the quiet hero here.
Sugar
Adds just a touch of sweetness and helps the crust brown beautifully in the oven.
Milk
Gives the dough its moisture and richness, creating that tender, pull-apart texture.
Butter or Oil
Adds richness and a slight buttery flavor. Melted butter gives that golden finish we all swoon over.
Instructions
Preheat Your Equipment
Start by preheating your oven to 375°F (190°C). This ensures even cooking and gives your bread that gorgeous, golden top.
Combine Ingredients
In a large bowl, whisk together the flour, baking powder, salt, and sugar. Pour in the milk and butter, and mix until a soft, slightly sticky dough forms. Don’t overmix—just stir until everything’s combined and dreamy.
Prepare Your Cooking Vessel
Grease a baking dish, loaf pan, or even a muffin tin for smaller portions. A light layer of butter or non-stick spray will keep your bread from sticking and make cleanup a breeze.
Assemble the Dish
Pour or spoon the dough into your prepared dish. Smooth out the top with a spatula or back of a spoon. Want extra flair? Sprinkle with herbs, shredded cheese, or a pinch of flaky salt.
Cook to Perfection
Bake for 18–22 minutes, until the top is golden brown and a toothpick inserted into the center comes out clean. Your kitchen will smell amazing—try not to devour it immediately!
Finishing Touches
Let it cool for a few minutes before slicing. That short wait allows the structure to set and keeps the inside soft and fluffy.
Serve and Enjoy
Serve warm with butter, jam, soup, or just as is. You earned it.
How to Serve 20-Minute Miracle Bread
Fresh Salads: Pair it with a crisp green salad dressed with a light vinaigrette for a refreshing contrast to the bread’s warm, rich flavor.
Soup or Stew: Dunk it in tomato soup, chili, or a cozy stew. The bread soaks it all up like a sponge of happiness.
Flavored Butters: Serve it with herbed or honey butter for a delightful twist.
Breakfast Boost: Toast leftovers and top with avocado, scrambled eggs, or a drizzle of honey.
As a Standalone: Slice it up, add a pat of butter, and call it a perfect snack.
Additional Tips
Prep Ahead: Mix dry ingredients in advance and store in an airtight container. Just add wet ingredients when you’re ready to bake.
Spice It Up: Toss in garlic powder, rosemary, thyme, or cheese for a flavor upgrade.
Dietary Adjustments: Use plant-based milk and oil to make it vegan.
Storage Tips: Store leftovers in an airtight container at room temp for 2–3 days. Warm in the oven or toaster to refresh.
Double the Batch: Make two loaves and freeze one! Just wrap tightly and thaw at room temp when ready to enjoy.
FAQ Section
Q1: Can I substitute milk with a non-dairy option?
A1: Absolutely! Almond, oat, or soy milk all work great here.
Q2: Can I make this dough ahead of time?
A2: It’s best baked fresh, but you can mix the dry ingredients ahead and store until needed.
Q3: How do I store leftovers?
A3: Store in an airtight container at room temperature for up to 3 days, or freeze for up to 1 month.
Q4: Can I freeze this bread?
A4: Totally! Wrap tightly in foil or plastic and freeze. Reheat in the oven or toaster.
Q5: What’s the best way to reheat this bread?
A5: Pop it in a 350°F oven for 5–10 minutes or toast individual slices.
Q6: Can I double the recipe?
A6: You bet—just use a larger pan and adjust baking time slightly.
Q7: Is this recipe suitable for vegans?
A7: Yes! Just use non-dairy milk and oil or vegan butter.
Q8: What side dishes go well with this recipe?
A8: Great with soups, salads, roasted veggies, or as a hearty side for pasta dishes.
Q9: How can I make this dish healthier?
A9: Use whole wheat flour for added fiber and swap sugar with a natural sweetener.
Q10: What’s the best cookware to use for this recipe?
A10: A ceramic baking dish or loaf pan gives you an even bake and a beautiful crust.
Conclusion
There’s something deeply satisfying about baking bread from scratch—especially when it takes less time than a TV episode. This 20-Minute Miracle Bread is proof that homemade doesn’t have to mean hard. It’s warm, reliable, and endlessly comforting. Keep this recipe in your back pocket for those moments when you need something simple, soulful, and seriously delicious. Trust me, you’re going to love this one.
Print
20-Minute Miracle Bread
- Prep Time: 5 minutes
- Cook Time: 15-20 minutes
- Total Time: 20-25 minutes
- Yield: 4 servings
- Category: Bread
- Method: Baking
- Cuisine: American
- Diet: Vegetarian
Description
This quick and easy bread recipe is ready in just 20 minutes. Perfect for a last-minute side dish or snack, with a golden crust and soft inside. You can add garlic powder or herbs for extra flavor.
Ingredients
- 2 cups all-purpose flour
- 1 tablespoon baking powder
- 1/2 teaspoon salt
- 1/4 cup unsalted butter, melted
- 3/4 cup milk (or water)
- 1 tablespoon sugar (optional, for a slight sweetness)
- 1 teaspoon garlic powder or herbs (optional for flavor)
Instructions
- Preheat your oven to 425°F (220°C). Grease a baking dish or line it with parchment paper.
- In a large bowl, combine the flour, baking powder, salt, and sugar (if using). Mix well.
- Add the melted butter and milk (or water) to the dry ingredients. Stir until combined into a dough. The dough should be slightly sticky but manageable.
- Turn the dough onto a lightly floured surface and knead for 1-2 minutes until smooth.
- Shape the dough into a round or oval loaf and place it onto the prepared baking dish. If you like, you can score the top with a knife for decorative purposes.
- Bake for 15-20 minutes, or until the bread is golden brown on top and a toothpick inserted into the center comes out clean.
- Let the bread cool slightly before slicing and serving.
Notes
- For a slightly sweet version, add the optional tablespoon of sugar.
- If you prefer a more savory flavor, you can add garlic powder or herbs like rosemary or thyme.
- This bread is best served fresh but can be stored for up to 2 days in an airtight container.
Nutrition
- Serving Size: 1 slice
- Calories: 150
- Sugar: 1g
- Sodium: 300mg
- Fat: 7g
- Saturated Fat: 4g
- Unsaturated Fat: 2g
- Trans Fat: 0g
- Carbohydrates: 20g
- Fiber: 1g
- Protein: 3g
- Cholesterol: 20mg

